
English Русский
Български
Беларускі
Український
Српски
Hrvatski
Română
Polski
Slovenský
Magyar
| Articles | Contacts | Sitemap |   
Repair and maintenance Lada Repair and maintenance Mazda Repair and maintenance Mitsubishi Repair and maintenance Toyota Repair and maintenance Land Rover Repair and maintenance Hyundai Repair and maintenance Nissan
VAZbook.ru


Main     1111   2101   2105   2106   2107   2109   2110   2115   2121  
VAZ-2108 (1984-2003) VAZ-2109 (1984-1997) VAZ-21099 (1990-2004)
  • Main
  • «Sputnik»
  • VAZ-2108
  • Body
  • Exterior
  • Checking and repairing the body frame and plumage

Checking and repairing the body frame and plumage (VAZ-2108)

            0

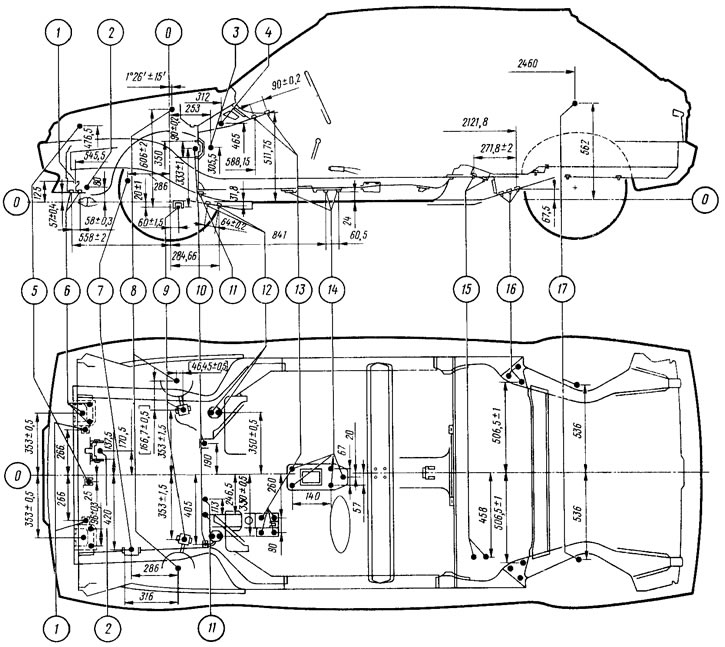
A significant portion of body repair work is performed on damaged vehicles, which in most cases require checking the geometry of the attachment points of the vehicle chassis units and assemblies. The main dimensions for checking the attachment points of the assemblies are shown in Figure 173.

Figure 173. Basic dimensions for checking the attachment points of units: 0 - baselines; 1 - lower…

Figure 173. Basic dimensions for checking the attachment points of units: 0 - baselines; 1 - lower radiator supports; 2 - front support for mounting the powertrain suspension; 3 - accelerator pedal axis; 4 - brake and clutch pedal axle; 5 - Upper radiator mount; 6 - fastening of front suspension struts; 7 - left support of the power unit; 8 - centers of the upper hinges of the pillars; 9 - centers of the front suspension arm hinges; 10 - Steering gear mount; 11 - fastening of the rear support of the power unit; 12 - anti-roll bar attachment points; 13 - Steering bracket mounting points; 14 - Gear shift lever mounting points; 15 - rear brake pressure regulator mounting points; 16 - rear suspension arm mounting points; 17 - Upper mounts of rear suspension shock absorbers


Car body damage can be very different. Therefore, the repair rules in each individual case should be individual, most suitable for this damage. In this case, the possibilities of straightening damaged panels are used to the maximum. It is necessary to avoid thermal effects on the metal, if possible, so as not to violate the factory welding and anti-corrosion protection of the body. In many cases, it is necessary to remove the front parts to determine the damage locations, straighten or check the frame. In cases of significant body damage, it is recommended to remove all easily removable internal trim parts to facilitate measurement, control and installation of hydraulic or screw jacks to eliminate distortions and damage to the body. Straightening restores the original linear dimensions and locations of load-bearing elements, windshield, hood openings, tailgate.


The protrusion of the front surfaces and removable parts relative to adjacent ones is achieved by adjusting or adjusting them.

[The original can be seen on the website VazBook.ru]

Most often, when repairing a car body, it is necessary to replace roof panels, wings, side panels, and windshields. The methods for replacing and repairing these parts can be used as a basis for repairing other parts of the car body.


This article is available at russian, bulgarian, belarusian, ukrainian, serbian, croatian, romanian, polish, slovak, hungarian
The text was reviewed by the specialist: Grigory Vologodtsev

Share with friends:

Previous articles
VAZ-2108: Exterior
Next articles

Possible body malfunctions, their causes and methods of elimination
Radiator lining — design description
Bumpers — design description
Engine hood — design description
Body frame and plumage
Replacing the roof panel of the car body
Removal and installation the front wing
Replacing the side panel
Windscreen Frame Panel Replacement
Repair of deformed body surfaces

More articles from other manuals on VAZ cars:
➠ Checking and repairing the body frame and plumage VAZ-1111 (1988-1996)
➠ Checking and repairing the body frame and plumage VAZ-2105 (1979-2010)
➠ Checking and repairing the body frame VAZ-2101 (1970-1983)
➠ The structure of the body frame and plumage VAZ-2121 (1977-1994)
➠ Generator — Checking and Repairing VAZ-2106 (1976-2006)
Link in different formats to this page


Visitor comments

No comments yet


How much will 20 + 37 ?


VAZ-21099 (1990-2004) 
  • General information
  • Specifications
  • User manual
  • Maintenance
  • Car care
  • Troubleshooting
  • Power unit
  • Engine repair
  • Cooling and lubrication system
  • Power and exhaust system
  • Transmission
  • Car gearbox
  • Clutch and drive shafts
  • Chassis
  • Car suspension
  • Steering
  • Brake system
  • Body
  • Exterior
  • Interior
  • Doors and locks
  • Electrical equipment
  • Equipment and devices
  • Lighting and signaling
  • Engine electrics
  • Ignition system


VAZ-2109 (1984-1997) 
  • General information
  • Vehicle operation
  • Vehicle device
  • Power unit
  • Engine repair
  • Cooling and lubrication system
  • Supply system
  • Transmission
  • Clutch
  • Gearbox and drive
  • Chassis
  • Car suspension
  • Steering
  • Brake system
  • Body
  • Body elements
  • Electrical equipment
  • Engine electrics
  • Equipment and devices


VAZ-2108 (1984-2003) 
  • General information
  • Introduction to guide
  • Power unit
  • Engine repair
  • Cooling and lubrication system
  • Power and exhaust system
  • Transmission
  • Clutch and drive shafts
  • Car gearbox
  • Chassis
  • Front suspension
  • Rear suspension
  • Steering
  • Brake system
  • Body
  • Exterior
  • Interior
  • Doors and glass
  • Electrical equipment
  • Equipment and devices
  • Engine electrics
  • Ignition system


VAZbook.ru © 2017 · Mobile version · Contact with administration · Sitemap: EN BG BY UA RS HR RO PL SK HU · Site search · News and articles VAZ-1111 · VAZ-11113 · VAZ-2101 · VAZ-21011 · VAZ-2104 · VAZ-2105 · VAZ-21051 · VAZ-2106 · VAZ-21061 · VAZ-2107 · VAZ-21099 · VAZ-2109 · VAZ-2108 · VAZ-2110 · VAZ-2112 · VAZ-2114 · VAZ-2115 · VAZ-2121 · VAZ-21213 · VAZ-21214 ·
The site stores technical data using cookies to improve the service.