




The contact welding points of the sidewall 2 with a ∅ 6 mm drill (figure 175) with mudguard 12, connector 9 of side and front panel, inner pillar 1 of windscreen, roof beams and reinforcements, groove of rear door opening, inner panel 7 of side panel, extensions, plug (for right side only), 5 overlays and 8 sidewall reinforcements.
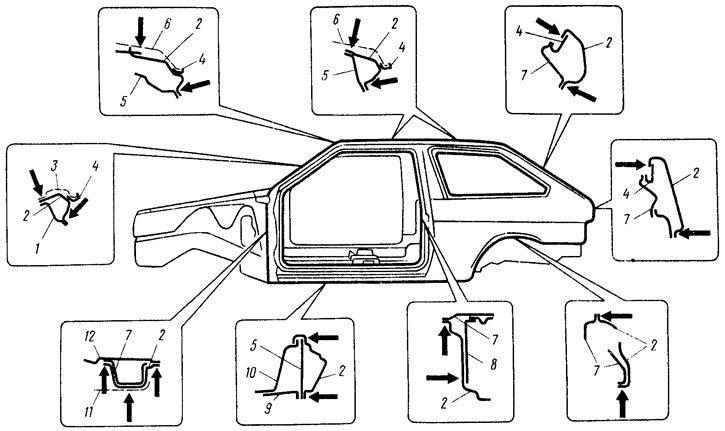
Figure 175. Replacing the side panel: 1 - inner windshield pillar; 2 - replaceable side panel; 3 - Windscreen frame panel; 4 - drainage gutters; 5 - pads; 6 - roof panel; 7 - inner side panel; 8 - side reinforcements; 9 - side connectors; 10 - floor panel; 11 - front wing; 12 - mudguard; The arrows on the fragments show the locations of the drilling of contact welding points
Remove the side panel, straighten the edges of the mating parts and clean them with a grinder on both sides. Drill with a ∅ 5 mm drill (the drilling points on the body pillars are shown in Figure 176) holes on the edges of the new panel in the welding areas with the following pitch: with the roof panel in the door opening 40 mm, with the windshield frame panel 45 mm, in the rear door opening 60 mm (at the bottom on a length of 140 mm with a step of 30 mm), with a plug (only for the right side) 35 mm, with the inner side panel from the rear panel to the lower trim 30 mm, in other places 40 mm.
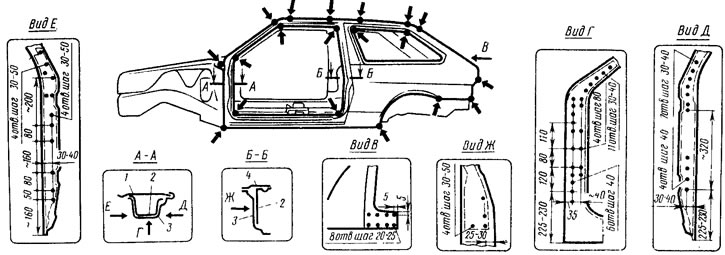
Figure 176. Welding points of the sidewall on the body pillars: 1 - mudguard; 2 - rack amplifiers; 3 - side panel, 4 - inner side panel
Clean the edges of the panel, install it on the body and secure it with clamps. Put the doors and front wing in place and check the fit of the side panel for uniformity of gaps with the doors and wings on both sides of the car. Weld the panel at the corners with gas welding (in Figure 176, the welding points are shown by arrows with dots). As a solder, you can use one of the brass rods L62, L63, LNKMts with a diameter of 2-3 mm.
The fit of the panel is checked, the doors and wing are removed and the side panel is welded at the drilled points using carbon dioxide electric welding with 0.8 mm diameter wire Sv.08G1S. After welding is complete, painting is performed and the removed units and parts are put back in place.
(The original is available on the website www.vazbook.ru)