




Checking the work
The ignition distributor sensor is installed on a stand for testing electrical devices and connected to an electric motor, the rotation speed of which is regulated. Connections are made to the ignition coil, to the switch and to the battery similar to the ignition system diagram on a car. Four terminals of the cover are connected on the stand to spark gaps, the gap between the electrodes of which is regulated.
Set a gap of 5 mm between the discharge electrodes, turn on the stand's electric motor and rotate the distributor sensor roller counterclockwise for several minutes (view from the lid side) with a frequency of 2000 rpm. Then increase the gap between the electrodes to 10 mm and monitor whether there are any internal discharges in the sensor-distributor, which are detected by the sound or by the weakening and interruption of sparking on the arrester of the test stand.
During operation, the ignition distributor sensor should not produce significant noise at any shaft rotation speed.
Removal the characteristics of automatic ignition advance
Install the ignition distributor sensor on the stand, connect terminal "4" of the switch to the "plus" terminal of the stand, terminal "1" to the "breaker" terminal of the stand, terminal "2" to the housing, and terminals "3", "5" and "6" of the switch to the ignition distributor sensor.
The electric motor of the stand is switched on and the shaft of the ignition distributor sensor is rotated at a frequency of 500-600 rpm. The value in degrees at which one of the four sparks is observed is noted on the graduated disk of the stand. By increasing the rotation frequency stepwise by 200-300 rpm, the number of degrees of ignition advance corresponding to each rotation frequency of the shaft of the distributor sensor is determined on the disk. The resulting characteristic of the centrifugal regulator is compared with the characteristic in Figure 139,a. If the characteristic does not match, it can be brought to normal by bending the spring struts.
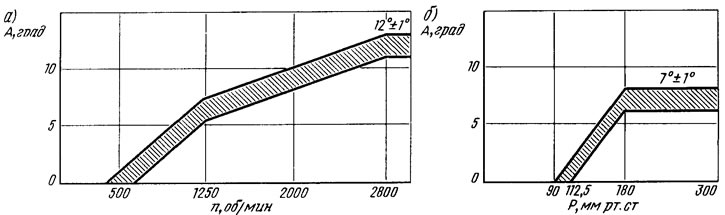
Figure 139. Characteristics of the centrifugal (a) and vacuum (b) ignition timing regulators of the ignition distributor sensor: A - ignition timing angle; n — rotation frequency of the ignition distributor shaft; R - vacuum
To take the characteristics of the vacuum ignition advance regulator, connect the vacuum regulator nipple to the vacuum pump of the stand. Turn on the electric motor of the stand and rotate the shaft of the ignition distributor sensor at a frequency of 1000 rpm. Using the graduated disk, set the conditional "zero" for the moment of sparking in any of the cylinders.
By gradually increasing the vacuum, the number of degrees of ignition advance relative to the initial value is noted every 20 mm Hg. The resulting characteristic is compared with the characteristic in Figure 139.6. Within small limits, the characteristic of the vacuum regulator can be adjusted by moving its body. If this method fails to bring the characteristic to the norm, then the vacuum regulator is replaced. When recording the characteristic, it is necessary to pay attention to the clarity of the return to the initial position after removing the vacuum of the support plate of the contactless sensor.
Checking the contactless sensor
Voltage is removed from the sensor output if there is a steel screen in its gap. If there is no screen in the gap, then the voltage at its output is close to zero.
On the ignition distributor sensor removed from the engine, the sensor can be checked according to the diagram shown in Figure 140,a, with a supply voltage of 8-14 V. Slowly rotating the distributor sensor shaft, measure the voltage at the sensor output with a voltmeter. It should change sharply from the minimum (no more than 0.4 V) up to the maximum - no more than 3 V less than the supply voltage.
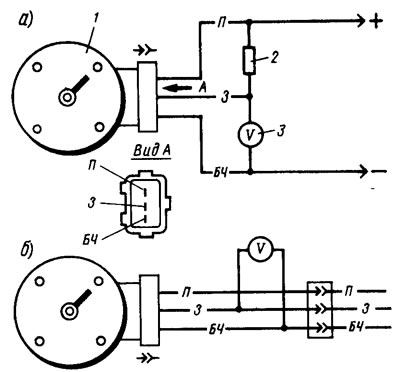
Figure 140. Schemes for checking the contactless sensor on the removed distributor sensor (a) and on the vehicle (b): 1 - ignition distributor sensor; 2 - 2 kOhm resistor; 3 - a voltmeter with a scale limit of at least 15 V and an internal resistance of at least 100 kOhm
On a car, the sensor can be checked using the diagram shown in Figure 140.6. An adapter connector with a voltmeter is connected between the plug connector of the ignition distributor sensor and the connector of the wire bundle. After turning on the ignition and slowly turning the crankshaft with a special key, the voltage at the sensor output is checked with a voltmeter. It should be within the limits specified above.