
Installation diagram of the rear brake pressure regulator and its adjustment
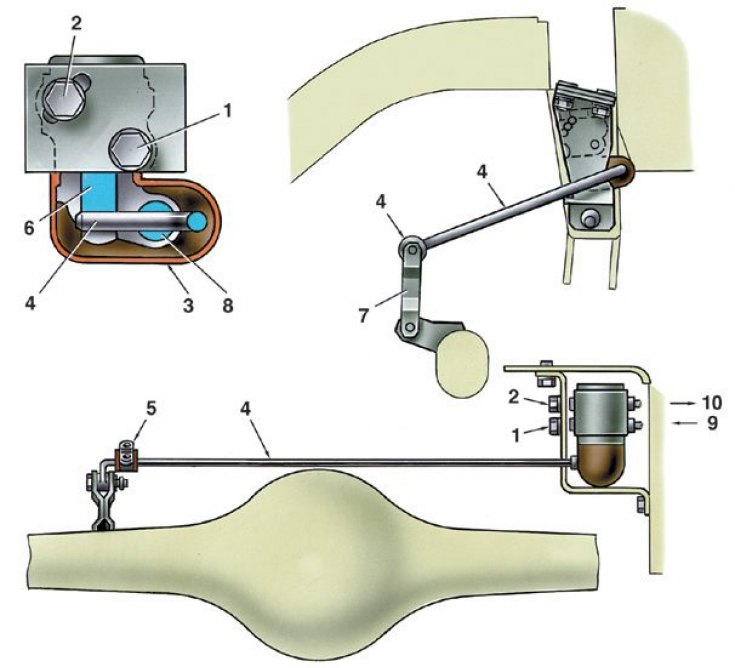
1, 2 - bolts for fastening the regulator to the bracket; 3 - protective cap; 4 – torsion lever of the regulator drive; 5 - bracket for attaching the lever to the body; 6 - piston; 7 - connection rod with rear axle beam bracket; 8 - axis; 9 - pipe fitting for supplying brake fluid from the master cylinder; 10 - fitting of the pipeline for draining brake fluid into the wheel cylinders
Installing tool 67.7820.9518 for adjusting the rear brake pressure regulator

1 - arm of the pressure regulator drive lever; 2 – the lever of a drive of a regulator of pressure of back wheels; 3 - fixture 67.7820.9518; 4 - rod connecting the pressure regulator drive lever with the bracket of the rear axle beam
1. If the bolts securing the rear brake pressure regulator are loose, adjust its position. To do this, after hanging the rear axle of the car, loosen bolts 1 and 2 (see fig. Installation diagram of the rear brake pressure regulator and its adjustment) so that the regulator can be easily rotated relative to the mounting bracket.
2. Disconnect lever 4 from rod 7 and fasten tool 67.7820.9518 at its end (see fig. Installing tool 67.7820.9518 for adjusting the rear brake pressure regulator).
3. Point the tool rod up until it stops in the body. This sets the distance of 140 + 5 mm between the end of the lever 4 (see fig. Installation diagram of the rear brake pressure regulator and its adjustment) and body spar.
4. Raise the protective rubber cap 3 and, turning the pressure regulator on the bolts, achieve a light contact of the lever with the piston 6.
5. Holding the pressure regulator in this position, tighten bolts 1 and 2 to failure, then coat axle 8 and the protruding part of the piston with grease DT-1.
6. Replace the rubber cap.
7. Remove tool 67.7820.9518 and connect the end of the lever to the rod 7.