




Checking the functionality of the control unit 25.3761
Scheme of the control system of the pneumatic valve of the carburetor type "Ozone"
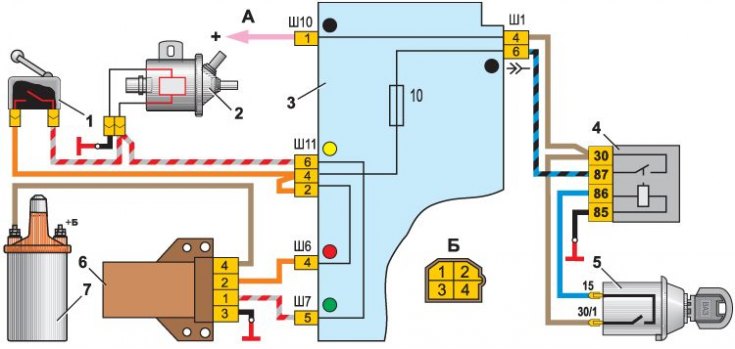
1 – micro switch in the carburetor; 2 – electro-pneumatic valve; 3 – mounting block; 4 – ignition relay; 5 – ignition switch; 6 – control unit of the electro-pneumatic valve; 7 – ignition coil; A – to the generator terminal "30"; B – the order of conventional numbering of plugs in the control unit
Pneumatic valve control unit test diagram
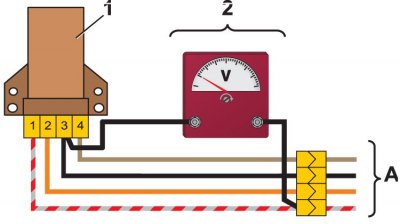
1 – control unit; 2 – adapter connector with voltmeter; A - vehicle wiring harness
A working control unit 25.3761 should switch off pneumatic valve 2 (see Fig. Diagram of the pneumatic valve control system of the Ozone carburetor) when the engine crankshaft speed increases to 1600 min⁻¹ and switch on the pneumatic valve when the speed decreases to 1200 min⁻¹.
1. Before checking the unit's functionality, it is necessary to make sure that the vehicle's wiring harness is connected correctly to the control unit (see the view of the control unit connector, Fig. Diagram of the Ozone carburetor pneumatic valve control system).
2. The operability of the control unit is checked using a tachometer and a voltmeter (with a measurement range of 0–15 V) in the following order:
- disconnect the wires from the microswitch mounted on the carburetor;
- connect to control unit 1 (see fig. Diagram of checking the pneumatic valve control unit) voltmeter using a special adapter connector 2;
- start the engine and, gradually increasing the rotation speed, monitor the voltmeter readings: after starting the engine, the voltmeter should show a voltage of at least 10 V, and at the moment the pneumatic valve is turned off - a sudden decrease in voltage to a value of no more than 1.5 V;
- after turning off the pneumatic valve, gradually reduce the rotation speed until the valve turns on: the voltmeter should show a sudden increase in voltage of at least 10 V.
Attention! It is permissible to check the operability of the unit without a voltmeter and an adapter connector by the characteristic knock of the pneumatic valve when switching off and on, respectively, during a smooth increase and decrease in the engine crankshaft speed.
Checking the solenoid valve control unit
Addresses of the output terminals of the electromagnetic valve control unit
Terminal | Address |
1 | To the ignition coil terminal |
2 | Weight |
3 | – |
4 | +12 V from terminal "15" of the ignition switch |
5 | Carburetor limit switch |
6 | Carburetor electromagnetic valve |
7 | – |
If the engine has a 21051-1107010 carburetor, then instead of the 21.3761 pneumatic valve control unit, a 501.3761 carburetor electromagnetic valve control unit is installed.
Control unit 501.3761 should switch off the valve at a crankshaft speed of 1900 min⁻¹, and switch on at 1700 min⁻¹. The addresses of the output terminals of the unit are specified in the table Addresses of the output terminals of the solenoid valve control unit.
The performance of the electromagnetic valve control unit is checked using a tachometer and a voltmeter (with a measurement range of 0–15 V).
The original is on the portal VAZBOOK
1. Disconnect the white/black wire from the carburetor limit switch and connect the tip of this wire to ground.
2. Connect the adapter connector with a voltmeter (similar to that shown in Fig. Diagram of the pneumatic valve control unit test) between the additional harness block and the block.
3. Start the engine and, gradually increasing the rotation speed, monitor the voltmeter readings: after starting the engine, the voltmeter should show a voltage of at least 10 V, and at the moment the valve is turned off, a sudden drop in voltage to a value of no more than 0.5 V.
4. After turning off the valve, gradually reduce the rotation speed until the valve turns on: the voltmeter should show a sudden increase in voltage of at least 10 V.
5. Set the crankshaft speed to 2200–2300 min⁻¹, disconnect the tip of the wire going to the carburetor limit switch from ground, and then reconnect it to ground. When disconnecting the wire from ground, the valve should turn on, and when connected to ground, it should turn off. It is permissible to check the unit without a voltmeter by the characteristic knock of the valve when disconnecting and connecting.