
English Русский
Български
Беларускі
Український
Српски
Hrvatski
Română
Polski
Slovenský
Magyar
| Articles | Contacts | Sitemap |   
Repair and maintenance Lada Repair and maintenance Mazda Repair and maintenance Mitsubishi Repair and maintenance Toyota Repair and maintenance Land Rover Repair and maintenance Hyundai Repair and maintenance Nissan
VAZbook.ru


Main     1111   2101   2105   2106   2107   2109   2110   2115   2121  
VAZ-2104 (1984-2012) VAZ-2105 (1979-2010) VAZ-21051 (1979-2010)
  • Main
  • «Zhiguli»
  • VAZ-21051
  • Power unit
  • Power and exhaust system
  • Fuel pump — removal, installation and repair

Fuel pump — removal, installation and repair (VAZ-21051)

            0

Contents: Checking the pump ↓ Disassembly, cleaning and inspection…↓ Installing the pump on the engine ↓

Fuel pump
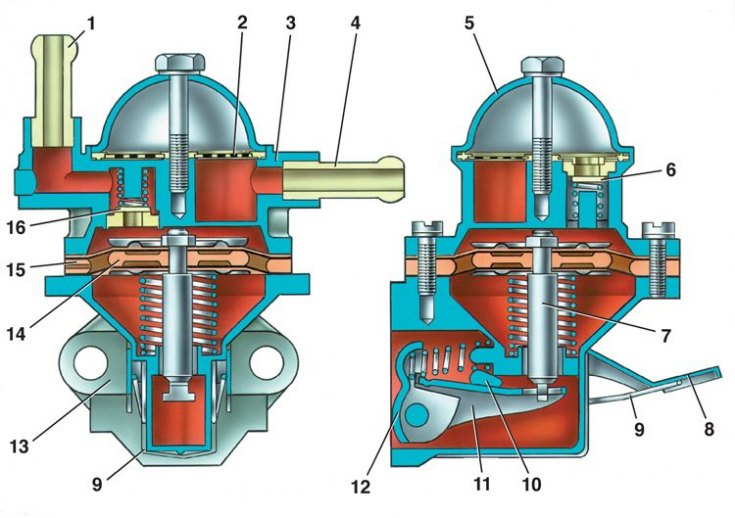


1 – discharge pipe; 2 – filter; 3 – body; 4 – suction pipe; 5 – lid; 6 – suction valve; 7 –…

1 – discharge pipe; 2 – filter; 3 – body; 4 – suction pipe; 5 – lid; 6 – suction valve; 7 – traction; 8 – manual fuel pumping lever; 9 – spring; 10 – eccentric; 11 – balance beam; 12 – lever for mechanical fuel pumping; 13 – bottom cover; 14 – internal spacer gasket; 15 – external spacer gasket; 16 – discharge valve


Checking the pump


Insufficient filling of the carburetor with gasoline may be due to a malfunction of the fuel pump, as well as clogged or damaged pipelines.

To find the cause of the malfunction, disconnect the hose from the discharge pipe 1 and use the lever 8 of the manual fuel pump to check whether fuel is supplied. If there is no fuel, then disconnect the hose from the suction pipe 4 and check whether a vacuum is created at the inlet of this pipe. If there is a vacuum, then the pipeline is probably damaged, and if not, then the pump is faulty.

Additionally, the fuel pump can be tested on a test bench. Rotating the drive shaft at a frequency of 2000±40 min⁻¹, check the pump flow (should be at least 54 l/h at 20±50°C) and the discharge pressure (should be 2.2–3.0 m of water column at zero flow). If you suspect a malfunction, disassemble the pump and check its parts.


Disassembly, cleaning and inspection of parts


1. To disassemble the pump, unscrew the cover mounting bolt 5, remove the cover and filter 2. Then unscrew the screws securing the housing to the bottom cover, separate them, remove the diaphragm assembly and spring.

2. Wash all parts with gasoline and blow with compressed air.

3. Check the integrity of the pump springs.

4. Check for valve sticking. Check the diaphragms. They should not be cracked or hardened. After checking, replace all worn or damaged parts with new ones. Replace damaged pump gaskets with new ones and lubricate with a thin layer of grease before installation.

Scheme of control and adjustment of the pump drive pusher protrusion
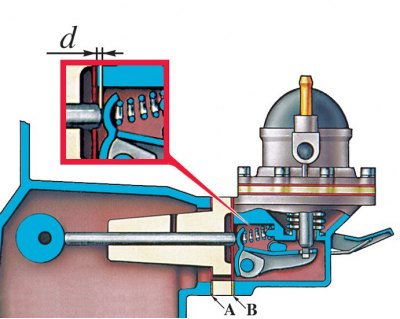


A – gasket thickness 0.27–0.33 mm;

A – gasket thickness 0.27–0.33 mm;
B – gasket thickness 0.70–0.80 mm;
d – pusher protrusion


To properly install the fuel pump, use two of the three gaskets listed below: A 0.27–0.33 mm thick; In thickness 0.70–0.80 mm; With a thickness of 1.20–1.30 mm.

Installing the pump on the engine


1. Install the heat-insulating spacer on the cylinder block, placing gasket A between them, and place gasket B on the plane mating with the pump.


2. Measure the distance d using the device 67.7834.9506 (the minimum amount by which the pushrod protrudes, determined by slowly turning the crankshaft).

3. If the dimension d is within 0.8-1.3 mm, fix the pump to the engine, if d is less than 0.8 mm, replace gasket B with gasket A; if d is greater than 1.3 mm, replace gasket B with gasket C. Check dimension d again and secure the pump to the engine. There should always be gasket A between the cylinder block and the heat-insulating spacer.

The original source is located on the website VAZbook


This article is available at russian, bulgarian, belarusian, ukrainian, serbian, croatian, romanian, polish, slovak, hungarian
The text was reviewed by the specialist: Grigory Vologodtsev

Share with friends:

Previous articles
VAZ-21051: Power and exhaust system
Next articles

Air filter — removal and installation
Engine power supply system — design description
Fuel tank — removal and installation
Carburetor 2105-1107010 — design description
Calibration data for carburetor 2105-1107010
Adjusting engine idle speed
Setting the fuel level in the float chamber

More articles from other manuals on VAZ cars:
➠ Fuel pump repair VAZ-11113 (1996-2003)
➠ Fuel pump repair VAZ-21061 (1976-2006)
➠ Fuel pump — inspection and repair VAZ-2108 (1984-2003)
➠ Removal, repair and installation of the fuel pump VAZ-2115 (1997-2012)
➠ Coolant pump — inspection and repair VAZ-2101 (1970-1983)
Link in different formats to this page


Visitor comments

No comments yet


How much will 11 + 11 ?


VAZ-2104 (1984-2012) 
  • General information
  • Operation and maintenance
  • Power unit
  • Engine repair
  • Fuel system (carburetor)
  • Fuel system (injector)
  • Control system
  • Cooling system
  • Exhaust system
  • Transmission
  • Clutch
  • Car gearbox
  • Cardan gear
  • Rear axle
  • Chassis
  • Front suspension
  • Rear suspension
  • Wheels and tires
  • Steering
  • Brake system
  • Body
  • Exterior
  • Interior
  • Doors and glass
  • Ventilation and heating
  • Electrical equipment
  • Equipment and devices
  • Headlights and lighting
  • Engine electrics
  • Electrical circuits


VAZ-2105 (1979-2010) 
  • General information
  • Vehicle description
  • Vehicle device
  • Vehicle operation
  • Maintenance
  • Power unit
  • Engine repair
  • Cooling and lubrication system
  • Supply system
  • Transmission
  • Clutch
  • Car gearbox
  • Cardan gear
  • Rear axle
  • Chassis
  • Suspension and shock absorbers
  • Steering
  • Brake system
  • Body
  • Body elements
  • Electrical equipment
  • Engine electrics
  • Equipment and devices


VAZ-21051 (1979-2010) 
  • General information
  • Introduction to guide
  • User manual
  • Troubleshooting
  • Power unit
  • Engine repair
  • Engine repair VAZ-2103
  • Cooling system
  • Lubrication system
  • Power and exhaust system
  • Fuel injection
  • Transmission
  • Clutch
  • Car gearbox
  • Cardan gear
  • Rear axle
  • Chassis
  • Suspension and shock absorbers
  • Steering
  • Brake system
  • Body
  • Exterior
  • Interior
  • Doors and windows
  • Electrical equipment
  • Equipment and devices
  • Engine electrics
  • Ignition system
  • Electrical circuits


VAZbook.ru © 2017 · Mobile version · Contact with administration · Sitemap: EN BG BY UA RS HR RO PL SK HU · Site search · News and articles VAZ-1111 · VAZ-11113 · VAZ-2101 · VAZ-21011 · VAZ-2104 · VAZ-2105 · VAZ-21051 · VAZ-2106 · VAZ-21061 · VAZ-2107 · VAZ-21099 · VAZ-2109 · VAZ-2108 · VAZ-2110 · VAZ-2112 · VAZ-2114 · VAZ-2115 · VAZ-2121 · VAZ-21213 · VAZ-21214 ·
The site stores technical data using cookies to improve the service.