
Note. When looking for a faulty lamp, keep in mind that the instrument panel is turned upside down. The location of the lamps on the front side of the instrument panel is shown in chapter «Controls and instruments».
Execution sequence
1. Remove the instrument panel from the panel (wiring harness connectors can not be disconnected).
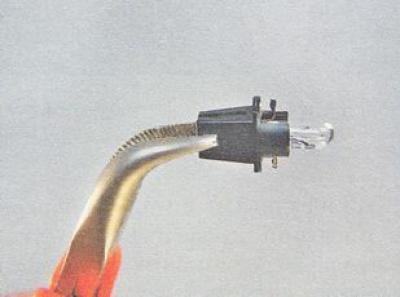
2. To replace any lamp, turn the protruding part of the lamp socket counterclockwise and remove the socket together with the lamp from the instrument panel. We replace the faulty lamp.
3. Install a new lamp and instrument panel in reverse order.
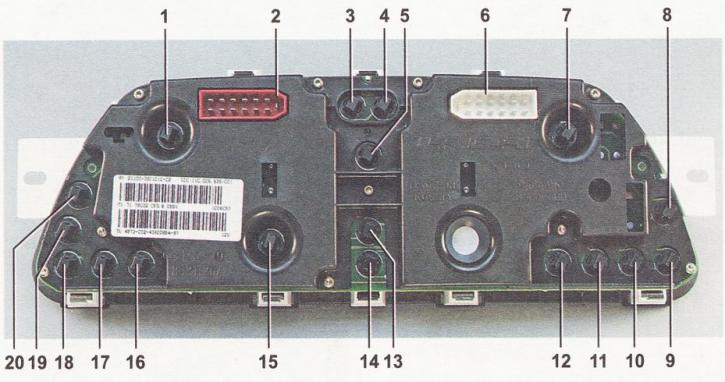
The location of the lamps on the instrument panel: 1, 5, 7, 8, 20 - backlights; 2 - socket for connecting the red connector of the wiring harness; 3 - control lamp of indicators of the right turn; 4 - control lamp of indicators of the left turn; 6 - socket for connecting the white connector of the wiring harness; 9 - reserve socket (airbag warning light); 10 - control lamp of emergency oil pressure; 11 - control lamp for turning on the parking brake; 12 - generator malfunction indicator lamp; 13 - control lamp for turning on the alarm; 14 - control lamp for a malfunction of the engine management system; 15 - odometer display backlight; 16 - control lamp for switching on the main beam of headlights; 17 - control lamp of insufficient level of brake fluid; 18 - control lamp for switching on external lighting; 19 - a control lamp of a reserve of fuel