
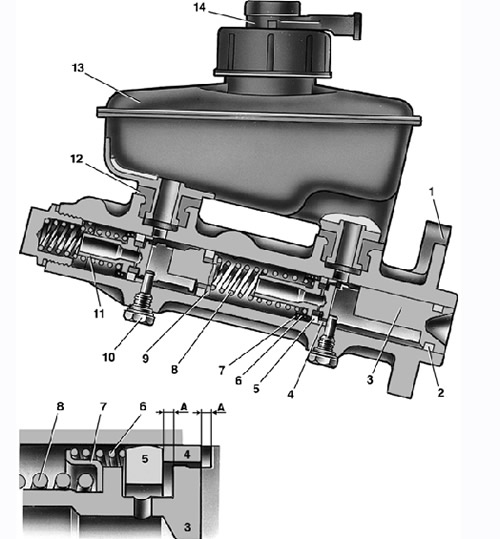
Pic. 8.5. Master cylinder with reservoir: A - gap; 1 - the body of the main cylinder; 2 - low pressure sealing ring; 3 - piston drive circuit left front-right rear brake; 4 - spacer ring; 5 - high pressure sealing ring; 6 - clamping spring of the sealing ring; 7 - spring plate; 8 - piston return spring; 9 - washer; 10 - locking screw; 11 - the piston of the drive circuit of the right front-left rear brake; 12 - connecting sleeve; 13 - tank; 14 - emergency brake fluid level sensor
1. Remove the brake master cylinder from the vehicle (see «Removal and installation of the main brake cylinder»).
2. Using a wooden spatula as a lever, remove the tank 13 (see fig. 8.5) from the cylinder.
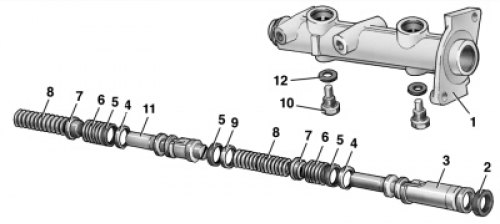
8.11. Master Cylinder Details: 1 - cylinder body; 2 - low pressure sealing ring; 3 - piston drive circuit left front-right rear brake; 4 - spacer ring; 5 - high pressure sealing ring; 6 - clamping spring of the sealing ring; 7 - spring plate; 8 - piston return spring; 9 - washer; 10 - locking screw; 11 - the piston of the drive circuit of the right front-left rear brake; 12 - sealing gasket
3. Remove the connecting sleeves 12 from the main cylinder body.
4. Remove the two locking screws 10 (pic. 8.11).
5. By force of hand, remove the pistons of the first and second chambers with cuffs, washers and springs from the housing. The piston 11 of the second chamber may not come out freely. To extract it with the remaining parts by hitting the end of the body from the side of the first chamber on a clean board, slide it through the first chamber. To extract the piston, you can also use compressed air, which must be brought to the outlet of the second chamber, closing the hole for the tank.
6. Carefully inspect and make sure that the cylinder mirror and the working surface of the pistons are perfectly clean, that there is no rust, scratches or other irregularities. Otherwise, replace the parts with new ones.
7. Replace torn, swollen or loose cuffs. It is recommended to replace the cuffs with new ones every time the master cylinder is disassembled, regardless of their condition.
8. Check the elasticity of the piston springs, the length of which should be 41 mm under a load of 38.26–46.1 N (3.9–4.7 kgf), 21 mm under load 81.81 - 99.47 N (8.34–10.14 kgf), 59.7 mm free. Replace loose springs.
9. Gaskets 12 under the locking screws are recommended to be replaced with new ones.
10. Before assembly, wash all parts with clean brake fluid. Avoid contact with mineral oils, gasoline, kerosene or diesel fuel, as even residual traces of these liquids can lead to the destruction of rubber seals.
Warning! The time for washing the O-rings in isopropyl alcohol is no more than 20 seconds, then blow them with air.
11. Assemble the cylinder in the reverse order of disassembly. Lubricate all parts with brake fluid.