
English Русский
Български
Беларускі
Український
Српски
Hrvatski
Română
Polski
Slovenský
Magyar
| Articles | Contacts | Sitemap |   
Repair and maintenance Lada Repair and maintenance Mazda Repair and maintenance Mitsubishi Repair and maintenance Toyota Repair and maintenance Land Rover Repair and maintenance Hyundai Repair and maintenance Nissan
VAZbook.ru


Main     1111   2101   2105   2106   2107   2109   2110   2115   2121  
VAZ-2121 (1977-1994) VAZ-21213 (1994-2006) VAZ-21214 (1994-2006)
  • Main
  • «Niva»
  • VAZ-21213
  • Transmission
  • Cardan gear
  • Assembly of the cardan transmission

Assembly of the cardan transmission (VAZ-21213)

            0

Assemble the cardan shafts in the reverse order disassembly taking into account the following:
  • apply 3-4 g of Fiol-1 or Fiol-2U grease evenly to the splined joints;
  • when connecting parts, align the marks applied to the detachable parts before disassembling;
  • after assembling the splined connection, pressing the seal by 0.3-0.5 mm with an axial load, squeeze the collar on the fork groove.

Assemble the cardan joint in the following sequence:
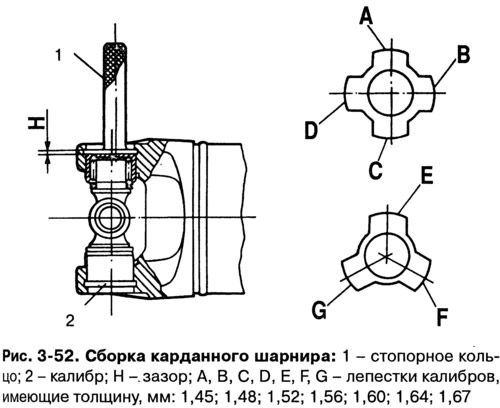
  • after removing the old thickened grease, lubricate the inner surface of the bearing housings with grease No.158 or Fiol-2U (0.8-1.2 g per bearing). The crosspiece pins should not be coated with grease to avoid the formation of an air cushion during assembly. Insert the crosspiece into the fork holes. Press the bearing into one fork hole and install a 1.56 mm thick retaining ring 1 (Fig. 3-52) into the fork groove. Press the bearing into the other fork hole until the opposite bearing stops against the end of the retaining ring. The pressing force should not exceed 15,000 N (1,500 kgf).
after removing the old thickened grease, lubricate the inner surface of the bearing housings with…


Using two gauges 2, having 4 and 3 petals of different thicknesses, respectively, determine which of the petals fits tightly into the gap H between the bottom of the bearing and the end of the fork groove, and install a retaining ring of the same thickness as the petal.


Note: One gauge has petals 1.45 thick; 1,48; 1,52; 1.56 mm, other 1.60; 1,64; 1.67 mm.


If the petal of the smallest thickness (1.45 mm) does not fit into the gap H, then ring 1 must be replaced with another one, 1.4 mm thick, and the specified operations must be repeated.

If the petal of the greatest thickness (1.67 mm) does not fit tightly into the gap H, it is necessary to install a ring of thickness 1.67 mm into this gap, remove ring 1 and repeat all the specified operations.

Note: It is recommended to measure the gap with the gauge petals from the pipe side. Retaining rings are supplied in spare parts in eight sizes (by thickness), each of which has a specific color: 1.45 - uncolored; 1.48 - yellow; 1.52 - brown; 1.56 - blue; 1.60 - black; 1,64; 1,67; 1.40 - colors are not indicated and their thickness is determined by measurement.


Having installed the retaining rings, hit the hinge forks with a hammer with a plastic striker. Under the impact, the gap between the bearing bottom and the retaining ring is selected, and gaps appear between the bearing housings and the ends of the crosspiece pins within 0.01-0.04 mm. After assembly, check the ease of turning the hinge forks and the balancing of the shafts.

When assembling the intermediate shaft joint, use the techniques described in the chapter "Front wheel drive". When assembling the separator 7 (fig. 3-49) install with the chamfer towards the drive shaft of the transfer case, and put Longtern-OO grease from the company into the joint "Dow corning" in the amount of 20 cm³.


This article is available at russian, bulgarian, belarusian, ukrainian, serbian, croatian, romanian, polish, slovak, hungarian
The text was reviewed by the specialist: Grigory Vologodtsev

Share with friends:

Previous articles
VAZ-21213: Cardan gear
Next articles

Checking the technical condition of the cardan shaft
Disassembling the cardan transmission
Checking the technical condition of the cardan shaft without disassembling
Removal and installation the cardan shaft
Possible cardan shaft malfunctions, their causes and methods of elimination
Balancing of cardan shafts
Cardan transmission of VAZ-2129 and VAZ-2131 cars

More articles from other manuals on VAZ cars:
➠ Cardan transmission VAZ-2101 (1970-1983)
➠ Cardan transmission of VAZ-2104 and VAZ-2105 cars VAZ-2105 (1979-2010)
➠ Cardan transmission device VAZ-2106 and VAZ-2103 VAZ-2106 (1976-2006)
➠ Cardan transmission — technical condition check VAZ-2107 (1982-2012)
➠ General information about front-wheel drive transmission VAZ-2109 (1984-1997)
Link in different formats to this page


Visitor comments

No comments yet


How much will 36 + 15 ?


VAZ-2121 (1977-1994) 
  • General information
  • Vehicle device
  • Car VAZ-21219
  • Power unit
  • Engine repair
  • Cooling system
  • Lubrication system
  • Supply system
  • Transmission
  • Clutch
  • Car gearbox
  • Transfer case
  • Cardan gear
  • Rear axle and gearbox
  • Front axle
  • Chassis
  • Front suspension
  • Rear suspension
  • Steering
  • Brake system
  • Body
  • Exterior
  • Interior
  • Doors and windows
  • Electrical equipment
  • Equipment and devices
  • Headlights and lighting
  • Engine electrics


VAZ-21213 (1994-2006) 
  • General information
  • Vehicle device
  • User manual
  • Power unit
  • Engine repair
  • Cooling and lubrication system
  • Supply system
  • Transmission
  • Clutch
  • Car gearbox
  • Transfer case
  • Cardan gear
  • Rear axle and shafts
  • Front axle and wheel drive
  • Chassis
  • Wheel suspension
  • Steering
  • Brake system
  • Body
  • Exterior
  • Interior
  • Electrical equipment
  • Engine electrics
  • Equipment and devices


VAZ-21214 (1994-2006) 
  • General information
  • Vehicle information
  • Troubleshooting
  • Power unit
  • Engine repair
  • Cooling system
  • Fuel system (carburetor)
  • Fuel system (injector)
  • Ignition system
  • Control system
  • Exhaust system
  • Transmission
  • Clutch
  • Car gearbox
  • Transfer case
  • Cardan gear
  • Front axle
  • Rear axle
  • Chassis
  • Front suspension
  • Rear suspension
  • Steering
  • Brake system
  • Body
  • Exterior
  • Interior
  • Doors, covers and windows
  • Ventilation and heating
  • Electrical equipment
  • Equipment and devices
  • Headlights and lighting
  • Engine electrics
  • Electrical circuits


VAZbook.ru © 2017 · Mobile version · Contact with administration · Sitemap: EN BG BY UA RS HR RO PL SK HU · Site search · News and articles VAZ-1111 · VAZ-11113 · VAZ-2101 · VAZ-21011 · VAZ-2104 · VAZ-2105 · VAZ-21051 · VAZ-2106 · VAZ-21061 · VAZ-2107 · VAZ-21099 · VAZ-2109 · VAZ-2108 · VAZ-2110 · VAZ-2112 · VAZ-2114 · VAZ-2115 · VAZ-2121 · VAZ-21213 · VAZ-21214 ·
The site stores technical data using cookies to improve the service.