
English Русский
Български
Беларускі
Український
Српски
Hrvatski
Română
Polski
Slovenský
Magyar
| Articles | Contacts | Sitemap |   
Repair and maintenance Lada Repair and maintenance Mazda Repair and maintenance Mitsubishi Repair and maintenance Toyota Repair and maintenance Land Rover Repair and maintenance Hyundai Repair and maintenance Nissan
VAZbook.ru


Main     1111   2101   2105   2106   2107   2109   2110   2115   2121  
VAZ-1111 (1988-1996) VAZ-11113 (1996-2003)
  • Main
  • «Oka»
  • VAZ-1111
  • Power unit
  • Engine repair
  • Disassembly and assembly of the power unit

Disassembly and assembly of the power unit (VAZ-1111)

            0

Contents: Disassembly ↓ Assembly ↓

Disassembly


Remove the exhaust pipe with the bracket. Unscrew the bolt and nut securing the starter 2 (figure 29) to the clutch housing and remove the starter. Remove brackets 6 (see figure 4) and 4 with left and rear powertrain suspension supports.
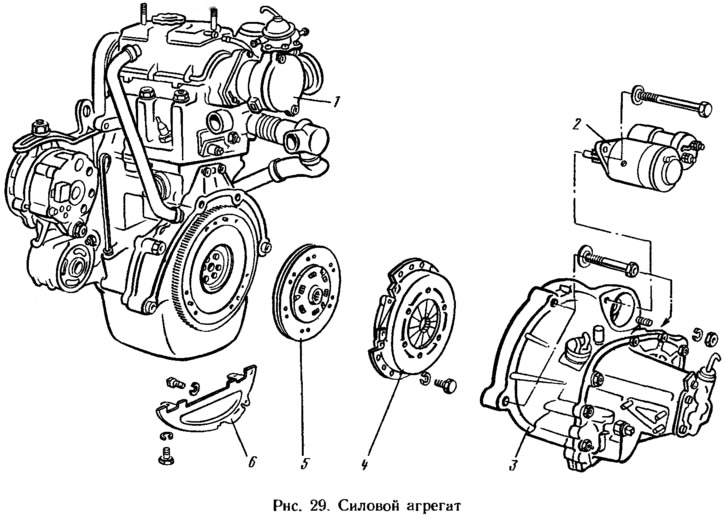
Remove the exhaust pipe with the bracket. Unscrew the bolt and nut securing the starter 2 (figure…


Remove the bottom cover 6 (see figure 29) clutch housing, having unscrewed the mounting bolts. Carefully disconnect gearbox 3 from engine 1, trying not to rest the input shaft of the gearbox on the petals of the clutch pressure spring. Disconnect the clutch housing 4 from the flywheel with the driven disk 5, having unscrewed the mounting bolts.

Assembly


Install the clutch housing with the driven disk on the flywheel using three centering pins and center it using mandrel 67. 7853.9597 (see figure 76) and secure the clutch housing with bolts. The driven disk is positioned with the protruding part of the hub towards the pressure plate.

Apply a layer of LSC-15 or Litol-24 grease to the splined end of the primary shaft of the gearbox and SHRUS-4 grease to the outer surface of the guide sleeve of the clutch release bearing. Connect the gearbox to the engine without resting the primary shaft on the petals of the clutch pressure spring. Attach the gearbox to the engine with bolts.


The material is posted on the website VazBook.ru

Install the lower cover of the clutch housing and secure it with bolts.

Lubricate the front bushing of the starter anchor shaft, located in the clutch housing, with engine oil. Install and secure the starter and two brackets with the supports of the left and rear suspension of the power unit. Install and secure the muffler inlet pipe with the bracket.


This article is available at russian, bulgarian, belarusian, ukrainian, serbian, croatian, romanian, polish, slovak, hungarian
The text was reviewed by the specialist: Grigory Vologodtsev

Share with friends:

Previous articles
VAZ-1111: Engine repair
Next articles

Removal and installation of the connecting rod and piston group
Removal and installation the balance shaft gear
Removal and installation the rear crankshaft oil seal
Removal and installation the front crankshaft oil seal
Removal and installation the camshaft oil seal
Disassembling the engine
Engine assembly
Disassembly and assembly of the cylinder block
Disassembly and assembly of the connecting rod and piston group
Disassembly and assembly of the cylinder head

More articles from other manuals on VAZ cars:
➠ Removal and installation of the power unit VAZ-2108 (1984-2003)
➠ Engine power supply system. Fuel supply, air supply and exhaust… VAZ-2101 (1970-1983)
➠ Power supply system of the VAZ-2104 and VAZ-2105 engine VAZ-2105 (1979-2010)
➠ The device of the engine power supply system of VAZ-2106 and… VAZ-2106 (1976-2006)
➠ Power supply system VAZ-2107 (1982-2012)
Link in different formats to this page


Visitor comments

No comments yet


How much will 43 + 19 ?


VAZ-1111 (1988-1996) 
  • General information
  • Vehicle description
  • Vehicle device
  • Vehicle operation
  • Maintenance
  • Applications
  • Power unit
  • Engine repair
  • Cooling system
  • Lubrication system
  • Supply system
  • Transmission
  • Clutch
  • Transmission
  • Chassis
  • Front suspension and wheels
  • Rear suspension
  • Steering
  • Brake system
  • Body
  • Exterior
  • Interior
  • Electrical equipment
  • Engine electrics
  • Equipment and devices


VAZ-11113 (1996-2003) 
  • General information
  • Introduction to the guide
  • User manual
  • Maintenance
  • Power unit
  • Engine repair
  • Cooling and lubrication system
  • Fuel system
  • Exhaust system
  • Transmission
  • Car gearbox
  • Clutch and drive shafts
  • Chassis
  • Front suspension
  • Rear suspension
  • Steering
  • Brake system
  • Body
  • Exterior
  • Interior
  • Doors and locks
  • Electrical equipment
  • Equipment and devices
  • Lighting and signaling
  • Engine electrics
  • Ignition system


VAZbook.ru © 2017 · Mobile version · Contact with administration · Sitemap: EN BG BY UA RS HR RO PL SK HU · Site search · News and articles VAZ-1111 · VAZ-11113 · VAZ-2101 · VAZ-21011 · VAZ-2104 · VAZ-2105 · VAZ-21051 · VAZ-2106 · VAZ-21061 · VAZ-2107 · VAZ-21099 · VAZ-2109 · VAZ-2108 · VAZ-2110 · VAZ-2112 · VAZ-2114 · VAZ-2115 · VAZ-2121 · VAZ-21213 · VAZ-21214 ·
The site stores technical data using cookies to improve the service.