




Place the car on a lift or inspection pit and apply the parking brake. Disconnect the wire from the negative terminal of the battery and remove the spare wheel. Raise the car, remove the engine mudguards and drain the coolant from the radiator and cylinder block by opening the heater valve and unscrewing the drain plugs on the radiator and cylinder block (just two plugs) and remove the expansion tank cap. Remove the clamp of the muffler inlet pipe and disconnect it from the muffler pipe by unscrewing the bolts that tighten the pipe flanges.
Lower the car and remove the air filter, disconnecting the crankcase ventilation system hoses from the cylinder head cover and from the carburetor, as well as the warm air supply hose from the air filter thermostat. Close the carburetor with a technological plug.
Disconnect the wires from the spark timing sensor, from the carburetor and from the coolant temperature gauge sensor. Remove the high-voltage wires.
Loosen the clamps and disconnect the hoses from the thermostat that go to the radiator, to the coolant pump and to the expansion tank, and disconnect the supply hose of the heater radiator from the heater pipe on the front shield. Disconnect the fuel supply hose from the fuel pump, and disconnect the coolant outlet hose and the vacuum take-off hose to the brake booster from the inlet pipe.
Disconnect the throttle and air valve drive cables from the engine. Unscrew the fastening nuts and disconnect the muffler intake pipe from the cylinder head.
Remove the windshield washer reservoir, then the front timing belt cover and cylinder head cover.
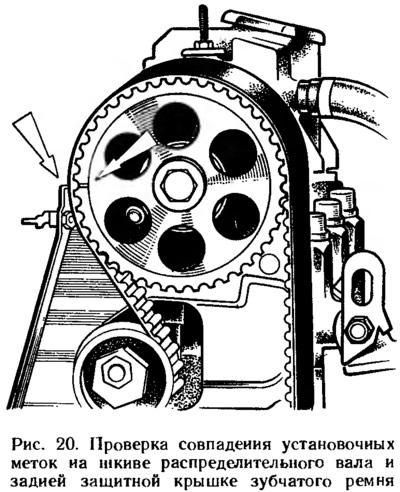
Set the gearshift lever to neutral so that the mark on the camshaft pulley is aligned with the timing mark on the rear timing belt cover (figure 20). This operation is necessary to ensure that the camshaft pulley is correctly positioned in relation to the crankshaft when installing the cylinder head on the engine.
Loosen the axle mounting nut 7 (see figure 7) tension roller and remove the axle together with the roller and spacer ring. Then remove the belt from the camshaft pulley.
Holding the camshaft pulley from turning with device 67.7811.9513 or some lever with grips on the pulley holes, unscrew the mounting bolt and remove the pulley with the key.
Loosen the nuts securing the generator to the tension bar and the front engine mount bracket and disconnect the tension bar from the cylinder head.
Loosen the nut that secures the rear toothed belt cover to the cylinder head and the bolt that secures the cover to the cylinder block. Loosen the mounting bolts and remove the head together with the carburetor, fuel pump and spark timing sensor. Remove the cylinder head gasket from the block.
Install the cylinder head in the reverse order, following the recommendations set out in section. "Engine assembly". The gasket between the head and the cylinder block cannot be reused, so it is replaced with a new one.
If the cylinder head mounting bolts have stretched out (the length of the bolt shank exceeds 135.5 mm), then they are replaced with new ones. The threads and bolt heads are lubricated in advance by dipping them in engine oil and allowing the excess oil to drain. In addition, the oil is removed from the holes (if it got there) under the bolts in the cylinder block.
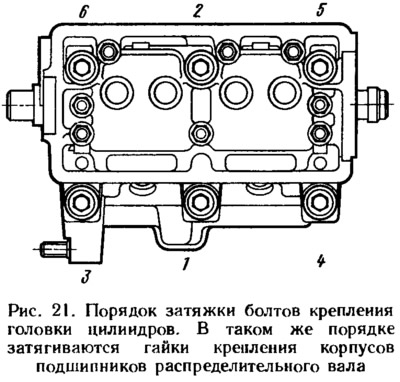
The bolts are tightened in a specific sequence (figure 21). To ensure a reliable seal and to avoid tightening the bolts during vehicle maintenance, the cylinder head mounting bolts are tightened in four stages:
- 1st step - torque 19.6 Nm;
- 2nd step - torque 69.6-85.3 Nm;
- step 3: Tighten the bolts by 90°;
- step 4: Turn all the bolts 90° again.
(Information copied from the portal: VAZbook.ru)
After installing the cylinder head, check and adjust the valve clearance, tension of the camshaft and generator drive belts, carburetor drive and ignition timing.