




If the rubber-metal hinges of the lever and tensioner are worn out, damaged or destroyed, they are pressed out. To press out the rear tensioner hinge, screwdriver-type mandrels are used, and to press in, a tubular mandrel with a diameter of 42 and 45 mm is used (stepped). The lever hinge and the front tensioner hinge are pressed out using devices 67.7823.9535 (∅ 48 mm) and 67.7823.9540 (∅ 45 mm), respectively - Figure 92.
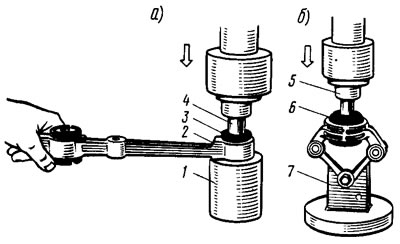
Figure 92. Pressing out rubber-metal hinges from the suspension arm (a) and the tie rod mounting bracket (b): 1 - device bushing; 2 - suspension arm; 3. 6 - rubber-metal hinges; 4, 5 - mandrels; 7 - fixture 67.7823.9540
The hinges of the stretcher and the lever are pressed into the press using the same mandrels (figure 93). In this case, before pressing, generously lubricate the hinge sockets and their outer surface with washer fluid*. This will facilitate pressing the hinges and protect them from damage. When pressing the front tie rod hinge into the bracket, install it with the marked part facing outward.
* An aqueous solution of triethanolamine soap of oleic acid and soap fraction of fatty acids.
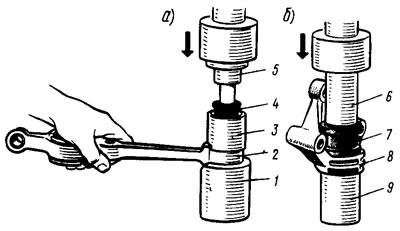
Figure 93. Pressing in the rubber-metal hinges of the suspension arm (a) and the tie rod mounting bracket (b): 1, 9 - support bushings; 2 - suspension arm; 3 - guide bushing; 4.7 - rubber-metal hinges; 5, 6 - mandrels; 8 - Stretch bracket
When assembling the lever with the tensioner, install the removed adjusting washers in place so that the chamfers on them are facing the thrust end of the tensioner. Before tightening the tensioner nuts 1 (figure 94), install lever 2 assembled with a stretcher on a special device; applying force to the tension rod, set a distance of 10 mm between the axis of the lever and the center of the tension rod and fix the tension rod. In this position, tighten the tension rod fastening nut with a torque of 16.3-18 kgf·m. Then remove the lever assembly from the device and install adjusting washers on the other end of the tension rod, observing the rules for their installation. After this, secure the bracket with a nut, tightening it with the torque specified in Appendix 1.
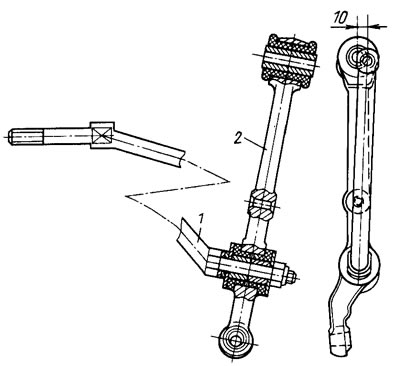
Figure 94. Assembly of the suspension arm with a tie rod