Contents: Telescopic stand ↓ Suspension arms ↓ Ball joints ↓ Anti-roll bar ↓ Suspension springs ↓ Stretcher and rubber-metal hinges ↓ Upper support of the telescopic stand ↓
Telescopic stand
Wash all parts with gasoline or kerosene and dry them. Check that the parts meet the following requirements:
- the compression and rebound valve discs, as well as the relief valve plate, must not be deformed; non-flatness of the bypass valve plate is allowed to be no more than 0.05 mm;
- the working surfaces of the piston, piston ring, guide sleeve, rod, cylinder, recoil buffer plunger and valve parts must be free of burrs, dents and wear marks that could affect the normal operation of the strut;
- the working edges of the seal must be free from damage and wear;
- no scratches, burrs or peeling of the fluoroplastic layer on the rod guide bushing are allowed;
- the springs of the rebound and compression valves, as well as the plungers of the recoil buffer, must be intact and sufficiently elastic;
- the inner surface of the rack housing must be clean, without scratches and damage, the threads must be in good condition; check the tightness of the rack housing with air under a pressure of 3 kgf/cm²;
- the rack body, bracket, spring cup and pivot arm must not have any deformations or damages;
- the compression buffer and protective cover must not be damaged.
Welding (welding) of the rack is not allowed, as this may affect the change in wheel alignment angles and the performance of the rack.
Suspension arms
The deformation of the suspension arms is determined by the device 67.7851.9508. The arm assembled with the ball joint is installed so that the mandrel for centering articulates with the cone of the arm ball joint pin, and the installation pins of the device enter the middle and outer holes of the arm. A sign of deformation is the impossibility of inserting the installation pins into the arm hole without force or poor articulation of the mandrel with the cone of the joint pin.
Ball joints
Make sure that the hinge covers are intact. Tears, cracks, rubber peeling off from the metal reinforcement, traces of grease leaking through the cover are unacceptable. Minor grease squeezing out through the sprue hole in the ball joint housing is allowed.
Check for wear on the working surfaces of the ball joints by manually turning the ball pin. Significant (over 0.5 mm) play in the pin and its seizure are unacceptable. An accurate check of the condition of the ball joint by the size of the radial and axial clearance is carried out on the device 32.8701.9502. For this, a steam joint 1 is installed (figure 95, a) into the socket of the device and tighten it with a screw. Install indicator 2 in the bracket of the device so that its leg rests against the side surface of the hinge housing, and the indicator arrow is at zero.
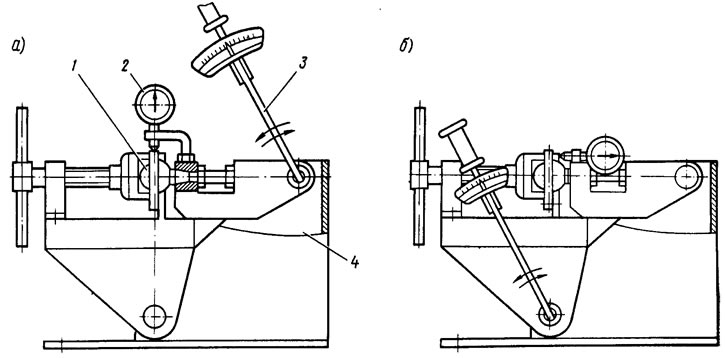
Figure 95. Checking the ball joint with fixture 02.8701.9503
Install torque wrench 3 in the upper socket of the device and, applying a torque of 20 kgf·m alternately in both directions, determine the total radial clearance in the ball joint using the indicator. If it exceeds 0.5 mm, replace the joint with a new one.
The axial clearance in the ball joint is checked in a similar manner, having first changed its fastening in the device, as shown in Figure 95, b. The axial clearance in the joint is also allowed to be no more than 0.5 mm.
Anti-roll bar
They check whether the bar is deformed and whether its ends are in the same plane; if the deformation is minor, straighten the rod; if it is significantly deformed, replace it. Check the condition and integrity of the cushions in the rod brackets. If worn or damaged, replace the cushions. Check the deformation of the stabilizer struts with a gauge; if the gauge fingers do not fit into the holes in the stand, replace it.
Suspension springs
Carefully inspect the springs. If cracks or deformation of the coils are detected, replace the spring with a new one. To check the spring settlement, press it three times until the coils touch, then apply a force of 325 kgf to the spring. Spring height H (figure 96) under such a load should be at least 201 mm. The compression of the spring is carried out along its axis; the support surfaces must match the surfaces of the support cups on the telescopic stand. If the spring with the yellow marking (class A) is longer than 207 mm, change its marking to green (class B).
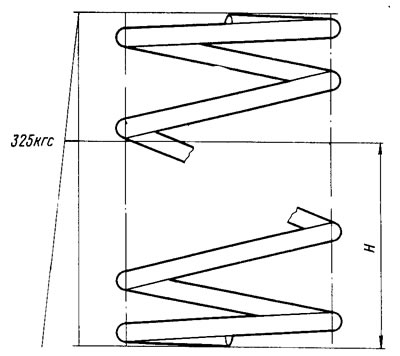
Figure 96. Parameters for checking spring shrinkage
Stretcher and rubber-metal hinges
The deformation of the stretchers is determined by the device 67.7851.9509. In case of minor deformation, the stretcher is straightened on a press. If straightening is impossible, the stretcher is replaced with a new one.
The signs by which the need to replace the joints is determined are described above in the section "Determining the technical condition of the suspension parts on a vehicle".
Upper support of the telescopic stand
The elastic characteristics (settlement) of the upper support are checked by applying a force of 700 kgf to the bearing (figure 97) support and measuring the distance A from the end of the bearing to the end of the outer support housing. This distance should not exceed 27 mm. Otherwise, replace the support with a new one.
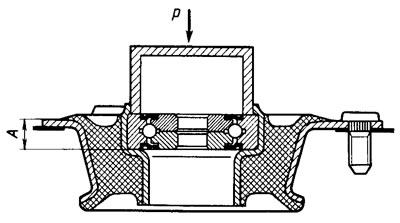
Figure 97. Checking the elastic deformation (settlement) of the upper support
Make sure that the bearing has no axial movement in the support housing. No corrosion, damage or seizure of the bearing due to wear is allowed. In these cases, replace the bearing with a new one. Check the condition of the support housing. No rubber peeling, tears or cracks are allowed.
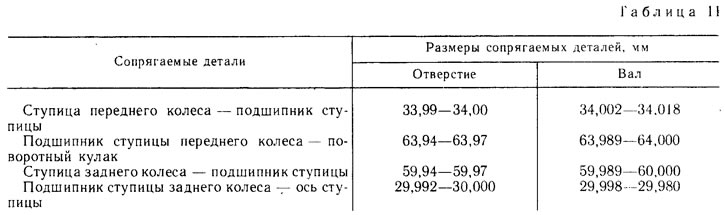
The dimensions of the main mating parts are given in Table 11.