




Place chocks under the rear wheels and remove the front wheels.
Puller 67.7824.9516 (fig. 5-10) press the pins out of the steering knuckle arms and move the steering rods to the sides.
Disconnect the stabilizer bar 6 (Fig. 4-6) from the lower suspension arms.
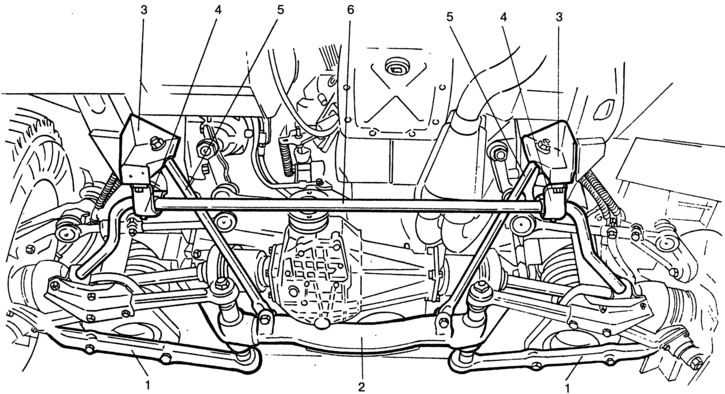
Fig. 4-6. Front suspension installed on the vehicle (rear view):
1 - lower arm; 2 - crossbar; 3 - brace mounting bracket; 4 - bracket for fastening the stabilizer bar to the body; 5 - stretching; 6 - crossbar stabilizer bar.
Disconnect the stretchers 5 from the body brackets and crossmember.
Disconnect the shock absorbers from the lower suspension arms.
Remove the engine sump and mudguard protective plate.
Remove the front brake caliper from each side without disconnecting the brake hoses and hang it up so that the caliper is not hanging by the hoses.
Compress the suspension spring until the lower arm is completely unloaded.
Disconnect the ball joint from the lower arm and remove the spring, smoothly unloading it, repeat the operations for the other suspension unit.
Disconnect axle 49 (fig. 4-1) the upper arm from the bracket 7 of the suspension cross member and remove the upper arm 46 complete with the steering knuckle, wheel hub, front brake and outer joint housing.
Note: When removing the upper arm axle, it is necessary to mark the number and location of the washers between the upper arm axle and the cross member, as well as the adjusting plates between the cross member and the body side member, so that when installing the units, the washers and plates are put back in their original place.
Disconnect the engine mount rubber mounts from the crossmember brackets.
Place a hydraulic jack with a crossmember fixing device under the suspension crossmember and, supporting the engine with a 67.7820.9514 crossmember or hoist, disconnect the 47 rebound buffer bracket and the suspension crossmember from the body side member.
Remove cross member 1 together with lower arms 4.
Suspension units and parts should be installed in the reverse order of removal. Only one class of springs are installed on the suspension. Class "A" may be unmarked or have white paint markings on the outer side of the spring coils, class "B" - with black markings. It is permissible to install class "A" springs on the front suspension if class "B" springs are installed on the rear suspension.
After assembling and installing the suspension, check the wheel alignment and toe-in angles.