




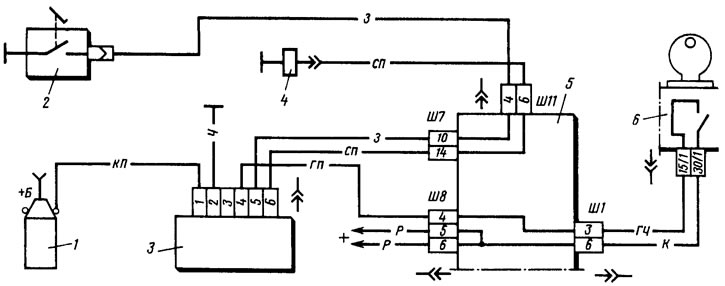
Figure 155. Wiring diagram of the carburetor electromagnetic valve control system: 1 - ignition coil; 2 - limit switch in the carburetor; 3 - control unit; 4 - electromagnetic valve; 5 - mounting block (fragment); 6 - ignition switch (fragment)
The control unit can only switch off the valve if the carburetor limit switch 2 is closed, i.e. if the accelerator pedal is not pressed. If you press the pedal, the valve will not switch off (or turn on if it was turned off).
Before checking the control unit, you must make sure that the wires are connected to it correctly (see figure 155). The unit's performance is checked using a voltmeter (with a measurement range of 0-15 V) in the following order.
Disconnect the green wire from the carburetor limit switch and connect the tip of this wire to the body. Connect to the control unit. voltmeter 2 (figure 156) using a special adapter connector. Start the engine and, gradually increasing the rotation speed, monitor the voltmeter readings: after starting the engine, it should show a voltage of at least 10 V, and at the moment the valve is turned off, a sudden drop in voltage to 0.5 V (no more).
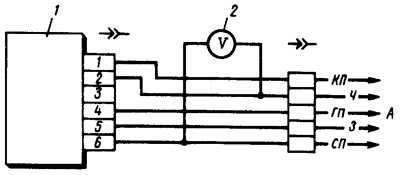
Figure 156. Carburetor electromagnetic valve control unit test diagram: 1 - control unit; 2 - voltmeter with adapter connector; A - to the vehicle's wire harness
Set the crankshaft speed to 2200-2300 rpm, disconnect the tip of the wire going to the carburetor limit switch from the housing, and then reconnect it to the housing. When disconnecting the wire from the housing, the valve should turn on, and when connected to the housing, it should turn off. After disconnecting the valve, gradually reduce the speed until the valve turns on. The voltmeter should show a sudden increase in voltage of at least 10 V.
It is permissible to check the control unit without a voltmeter by the characteristic knocking sound of the valve when turning it off and on.
The text is copied from the online portal VAZBOOK.ru