




After unscrewing the nuts, remove the rear cover of the gearbox housing and the sealing gasket. Remove the mounting rings from the bearings of the primary and secondary shafts. Remove the cover of the retainers and take out the springs and balls of the retainers from the sockets. Unscrew the plug and take out the parts of the reverse gear fork retainer. After unscrewing the bolt and nuts securing the gearbox housing to the clutch housing, remove the housing from the studs.
Having unscrewed the bolts securing the forks on the gearshift rods, remove the rods and forks. Remove the axle and remove the intermediate reverse gear. Then remove the primary and secondary shafts simultaneously (figure 67) from the roller bearings of the clutch housing. Remove the differential unit. Press out the outer bearing rings from the clutch housing using the A.70157 mandrel.
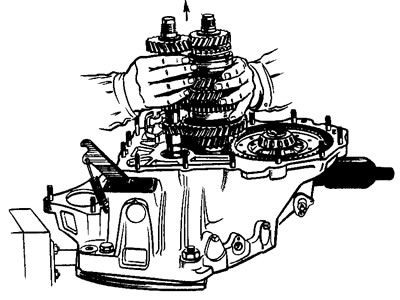
Figure 67. Removing the primary and secondary shafts
Having unscrewed the bolts of the gear selection mechanism (figure 68), remove it. Unscrew the screw securing the gear selector lever and remove it from the rod, and remove the rod from the clutch housing (figure 69). Unless necessary, do not remove the lever and joint from the gear selector rod, as the conical screws that secure them are installed with sealant.
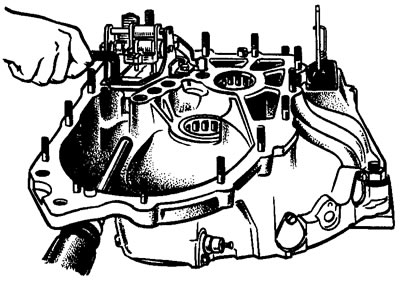
Figure 68. Removing the gear selection mechanism |
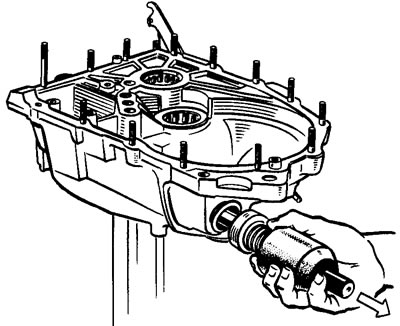
Figure 69. Removing the gear selector rod |
If it is necessary to disassemble the secondary shaft, clamp it in a vice with soft metal pads, and then, having unscrewed the nut, press the ball bearing off the shaft with a universal puller. Similarly, press the bearing off the primary shaft. Then remove the driven gears of the IV, III, II and I gears and the synchronizer parts from the secondary shaft in the order shown in Figure 70. Remove the synchronizer clutch hubs on a press or with puller A.40005/1/6. It is not recommended to press the hubs off the shaft unless necessary, so as not to reduce the tension in the splined connection; it is also not recommended to press out the oil seals from the crankcase unless they are damaged.
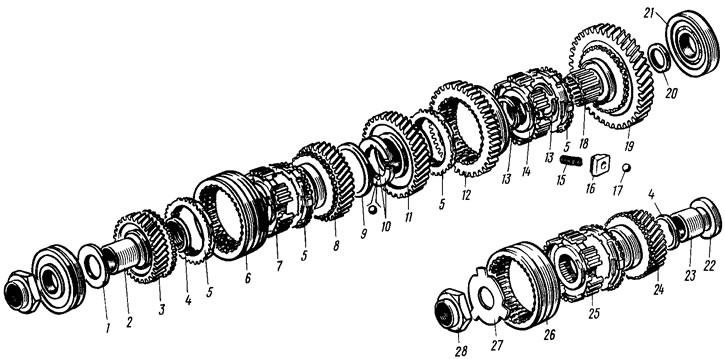
Figure 70. Secondary shaft parts (marked with "*" - only for five-speed gearbox): 1 - thrust washer; 2 - bearing sleeve; 3 - 4th gear pinion; 4 - bearing spacer ring; 5 - synchronizer locking ring; 6 - sliding clutch of synchronizer III and IV gears; 7 - sliding clutch hub; 8 - gear of the 3rd gear; 9 - retaining ring; 10 - secondary shaft thrust half rings; 11 - 2nd gear pinion; 12 - sliding clutch of synchronizer of 1st and 2nd gears; 13 - synchronizer hub retaining ring; 14 - hub of the sliding clutch of the synchronizer of the 1st and 2nd gears; 15 - synchronizer spring; 16 - cracker; 17 - retainer; 18 - needle bearing; 19 - 1st gear pinion; 20 - thrust washer; 21 - cylindrical roller bearing; 22* - thrust washer; 23* - bearing sleeve; 24* - V gear; 25* - sliding clutch hub; 26* - sliding clutch of the 5th gear synchronizer; 27* - thrust plate; 28 - nut
The differential is disassembled, for which:
- if it is necessary to replace the driven gear of the main transmission, unscrew its mounting bolts and press out gear 6 (figure 71) from the box 4 differentials;
- remove the retaining ring from the axis 1 of the satellites and press out the axis. Then remove the half-axle gears 2 and the satellites 5 from the differential box. If necessary, press out the bearings from the differential box using the stop 67.7853.9582* and the universal puller, and the gear 3 of the speedometer drive.
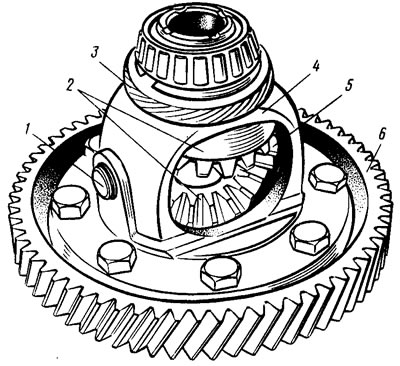
Figure 71. Differential assembly
* Stepped cylindrical stop ∅ 30 mm with centering shank ∅ 27.3 mm.
If necessary, disassemble the gear selection mechanism, for which unscrew the axle mounting nut 4 (figure 72) gear selection lever and remove retaining rings 6 from axis 7 of the reverse fork and from axis 3 of the locking brackets, remove fork 10 of the reverse gear, the gear selection lever assembled with the locking bracket, axis 4 of the lever and spring 5.
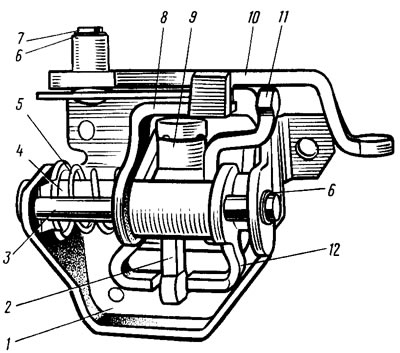
Figure 72. Gear selection mechanism assembly: 1 - gear selection mechanism housing; 2 - gear selection lever (forward running); 3 - guide axis of the locking brackets; 4 - gear selector lever axis; 5 - spring; 6 - retaining ring; 7 - reverse fork axle; 8 - locking bracket (lower part); 9 - gear selector lever lock; 10 - reverse gear fork; 11 - gear selection lever (reverse); 12 - locking bracket (upper part)
If necessary, remove the speedometer drive by unscrewing its mounting nut and, holding the driven gear shaft, removing the speedometer drive.
The material is posted on the online resource (VAZbook.ru)
The methods of work, the order of disassembly (assembly) of the five-speed gearbox are similar to those described above, but before removing the primary and secondary shafts, do the following: after removing the rear cover, lock the primary shaft with device 41.7816.4070 and unscrew the nuts from the primary and secondary shafts, then unscrew the bolt securing the 5th gear fork on the rod and press the 5th gear synchronizer together with gear 2 from the splines of the secondary shaft with a universal puller (see figure 64) and a fork. Then press gear 8 off the primary shaft and use an impact drill-screwdriver to unscrew the screws securing the thrust plate 9 and remove the bearing mounting rings.