
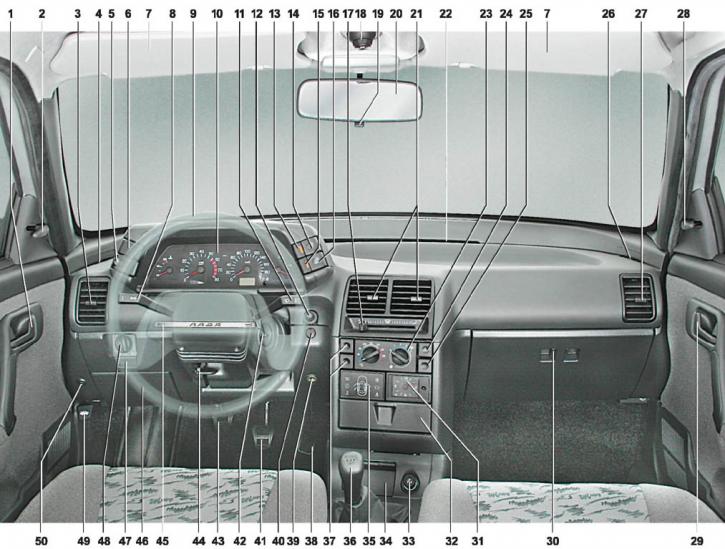
1, 29 - door handle from the salon.
2, 28 - handle for adjusting the outside rear-view mirror.
The handle allows you to change the position of the mirror from the passenger compartment. Some of the cars are equipped with electric mirrors.
3, 27 - side ventilation grilles. For more details, see "Central ventilation grilles" (pos. 21)
4, 26 - ventilation grilles for blowing glass doors. The grilles direct the air flow to the windows of the front doors, which prevents them from fogging and freezing.
5 - switch key for lighting and headlights.
The switch key has three positions: I - off; II the side light lamps, the backlight lamps for control devices and the switch keys are turned on; III - side light lamps and headlight lamps are on.
6 - plug. On some cars, a fog light switch is installed in this place. The headlights turn on when the outdoor lighting is on, at the same time the fog lamp indicator lamp, installed next to the switch button, lights up.
7 - sun visor. The visor is mounted on a swivel joint. If necessary, it can be deployed to the door to protect from side sunlight.
8 - left shifter lever. The switch is designed to turn on the direction indicators and switch the headlights. When moving the lever from the middle position up, the right direction indicators are turned on, when moving down, the left ones. If the lever is moved to the extreme position until it stops, then it is fixed in this position. At the end of the turn, the lever automatically returns to the middle position (if the steering wheel has been turned 90°or more). When it is required to give a short signal with the turn signal (for example, when rebuilding), the lever can be slightly deflected from the middle position - the direction indicators will work as long as the lever is held in this position. The direction indicators only work when the ignition is on.
Pushing the lever forward will switch the headlights from low beam to high beam and the high beam warning lamp in the instrument cluster will illuminate. The lever is locked in this position. To switch the headlights from high beam to low beam, the lever must be returned to its original position. If it is necessary to signal with high beam headlights, the lever must be pulled towards you - in this position, the lever is not fixed. A light signal can be given at any position of the external lighting switch key and the key in the ignition lock.
9 - steering wheel. Steering wheel position can be changed (pos. 44).
10 - instrument panel (see below for details).
11 - right steering column switch. The switch is designed to control the operation of the windshield wipers and washers. The switch lever has five positions in the vertical plane:
- I - wipers and washers off (fixed position);
- II - windshield wiper on (non-fixed position). The mode is intended for short-term activation of the wiper - the brushes will make three full strokes and stop.
- III - the windshield wiper is on in intermittent mode (fixed position).
- IV - the windshield wiper is on in continuous mode at low speed (fixed position).
- V - the windshield wiper is on in continuous mode at high speed (fixed position).
When moving the lever towards you (not fixed position) the windshield washer is turned on. Fluid will be applied to the glass as long as the lever is held in this position. If the washer is turned on with the lever in position I or II, the windshield wiper will automatically turn on in continuous mode. After releasing the lever, the brushes will make another three or four full strokes.
On station wagon and hatchback vehicles, the right stalk lever has two more positions. Moving the lever away from you will turn on the rear window wiper (fixed position). The brush will make four full strokes and the wiper will switch to intermittent operation. When moving the lever away from you until it stops (not fixed position) the tailgate glass washer is switched on. Fluid will be applied to the glass as long as the lever is held in this position and the wiper will operate continuously.
12 - instrument lighting control knob. By turning the knob, you can adjust the brightness of the instrument panel lights.
13 - control lamp for turning on the rear fog lights. Illuminates when the rear fog lamps are turned on.
14 - rear fog lamp switch button. The fog lights can only be turned on when the outside lights are on by pressing the switch button. When the rear fog lights are on, the indicator lamp will be on (pos. 13). The lights are turned off by pressing the button again.
15 - control lamp for turning on the rear window heating. Lights up when the heated rear window is turned on.
16 - rear window heating switch button. Rear window heating is only available when the ignition is on. When you press the switch button, the control lamp will light up and current will flow through the heating element glued to the rear window. The element will heat the glass, preventing it from freezing or fogging. The heated rear window is switched off by pressing the button again.
17 - control lever for the air distributor dampers. By moving the lever, you can direct the air flow to the windshield, to the feet of the driver and passengers and to the upper part of the cabin (see 2.3, pos. 10).
18 - lantern for individual lighting. The lantern allows you to adjust the direction of the light. The lantern is turned on and off by turning its diffuser around its axis.
19 - rear-view mirror control key (switch "day Night"). To prevent the headlights of cars moving in the same direction from dazzling the driver through the rear-view mirror, it is necessary to move the button to the front position.
20 - interior rear-view mirror.
21 - central ventilation grilles. Designed to change the direction of the air flow that has passed through the filter element of the interior ventilation system and the heater. It is possible to shut off the air flow through the grille by turning its vertical guide plates across the airflow.
22 - ventilation grill for blowing the windshield. Directs the flow of air coming through the heater to the windshield. The intensity of the air flow is regulated by the air damper control lever (pos. 17).
23 - heater control unit. For more details, see "Onboard control system display unit, immobilizer and heater controls".
24 - alarm switch button. Pressing this button will intermittently turn on all direction indicators and the hazard warning lamp on the instrument panel. The alarm will work both when the ignition is on and when the ignition is off.
25, 37 - plugs. Reserve places for installation of switches of the additional equipment.
30 - glove box cover.
31 - hours. On some cars, a trip computer can be installed here.
32 - niche cover. Designed for installation of a car radio or other head unit of an audio system.
33 - cigarette lighter. To turn on the cigarette lighter should be sunk into the socket to a fixed position. After heating the coil, the cigarette lighter automatically moves out of the socket a little.
Warning! To avoid fire, do not hold the cigarette lighter in the pressed position.
34 - ashtray cover. To clean the ashtray, remove it from the lid by pulling it upwards.
35 - display unit of the onboard control system. For more details, see "Onboard control system display unit, immobilizer and heater controls".
36 - gear lever. The gear shift diagram is printed on the lever handle. The gearshift drive mechanism has a lock against erroneous engagement of the reverse gear instead of the first gear. To engage reverse gear, you must first press the lever from above and then move it to the left and forward until it stops.
38 - pedal "gas".
39 - socket for connecting a portable lamp.
40 - immobilizer sensor with indicator. The immobilizer blocks the engine from starting without using the electronic key supplied with the car. To disarm, you need to bring the black key to the sensor. The sensor has an LED - an indicator that informs the driver about the state of the electronic anti-theft system (see 2.3, item 9). If the immobilizer is not activated, then with the doors closed and the ignition off, the LED will flash twice per second.
41 - brake pedal.
42 - ignition switch lock (egnition lock). You can turn on the ignition only with the key supplied with the car. The lock has three fixed positions:
- 0 - "turned off". The ignition is turned off, while the alarm, radio, light and sound alarms, brake signals, electric drives for the trunk lid lock and side door locks can work. The key can only be removed from the lock in this position. Removing the key will activate the mechanical anti-theft device. If you try to turn the steering wheel, the steering shaft will lock.
- I - "included". The ignition is on, and you can turn on various electrical equipment that works without starting the engine.
- II - "starter". The ignition and starter are on. The position is not fixed, intended for short-term engagement of the starter to start the engine.
Warning! To avoid discharging the battery, do not leave the key in position I for a long time when the engine is not running
Warning! To avoid damage to the starter, do not hold the key in this position after starting the engine.
43 - clutch pedal.
44 - lever of the mechanism for fixing the column of the steering shaft. To put the steering wheel in a comfortable position, you need to lower the lever. After adjusting the angle of the steering column, the lever should be returned to its original position.
Warning! Do not adjust the steering column angle while the vehicle is moving
45 - steering wheel pad (horn button). To give a sound signal, press the overlay.
46 - cover of the fuse and relay mounting block. To access the fuses and relays in the mounting block, press the button to open the cover (pos. 47).
47 - button for opening the cover of the fuse and relay mounting block.
48 - headlight hydraulic corrector control knob. The handle is designed to adjust the angle of the headlight beam from the driver's seat when the vehicle load changes. Adjustment ensures the correct illumination of the road with low beam headlights (reduces the risk of dazzling oncoming drivers).
49 - lever for opening the hood lock. To open the hood lock, the lever must be pulled up.
50 - electric cover lock button (or doors) baggage compartment. Pressing the button will open the lid lock (doors) baggage compartment.