
English Русский
Български
Беларускі
Український
Српски
Hrvatski
Română
Polski
Slovenský
Magyar
| Articles | Contacts | Sitemap |   
Repair and maintenance Lada Repair and maintenance Mazda Repair and maintenance Mitsubishi Repair and maintenance Toyota Repair and maintenance Land Rover Repair and maintenance Hyundai Repair and maintenance Nissan
VAZbook.ru


Main     1111   2101   2105   2106   2107   2109   2110   2115   2121  
VAZ-2114 (2004-2013) VAZ-2115 (1997-2012)
  • Main
  • «Samara-2»
  • VAZ-2114
  • Power unit
  • Engine repair
  • Cylinder head — removal and installation

Cylinder head — removal and installation (VAZ-2114)

            0

Contents: Removal ↓ Installation ↓
The cylinder head is removed for its repair, for replacing the head gasket, and also during major engine repairs.

Removal


1. Prepare the vehicle for work and disconnect the wire terminal from the negative terminal of the battery (see "Preparing the car for maintenance and repair").

2. Drain the coolant from the engine (see "Coolant - replacement").

3. Remove the air filter (see "Air filter - removal and installation").

4. Remove the intake manifold and exhaust manifold from the engine (see "Intake manifold and exhaust manifold gasket - replacement").

Note: If necessary, the cylinder head can be removed together with the fuel system components and the exhaust manifold.


5. Remove the cylinder head cover (see "Cylinder Head Cover Gasket - Replacement").

6. On engines with phased fuel injection disconnect the wiring block from the camshaft position sensor (see "Camshaft Position Sensor - Checking and Replacing").

7. Disconnect the wire ends from the coolant temperature sensor (see "Coolant Temperature Sensor - Checking and Replacing"). For ease of operation, disconnect the wiring harness connector from the knock sensor (see "Knock sensor - testing and replacement") and move the sensor wiring harness to the side.

8. Disconnect the wire tip from the coolant temperature gauge sensor (see "Coolant Temperature Gauge Sensor - Checking and Replacing").

9. With a socket wrench by 13 mm we unscrew the nut that secures the ground wire to the engine and remove the wire tip from the stud.
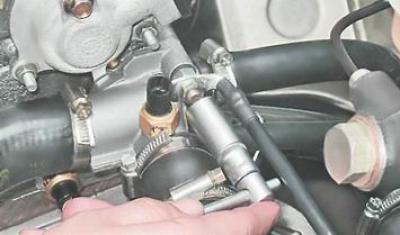


9. With a socket wrench by 13 mm we unscrew the nut that secures the ground wire to the engine and…


10. With a socket wrench by 13 mm we unscrew the two nuts securing the pipe.
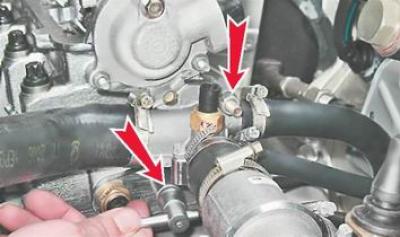
10. With a socket wrench by 13 mm we unscrew the two nuts securing the pipe.


11. Remove the pipe from the cylinder head studs and, without disconnecting the hoses, move it to the side.

12. Remove the sealing gasket from the studs.
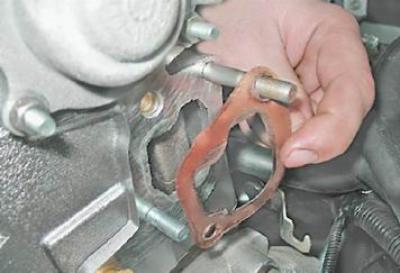
12. Remove the sealing gasket from the studs.


13. Remove the camshaft pulley (see "Camshaft Seal - Replacement").

14. Unscrew the nut and bolt of the upper fastening of the rear timing belt cover (see "Coolant pump - replacement").


15. Remove the oil level indicator.

16. With a socket wrench Torx E14 using a narrow head, unscrew the ten cylinder head mounting bolts.
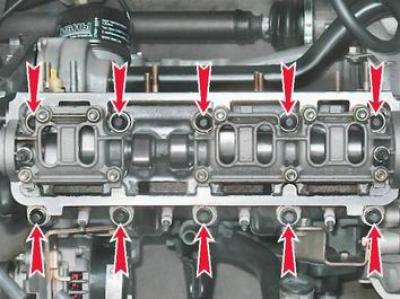
16. With a socket wrench Torx E14 using a narrow head, unscrew the ten cylinder head mounting bolts.


Tip: Some of the cylinder head mounting bolts can only be removed with a socket wrench with a narrow head. If you don't have such a wrench, remove the camshaft (see "Camshaft - removal and installation") and only after that unscrew the cylinder head mounting bolts.


17. Pulling the rear timing belt cover slightly to the side, remove the cylinder head.
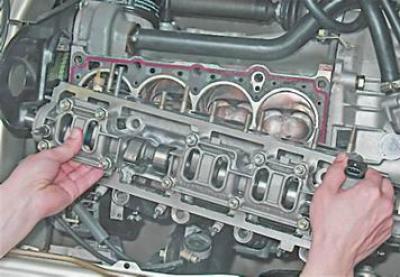
17. Pulling the rear timing belt cover slightly to the side, remove the cylinder head.


18. Remove the cylinder head gasket.
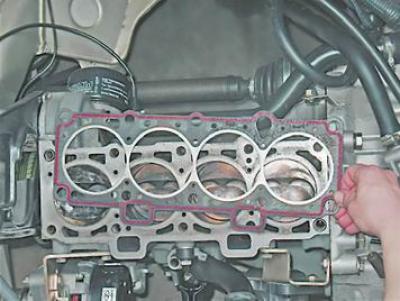
18. Remove the cylinder head gasket.


19. Remove two guide bushings.
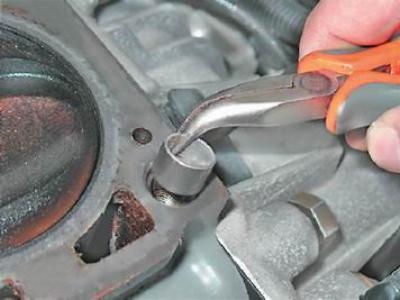
19. Remove two guide bushings.


Installation


1. We flush the cylinder head from dirt and deposits with kerosene or diesel fuel.

2. Remove from the threaded holes of the cylinder block (under the cylinder head mounting bolts) oil and coolant residues.
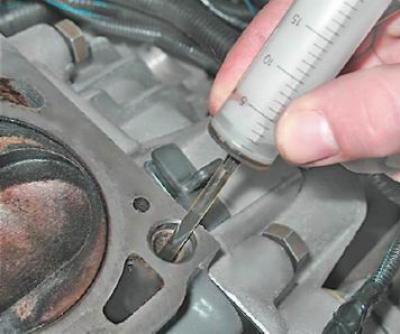
2. Remove from the threaded holes of the cylinder block (under the cylinder head mounting bolts)…


3. Clean the mating surfaces of the head and cylinder block from the remains of the old gasket, degrease the surfaces with solvent.

Warning! Always use a new gasket when installing the cylinder head. Do not allow oil to come into contact with the gasket surface.


4. Install the head guide bushings into the cylinder block mounting holes.
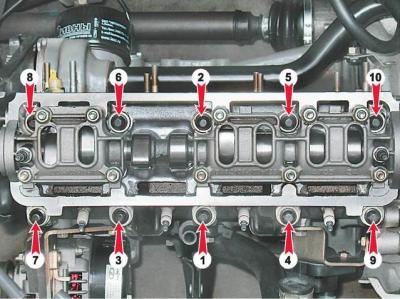
4. Install the head guide bushings into the cylinder block mounting holes.


Cylinder head bolt tightening sequence

5. Place the gasket on the cylinder block, while the guide bushings should enter the corresponding holes of the gasket.

6. Install the head on the cylinder block. Slightly moving the head from side to side, we ensure that the guide bushings enter the corresponding holes in the head.

Warning! Reuse of cylinder head bolts is permitted only if their length does not exceed 135.5 mm.


7. Using a caliper or a mechanic's ruler, measure the length of the bolts. Replace bolts longer than 135.5 mm.
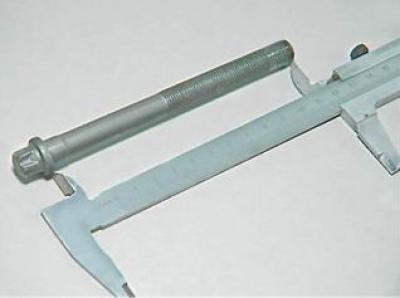
7. Using a caliper or a mechanic's ruler, measure the length of the bolts. Replace bolts longer…


8. Before tightening, dip the threaded part of the bolts in engine oil, then let the oil drain, waiting about half an hour.

9. Install bolts with washers into the head holes.

10. Using a torque wrench, tighten the head mounting bolts (in the sequence shown in the photo) in four steps:
  • tighten the bolts to a torque of 20 Nm (2 kgf·m);
  • tighten the bolts to a torque of 69.4-85.7 N·m (7.1-8.7 kgf·m);
  • we turn the bolts by 90°;
  • we turn the bolts 90° again.

11. Further assembly is carried out in reverse order.


This article is available at russian, bulgarian, belarusian, ukrainian, serbian, croatian, romanian, polish, slovak, hungarian
The text was reviewed by the specialist: Grigory Vologodtsev

Share with friends:

Previous articles
VAZ-2114: Engine repair
Next articles

Valve stem seals — replacement
Camshaft — Removal and Installation
Adjusting the clearances in the timing drive valves
Cylinder Head Cover Gasket — Replacement
Intake manifold and exhaust manifold gasket — replacement
Cylinder head — check
Valves — lapping
Flywheel — removal and installation
Rear Crankshaft Oil Seal — Replacement
Engine Oil Pan — Gasket Replacement

More articles from other manuals on VAZ cars:
➠ Replacing the cylinder head gasket VAZ-11113 (1996-2003)
➠ Parting plane with cylinder head VAZ-21011 (1974-1983)
➠ Cylinder head design VAZ-2105 (1979-2010)
➠ Cylinder Head Cover Gasket — Replacement VAZ-2106 (1976-2006)
➠ Cylinder Head Cover Gasket — Replacement VAZ-2107 (1982-2012)
Link in different formats to this page


Visitor comments

No comments yet


How much will 20 + 43 ?


VAZ-2114 (2004-2013) 
  • General information
  • Operation and maintenance
  • Power unit
  • Engine repair
  • Cooling system
  • Supply system
  • Control system
  • Exhaust system
  • Transmission
  • Clutch
  • Car gearbox
  • Front wheel drives
  • Chassis
  • Wheels and tires
  • Front suspension
  • Rear suspension
  • Steering
  • Brake system
  • Body
  • Exterior
  • Interior
  • Doors and glass
  • Tailgate
  • Ventilation and heating
  • Electrical equipment
  • Equipment and devices
  • Headlights and lighting
  • Engine electrics
  • Electrical circuits


VAZ-2115 (1997-2012) 
  • General information
  • Vehicle device
  • Operation manual
  • Vehicle malfunctions
  • Car care
  • Power unit
  • Engine repair
  • Cooling system
  • Supply system
  • Control system
  • Exhaust system
  • Transmission
  • Clutch
  • Car gearbox
  • Front wheel drives
  • Chassis
  • Front suspension
  • Rear suspension
  • Steering
  • Brake system
  • Body
  • Exterior
  • Interior
  • Doors, covers and windows
  • Electrical equipment
  • Equipment and devices
  • Headlights and lighting
  • Engine electrics
  • Anti-theft system


VAZbook.ru © 2017 · Mobile version · Contact with administration · Sitemap: EN BG BY UA RS HR RO PL SK HU · Site search · News and articles VAZ-1111 · VAZ-11113 · VAZ-2101 · VAZ-21011 · VAZ-2104 · VAZ-2105 · VAZ-21051 · VAZ-2106 · VAZ-21061 · VAZ-2107 · VAZ-21099 · VAZ-2109 · VAZ-2108 · VAZ-2110 · VAZ-2112 · VAZ-2114 · VAZ-2115 · VAZ-2121 · VAZ-21213 · VAZ-21214 ·
The site stores technical data using cookies to improve the service.