
English Русский
Български
Беларускі
Український
Српски
Hrvatski
Română
Polski
Slovenský
Magyar
| Articles | Contacts | Sitemap |   
Repair and maintenance Lada Repair and maintenance Mazda Repair and maintenance Mitsubishi Repair and maintenance Toyota Repair and maintenance Land Rover Repair and maintenance Hyundai Repair and maintenance Nissan
VAZbook.ru


Main     1111   2101   2105   2106   2107   2109   2110   2115   2121  
VAZ-2121 (1977-1994) VAZ-21213 (1994-2006) VAZ-21214 (1994-2006)
  • Main
  • «Niva»
  • VAZ-2121
  • Electrical equipment
  • Equipment and devices
  • Removal the instrument panel

Removal the instrument panel (VAZ-2121)

            0

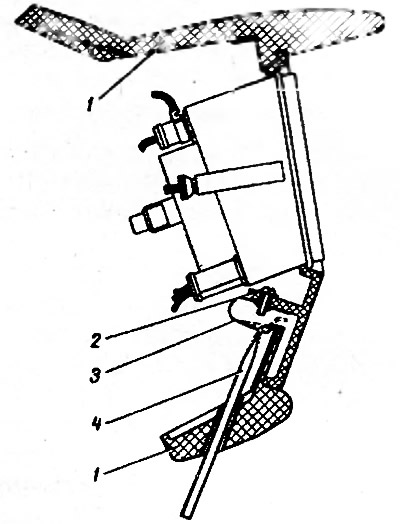
To remove the instrument panel to replace a faulty device or a burnt-out bulb, press the clamps 3 (Fig. 7-38) with the stitching 4 through the special holes in the lower part of the instrument panel, then disconnect the plug connections of the devices and disconnect the flexible shaft from the speedometer. The instrument lighting and signaling bulbs are removed from the lamp holders together with the sockets.

Fig. 7-38. Removing the instrument panel: 1 - instrument panel; 2 - instrument panel; 3 - bracket;…

Fig. 7-38. Removing the instrument panel: 1 - instrument panel; 2 - instrument panel; 3 - bracket; 4 - firmware


When removing the instrument cluster, pay attention to how the flexible shaft of the speedometer drive was routed, and when installing the cluster, position the flexible shaft along the previous route, avoiding shaft bends with radii less than 100 mm. The flexible shaft should not be intertwined with wire bundles, cables, and pipelines.

Before installing a new flexible shaft, it is recommended to apply consistent grease LSC-15 or LITOL-24 to the shaft casing over a length of 50 mm before and after the seal. The seal should be located at a distance of 450-550 mm from the upper end of the shaft. The lubricated shaft casing will slide easily in the seal and therefore a shaft loop will not form under the instrument panel when installing the instrument panel in place. After applying the grease, pull the shaft in the seal two or three times with an amplitude of 200-300 mm to rub the grease.

[The information can be read on the website: VazBook.ru]


This article is available at russian, bulgarian, belarusian, ukrainian, serbian, croatian, romanian, polish, slovak, hungarian
The text was reviewed by the specialist: Grigory Vologodtsev

Share with friends:

Previous articles
VAZ-2121: Equipment and devices
Next articles

Possible malfunctions of control devices, their causes and methods of elimination
Repair of heater electric motor
Possible malfunctions of the heater electric motor, their causes and methods of elimination
Headlight cleaner
Windscreen wiper relay test data
Methodology for troubleshooting devices
Checking the devices
Checking the sensors of control devices

More articles from other manuals on VAZ cars:
➠ Removal and installation the instrument panel VAZ-1111 (1988-1996)
➠ Instrument panel — device and removal VAZ-2101 (1970-1983)
➠ Instrument panel VAZ-2105 (1979-2010)
➠ Instrument panel VAZ-2106 (1976-2006)
➠ Instrument panel — removal and installation VAZ-2107 (1982-2012)
Link in different formats to this page


Visitor comments

No comments yet


How much will 24 + 23 ?


VAZ-2121 (1977-1994) 
  • General information
  • Vehicle device
  • Car VAZ-21219
  • Power unit
  • Engine repair
  • Cooling system
  • Lubrication system
  • Supply system
  • Transmission
  • Clutch
  • Car gearbox
  • Transfer case
  • Cardan gear
  • Rear axle and gearbox
  • Front axle
  • Chassis
  • Front suspension
  • Rear suspension
  • Steering
  • Brake system
  • Body
  • Exterior
  • Interior
  • Doors and windows
  • Electrical equipment
  • Equipment and devices
  • Headlights and lighting
  • Engine electrics


VAZ-21213 (1994-2006) 
  • General information
  • Vehicle device
  • User manual
  • Power unit
  • Engine repair
  • Cooling and lubrication system
  • Supply system
  • Transmission
  • Clutch
  • Car gearbox
  • Transfer case
  • Cardan gear
  • Rear axle and shafts
  • Front axle and wheel drive
  • Chassis
  • Wheel suspension
  • Steering
  • Brake system
  • Body
  • Exterior
  • Interior
  • Electrical equipment
  • Engine electrics
  • Equipment and devices


VAZ-21214 (1994-2006) 
  • General information
  • Vehicle information
  • Troubleshooting
  • Power unit
  • Engine repair
  • Cooling system
  • Fuel system (carburetor)
  • Fuel system (injector)
  • Ignition system
  • Control system
  • Exhaust system
  • Transmission
  • Clutch
  • Car gearbox
  • Transfer case
  • Cardan gear
  • Front axle
  • Rear axle
  • Chassis
  • Front suspension
  • Rear suspension
  • Steering
  • Brake system
  • Body
  • Exterior
  • Interior
  • Doors, covers and windows
  • Ventilation and heating
  • Electrical equipment
  • Equipment and devices
  • Headlights and lighting
  • Engine electrics
  • Electrical circuits


VAZbook.ru © 2017 · Mobile version · Contact with administration · Sitemap: EN BG BY UA RS HR RO PL SK HU · Site search · News and articles VAZ-1111 · VAZ-11113 · VAZ-2101 · VAZ-21011 · VAZ-2104 · VAZ-2105 · VAZ-21051 · VAZ-2106 · VAZ-21061 · VAZ-2107 · VAZ-21099 · VAZ-2109 · VAZ-2108 · VAZ-2110 · VAZ-2112 · VAZ-2114 · VAZ-2115 · VAZ-2121 · VAZ-21213 · VAZ-21214 ·
The site stores technical data using cookies to improve the service.