
English Русский
Български
Беларускі
Український
Српски
Hrvatski
Română
Polski
Slovenský
Magyar
| Articles | Contacts | Sitemap |   
Repair and maintenance Lada Repair and maintenance Mazda Repair and maintenance Mitsubishi Repair and maintenance Toyota Repair and maintenance Land Rover Repair and maintenance Hyundai Repair and maintenance Nissan
VAZbook.ru


Main     1111   2101   2105   2106   2107   2109   2110   2115   2121  
VAZ-2121 (1977-1994) VAZ-21213 (1994-2006) VAZ-21214 (1994-2006)
  • Main
  • «Niva»
  • VAZ-2121
  • Electrical equipment
  • Equipment and devices
  • Methodology for troubleshooting devices

Methodology for troubleshooting devices (VAZ-2121)

            0

Contents: Coolant temperature gauge ↓ Fuel level indicator ↓ Oil pressure gauge ↓
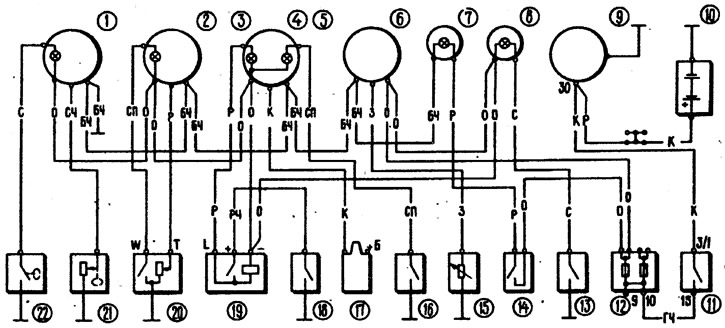
The wiring diagram for the instruments is shown in Fig. 7-39. The wiring diagram for the battery charge indicator lamps, side lights, high beam headlights and turn signals is shown earlier in Fig. 7-5, 7-25, 7-26 and 7-29.

Fig. 7-39. Wiring diagram of the devices: 1 - oil pressure gauge with low pressure indicator lamp;…

Fig. 7-39. Wiring diagram of the devices: 1 - oil pressure gauge with low pressure indicator lamp; 2 - fuel level indicator with fuel reserve indicator lamp; 3 - Parking brake indicator lamp; 4 - tachometer; 5 - carburetor air damper control lamp; 6 - coolant temperature indicator; 7 - brake fluid level indicator lamp; 8 - differential lock indicator light; 9 - generator; 10 - battery; 11 - ignition switch; 12 - fuse box; 13 - differential lock indicator light switch; 14 - Low brake fluid level sensor; 15 - coolant temperature gauge sensor; 16 - carburetor air damper indicator lamp switch; 17 - ignition coil; 18 - Parking brake indicator lamp switch; 19 - parking brake indicator lamp relay-interrupter, 20 - fuel level and reserve indicator sensor; 21 - Oil pressure indicator sensor; 22 - Oil pressure warning light sensor


Coolant temperature gauge


If the pointer is constantly at the beginning of the scale, then with the ignition on, disconnect the wire from the pointer sensor and connect the tip of the wire to the ground.

If the pointer deflects, then the sensor is faulty and must be replaced. If the pointer does not deflect, remove the instrument panel and, with the ignition on, connect the "V" plug of the indicator to the "ground". In this case, the deflection of the pointer will indicate the serviceability of the device and damage to the wire connecting the sensor to the indicator. If the pointer does not deflect, replace the device.

If the pointer is constantly in the red zone, then with the clamp on, disconnect the wire from the sensor. If the sensor is faulty, the pointer should return to the "50" mark.

If the pointer remains in the red zone, then either the wire has a short circuit with the "ground" or the device is damaged. The serviceability of the device can be checked by disconnecting the green wire from the indicator, which goes to the sensor. With the ignition on, the pointer should return to the "50" mark.

Fuel level indicator


The testing method is similar to that described above. It should be borne in mind that the wire going to the fuel reserve indicator lamp is connected to the "W" plug of the indicator sensor, and the wire going to the "T" plug is connected to the "T" plug; j, going to the pointer itself.

If the pointer of the indicator is constantly at the beginning of the scale and does not deviate after short-circuiting the tip of the wire disconnected from the sensor plug "T" with the "ground", then it is necessary to check the device. To do this, remove the instrument panel and, with the ignition on, connect the plug "S" of the indicator to the "ground". If the device is in good order, the pointer should deviate to the end of the scale.


[The original can be seen on the website vazbook]

If the pointer is constantly opposite the 4/4 mark, then the serviceability of the device can be checked by disconnecting the pink wire from the pointer (going to the "T" plug of the sensor). In this case, the pointer of a serviceable device with the ignition on should be opposite the "0" mark.

Oil pressure gauge


The testing method is similar to the one described above. When searching for a fault, connect the "HN" plug of the indicator to the "ground" or disconnect the gray wire with black stripes from it, which goes to the sensor.


This article is available at russian, bulgarian, belarusian, ukrainian, serbian, croatian, romanian, polish, slovak, hungarian
The text was reviewed by the specialist: Grigory Vologodtsev

Share with friends:

Previous articles
VAZ-2121: Equipment and devices
Next articles

Removal the instrument panel
Possible malfunctions of control devices, their causes and methods of elimination
Repair of heater electric motor
Possible malfunctions of the heater electric motor, their causes and methods of elimination
Headlight cleaner
Checking the devices
Checking the sensors of control devices

More articles from other manuals on VAZ cars:
➠ Methodology for troubleshooting devices VAZ-1111 (1988-1996)
➠ Methodology for troubleshooting devices VAZ-21011 (1974-1983)
➠ Methodology for troubleshooting devices VAZ-21051 (1979-2010)
➠ Methodology for troubleshooting devices VAZ-2108 (1984-2003)
➠ Methodology for troubleshooting devices VAZ-2115 (1997-2012)
Link in different formats to this page


Visitor comments

No comments yet


How much will 43 + 34 ?


VAZ-2121 (1977-1994) 
  • General information
  • Vehicle device
  • Car VAZ-21219
  • Power unit
  • Engine repair
  • Cooling system
  • Lubrication system
  • Supply system
  • Transmission
  • Clutch
  • Car gearbox
  • Transfer case
  • Cardan gear
  • Rear axle and gearbox
  • Front axle
  • Chassis
  • Front suspension
  • Rear suspension
  • Steering
  • Brake system
  • Body
  • Exterior
  • Interior
  • Doors and windows
  • Electrical equipment
  • Equipment and devices
  • Headlights and lighting
  • Engine electrics


VAZ-21213 (1994-2006) 
  • General information
  • Vehicle device
  • User manual
  • Power unit
  • Engine repair
  • Cooling and lubrication system
  • Supply system
  • Transmission
  • Clutch
  • Car gearbox
  • Transfer case
  • Cardan gear
  • Rear axle and shafts
  • Front axle and wheel drive
  • Chassis
  • Wheel suspension
  • Steering
  • Brake system
  • Body
  • Exterior
  • Interior
  • Electrical equipment
  • Engine electrics
  • Equipment and devices


VAZ-21214 (1994-2006) 
  • General information
  • Vehicle information
  • Troubleshooting
  • Power unit
  • Engine repair
  • Cooling system
  • Fuel system (carburetor)
  • Fuel system (injector)
  • Ignition system
  • Control system
  • Exhaust system
  • Transmission
  • Clutch
  • Car gearbox
  • Transfer case
  • Cardan gear
  • Front axle
  • Rear axle
  • Chassis
  • Front suspension
  • Rear suspension
  • Steering
  • Brake system
  • Body
  • Exterior
  • Interior
  • Doors, covers and windows
  • Ventilation and heating
  • Electrical equipment
  • Equipment and devices
  • Headlights and lighting
  • Engine electrics
  • Electrical circuits


VAZbook.ru © 2017 · Mobile version · Contact with administration · Sitemap: EN BG BY UA RS HR RO PL SK HU · Site search · News and articles VAZ-1111 · VAZ-11113 · VAZ-2101 · VAZ-21011 · VAZ-2104 · VAZ-2105 · VAZ-21051 · VAZ-2106 · VAZ-21061 · VAZ-2107 · VAZ-21099 · VAZ-2109 · VAZ-2108 · VAZ-2110 · VAZ-2112 · VAZ-2114 · VAZ-2115 · VAZ-2121 · VAZ-21213 · VAZ-21214 ·
The site stores technical data using cookies to improve the service.