




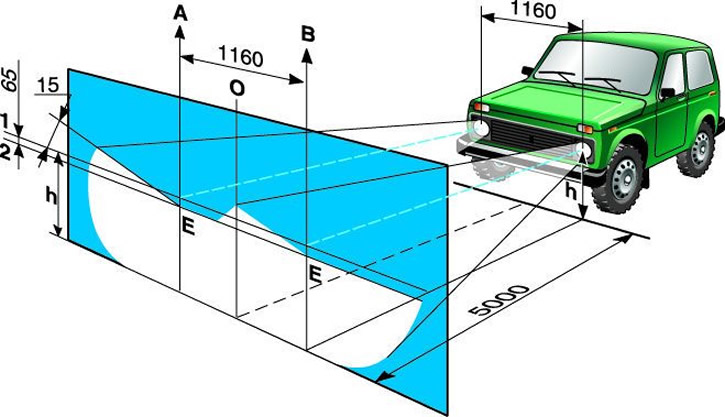
Headlight adjustment diagram
Select a flat horizontal area within the vehicle base at a distance of 5 m from the screen - a light wall of a building, garage, etc. You can use a sheet of plywood or hardboard measuring 1x2 m. Fill the car with fuel, put the tool and spare tire in their regular places, check the tire pressure of all wheels. In the dark, park the car on the selected area perpendicular to the screen, the distance between the headlights and the screen should be 5 m. Place an assistant in the driver's seat or put a 75 kgf load and slightly rock the car from the side to install the suspension.
Measure the distance from the headlight centers to the floor, draw a line on the screen at this height, and 120 mm below it - a second one (if a headlight corrector is installed, the second line is drawn 65 mm below the first). Draw a vertical center line on the screen (the distances from it to the centers of the left and right headlights should be equal) and lines corresponding to the centers of the headlights.
Install the headlight range control knob (if any) to the minimum load position. Cover one of the headlights with a piece of cardboard, plywood, etc. Turn on the low beam headlights. Opposite the recesses in the rim of the optical element and the radiator grille are the headlight adjustment screws. Use the adjustment screws to ensure that the upper boundary of the light spot (horizontal) coincided with the lower line, and the place of the beam break (intersection point of horizontal and inclined section) – with a vertical line of the headlight center.
To adjust the headlight beam in the vertical plane, screws C and D are turned in the same direction and by the same number of turns. The difference in the turns of one screw without adjusting the other should not exceed 3 turns.
In the horizontal plane, the headlights are also adjusted by screws C and D, but by turning them in different directions. For example, if one screw is turned one turn clockwise, then the second screw must be turned one turn counterclockwise.
Adjust the second headlight by covering the first one.
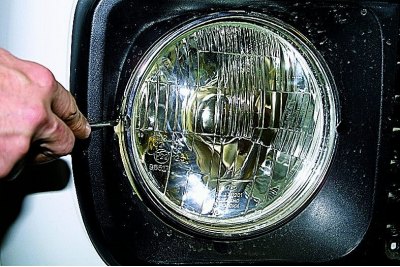
Using a Phillips screwdriver, turn the outer screw C for adjusting the light beam of the right headlight.
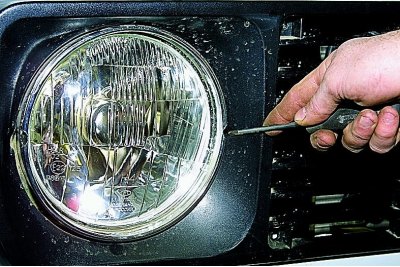
Using a Phillips screwdriver, turn the inner screw D for adjusting the light beam of the right headlight.
[The article is taken from an online resource www.vazbook.ru]