
The wings of the car are in the same position as the bottom. Moreover, the wings also have pockets where dirt and moisture collect and accumulate. Even with a new car, it is necessary to remove the wheels before starting operation and meticulously examine the quality of applying bituminous mastic on the inner surface of the wings, especially at the location of the headlights. It happens that they make a mistake at the factory, and such a wing becomes a victim of corrosion.
No less vulnerable are the internal cavities of the thresholds, the bases of the central pillars, and the spars. Although they are processed at the factory, the possibility of flaws is not excluded.
The thresholds are in a particularly difficult situation if the drainage holes are clogged, designed to drain the water that has entered the thresholds.
Putting an additional anti-corrosion protection on a newly purchased car is a simple matter. All you need is a material and a tool to apply it. It is much more difficult to perform this operation on a vehicle that has already been used. Here the lion's share of time and physical effort should be spent on surface preparation. There is no point in postponing this dirty, time-consuming, inconvenient and responsible operation for later. Engage in the processing of the car, having previously prepared a metal brush, wooden scraper, emery cloth, brush, white spirit, rust converter, anti-corrosion mastic and rags.
Getting started, we must remember that labor and money will not be spent in vain only if the surface is well prepared. It should be clean from dirt, old destroyed coating, all kinds of fats. Only on a clean, fat-free surface, the adhesion of mastic to metal will be reliable. Thoroughly rinse the surfaces to be prepared, preferably with a powerful jet of water under pressure. After getting rid of the dirt, it will be possible to see the condition of the old coating. If it begins to peel off, it must be removed with a metal brush and scraper. A metal brush is a reliable tool for stripping loose and seam rust. After completing the rough work, the surfaces cleaned with emery cloth are degreased with white spirit. Chemists have invented one very effective composition - a rust converter. In a short time, such a composition, applied to a rust-red surface, will create a small miracle. Red raids will become grayish, and the rust itself will be converted into a more stable and already harmless compound. The surfaces processed by the converter are ready for drawing on them of anticorrosive materials. Mastics and pastes, depending on their viscosity, can be applied with a brush, spatula or gloved hand. The main condition is that there should be no bare places.
Prepare materials and tools
Bituminous mastics are the most technologically advanced for manual application. They well resist the action of moisture, salt, but are not sufficiently resistant to sand and gravel, and also have low frost resistance. At low temperatures, the coating becomes brittle and a stone strike is enough for the mastic to begin to crumble. Often, wax compositions are used for short-term protection of the bottom and wings. They have their advantages and their disadvantages. So, they penetrate well and fill the pores, cracks, flanging and pockets, but they can not stand the blows. On reflection, resourceful motorists decided to apply wax compositions over bituminous ones, which ensured their less fragility at low temperatures.
As noted above, all parts with a box section are particularly susceptible to corrosion. And this is no coincidence. Due to insufficient ventilation, the cavities are always damp. There is access to water and dirt in the gap between the welding points, and if we consider that it is not always possible to properly treat these cavities with anti-corrosion materials, it becomes clear why these places are particularly susceptible to corrosion. Until the 1950s, hidden cavities were practically not processed. Saved them only a significant thickness of the metal. The so-called ML-method of corrosion control found in Sweden (from the first letters of the company name «Motorman Laurin») made it possible to consciously manage the process of aging and wear of box-shaped structures. Naturally, the new method required appropriate materials that could be delivered into hidden cavities and sprayed in a uniform thin layer over the entire surface. Special equipment was also required to ensure the delivery and spraying of materials.
Domestic preparations designed specifically for application to hidden cavities are «Movil» and «Resistin-ML». The preparations are interesting in that they can be applied to surfaces previously covered with liquid oil and affected by corrosion. This is important, since it is far from always possible to clean the inner surfaces of box structures from old coatings.
Given that «Movil» and «Resistin-ML» So far, the only domestic preparations that provide a tangible effect in protecting hidden cavities from corrosion, they are used both at the plant, at service stations, and by car owners.
Individual owners have to solve serious problems associated primarily with the lack of equipment for applying the drug. In order to somewhat facilitate the task for those who, having no other opportunity, decided to process the bodywork on their own, we advise you to use the experience already accumulated in this area. The necessary equipment for this is very simple, operating on the basis of air spraying at a pressure of 400-600 kPa, which is quite sufficient for spraying preparations.
One of the simplest designs is shown in Fig. 2. A Moscow motorist used a nozzle from a conventional eau de cologne sprayer 4, drilling 1.2 mm of rot in the tip 9. He soldered a brass tube 7 to the inner wall of the tube 8, through which the preservative enters. Pump 1 (it can be more powerful) hose 2 is connected to tube 8, and hose 2 to spray gun 4. To supply the preservative in tube 7, a polyvinyl chloride tube 5 was used, lowered into vessel 6.
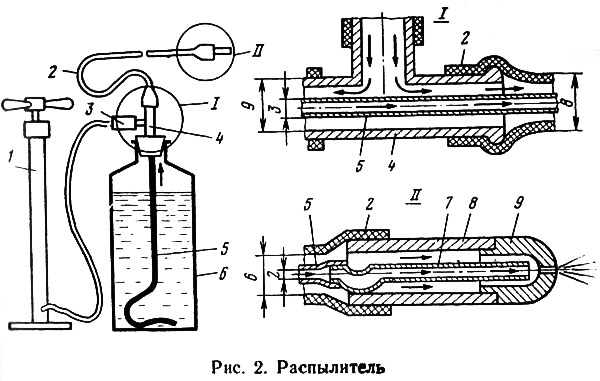
An atomizer of this design provides a torch of atomized Movil with a diameter of up to 0.2 m with a constant air supply.
Prepare the body
To ensure that the sprayer is in the desired area:
- remove the rubber seals under the front fenders, the headlight bezels and the headlights themselves (for car models VAZ-21013 and VAZ-2102);
- open the trunk and take out the spare wheel, jack and mat for the VAZ-21013 car and the trunk lining for the VAZ-2103, VAZ-2107 and VAZ-2106 cars;
- open the back door of the station wagon (VAZ-2102) and remove the trunk mat, sidewall upholstery, spare wheel cover and the spare wheel itself;
- dismantle the front door open signal lamps for VAZ-2103 and -2106 cars and the reversing lamp for the VAZ-2103 car.
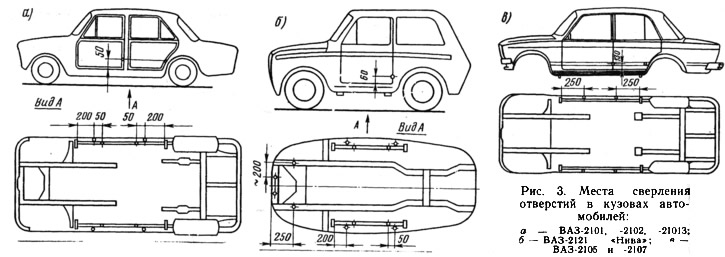
Of course, it is difficult to raise a hand on your own car, but the technology requires it. Armed with an electric drill, drill (pic. 3) holes with a diameter of 9 mm in the internal and external thresholds, and for models VAZ-21013, VAZ-2102, VAZ-2121 and VAZ-2105 also at the ends of the front and rear doors.
The places where the anti-corrosion material is applied under the hood and in the luggage compartment at service stations are washed with water before the application of the anti-corrosion material. At home, where drying options are limited, washing can be replaced by a thorough wipe with a damp cloth. It is most convenient to handle the body on a lift. At home, everyone settles down as far as his ingenuity allows. Only one thing is clear: the main number of processed points is located in the area of the bottom.
To get inside the thresholds, to the spare wheel niche and the crossbar under the front seats, it is necessary to remove special rubber plugs located two pieces on each side under the front fender, one piece on each side in the rear wheel arch, in the center of the spare wheel well. wheel, one on each side in the cross member under the front seats. The drain holes in the thresholds should also be cleaned.
Although it is difficult to dry a car in a garage, the bottom, wheel arches and hard-to-reach hidden cavities must still be thoroughly washed under pressure, otherwise all the work done will be a waste of time. Well, if at hand there is compressed air. With it, you can dry the washed areas of the body much faster. So that the wheels do not interfere, it is advisable to remove them by placing the car on stands, and wrap the discs, brake drums, rear axle, driveshafts and gearbox with paper. It remains to open the doors, hood, trunk lid and you can start processing. The drug must be applied in hidden cavities and on the surface of car body parts VAZ-2101, -21013, -2102, -2103, -2106 (pic. 4) in the following sequence.
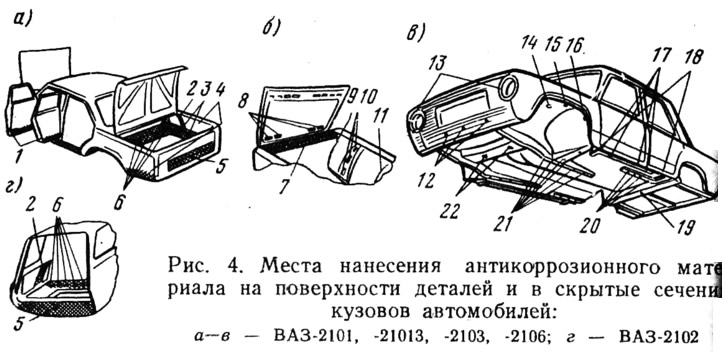
First in the cavity: 1 doors; 2 between rear fenders and wheel arches; 3 rear spars; 5 and 6 rear crossbars; 7 and 12 front cross members; 10 stock mudguards; 17 thresholds; 19 crossbars between the rear wheel arches; 20 rear spars; 21 front spars; 22 - front suspension crossbars.
Then: into recesses 4 for the fuel tank and spare wheel; in hood pockets 8; at the joints of panel 9 and shield 11 with the sidewalls of the front fenders; in niches 13 headlights; into the brackets 14 of the front suspension buffers into the junction box 15; in the pockets of 16 front fenders; in brackets 18 under the jack.
To facilitate the work of the owners of the VAZ-2121 «Niva», remind them of the procedure for performing the preparation and application of anti-corrosion material on this vehicle as well. They remove from the car: the radiator grille, the headlight rims and the headlights themselves, the upholstery of the rear fenders, the shields that cover the pockets of the front fenders, two rubber plugs in the cross member between the arches! rear wheels from the bottom side and two plugs in the lower rear cross member. The cavities of the spars, cross members and thresholds are washed with a jet of water under pressure.
It is necessary to wash until clear water begins to flow from the numerous drilled holes. Drying of the cavities is mandatory. Compressed air is a good helper in this matter. Anti-corrosion material is applied to body parts and to hidden sections of the VAZ-2121 car «Niva» (pic. 5) next sequence.
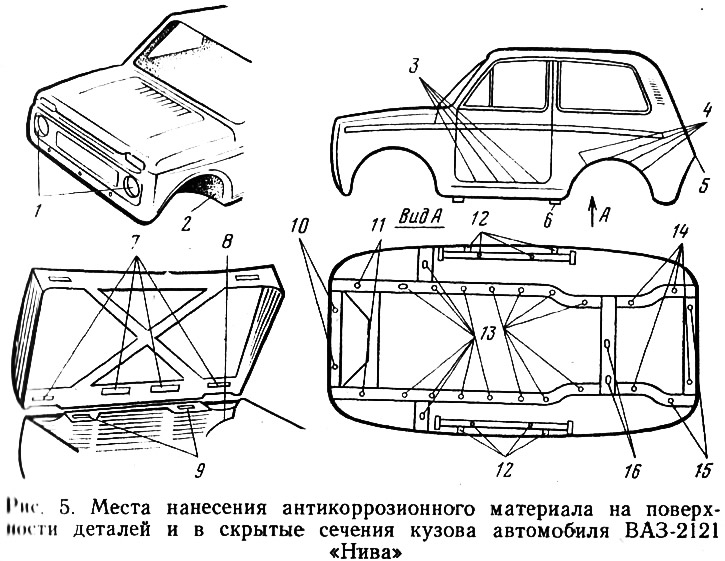
First in the cavity: 3 doors; 4 rear wheel arches; 5 upper cross members of the rear body panel; 9 tops of the front cross member of the body; 10 lower front and body crossbars; 11 front spars; 12 thresholds; 13 longitudinal spars of the body floor and their amplifiers; 14 rear spars; 15 lower rear cross member; 16 cross members between the rear wheel arches.
Then: in niches 1 headlights; in the pockets of 2 front fenders; in brackets 6 under the jack; in pockets 7 of the hood; and joints 8 of the panel with the sidewalls of the front fenders.
To apply anti-corrosion material to vehicles VAZ-2105 and VAZ-2107 necessary:
- remove all parts that interfere with access to the treated cavities, i.e., guards under the front fenders, spare wheel, trunk mat, sidewall lining. To perform these preparatory operations, you will need a 10 mm socket wrench, pliers, a screwdriver;
- close the oval openings of the thresholds at the base of the front pillars with some plugs, otherwise, when washing the cavities subject to anti-corrosion treatment, water will enter the interior of the body;
- wash all places where anticorrosive was applied with a jet of water under pressure, but first: remove the rubber plugs in the rear wheel arch (one on each side), in the beam connecting the rear wheel arches, in the cross member under the front seat (one on each side), in the spare wheel recess; clean the drainage holes in the spars, thresholds and doors; blow out all cavities and places to be treated with compressed air; dry all washed places before processing; apply an anti-corrosion material, guided by fig. 6 in the following sequence.
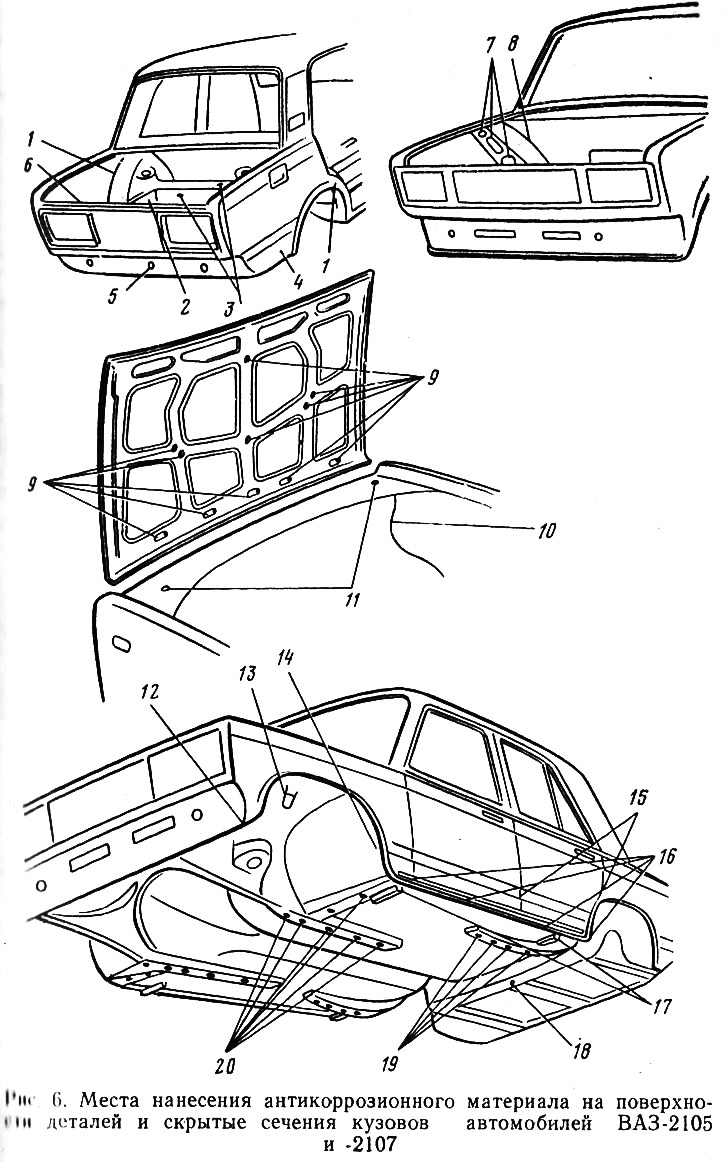
First in the cavity: 1 between the rear wing and the wheel arch; 2 rear spars; 3 rear floor crossbars; 5 rear lower crossbar; 7 mudguard racks; 11 the upper cross member of the front end; 12 lower cross member of the front end; 15 doors; 16 thresholds; 18 cross members between the rear wheel arches; 19 rear spars; 20 front spars and their amplifiers.
Then: into recess 4 under the fuel tank; in recess 6 for the spare wheel; in connection 8 of the bulkhead with the sidewall of the wing; in pockets 9 of the hood; in connection 10 of the front panel with the wing sidewall; in the brackets 13 front suspension buffers; in the pockets of 14 front fenders; into bracket 17 of the jack.
After finishing the treatment of the bodies, it is necessary to remove traces of anti-corrosion material using a swab moistened with white spirit or kerosene, and then reinstall all dismantled parts.
It should be noted that many experienced motorists often show completely unjustified conservatism when choosing an anti-corrosion material for their car. They forget that when creating this or that material, such a factor as compatibility is also taken into account. Often, especially in port cities, one has to see that thresholds, wheel arches, and the bottom of cars are treated with such a common material as minium. Practice shows that minium in this case causes delamination of the coating, or accelerated development of under-film corrosion, therefore, when choosing a non-standard anti-corrosion material, it is advisable to consult with specialists.
To finish with the body and start servicing the engine and other vehicle components, you should pay attention to glass, decorative details and upholstery. Almost on every new model of VAZ cars, the quality characteristics of glasses are improved or the glazing area is increased. By improving the quality of glass and improving the technology of its manufacture, an improvement in optical properties is achieved. But no matter how perfect the glass, transparency, and hence visibility, depend primarily on its condition. The highest quality glass can be destroyed without knowing how to handle it.
It has long been known that the more complex and expensive the item, the more attention it requires. Windshield of VAZ cars (and rear windows on cars VAZ-2105, VAZ-2106 and VAZ-2107) complex in design, expensive and absolutely not protected from environmental influences. Dirt, residues of oils, fats, resins, particles of silicone and wax products, insects, various vapors and gases - all this gets on the glass surface and leaves marks there. Especially these traces are visible when the car is moving at night and give the driver a lot of trouble. To clean glass from so many different sources of contamination, detergents must be truly versatile. They should wash glass from almost everything, should not disturb the gloss and optical properties and should not interact with metal, paints and varnishes and rubber.
For those motorists who understand a lot about clean, high-quality glass, we strongly advise you to always have in your car «Auto glass cleaner». Having moistened the glass with the composition, and at the same time the headlights and the radiator lining, after 1-2 minutes any dirt can already be washed off with clean water.
If your car's seats are covered with covers, this does not mean that they are reliably protected from dust and dirt. Upholstery of seats, doors, ceiling, instrument panel - all these are synthetic materials, leather substitutes and films. Over time, they age, lose elasticity, fade. Such aging is natural and difficult to fight. But it is possible to fight dirt, oil and other contaminants that contribute to aging and destruction of upholstery.
Summing up the preventive work on the body, it should be emphasized that the body is the basis of the car, it is 50% of its cost, this is the main object of concern for the owner.