
English Русский
Български
Беларускі
Український
Српски
Hrvatski
Română
Polski
Slovenský
Magyar
| Articles | Contacts | Sitemap |   
Repair and maintenance Lada Repair and maintenance Mazda Repair and maintenance Mitsubishi Repair and maintenance Toyota Repair and maintenance Land Rover Repair and maintenance Hyundai Repair and maintenance Nissan
VAZbook.ru


Main     1111   2101   2105   2106   2107   2109   2110   2115   2121  
VAZ-2101 (1970-1983) VAZ-21011 (1974-1983)
  • Main
  • «Zhiguli»
  • VAZ-2101
  • Transmission
  • Rear axle
  • Replacing the pinion seal

Replacing the pinion seal (VAZ-2101)

            0

The need to replace the seal is determined by the decrease in the oil level in the rear axle housing due to oil leakage through the seal to a level that disrupts the normal operation of the gearbox. Congealing of the housing neck and even the formation of individual drops (less than 5 drops in 15 minutes under a certain mode - see below) is not a sign of leakage.

If there is a lot of dripping, the condition of the gland should be determined, for which:
  • place the car on a lift or inspection pit, clean the breather from dirt and check its condition, unscrew the inspection plug and check the oil level in the axle housing. If necessary, bring the oil level up to the norm;
  • clean the gearbox filler neck from traces of oil and wipe it dry, hang up the rear axle and place it on supports, start the engine, engage direct transmission and when the speedometer shows 90-100 km/h, warm up the oil to a temperature of 80-90°C (approximately 15 minutes);
  • with direct transmission engaged, at a reading of 100 km/h, determine the amount of oil flowing out in 15 minutes.

Oil leakage exceeding 5 drops in 15 minutes is a sign of a faulty oil seal.

A damaged oil seal can be replaced without removing the gearbox from the vehicle, if no other gearbox parts need to be replaced. The procedure for replacing the oil seal is as follows:
  • drain the oil from the rear axle housing, loosen the rear wheel mounting nuts, place chocks under the front wheels and lift the rear axle;
  • release the parking brake and set the gear shift lever to neutral;
  • remove the wheels and brake drums, unscrew the nuts securing the brake shield 1 (see fig. 79) to the bridge beam, the ejector removes the axle shafts from the differential box (see fig. 80), disconnect the cardan shaft from the drive gear flange and move it to the side;
  • check the torque of resistance to turning of the drive gear with a dynamometer (see fig. 94) and remember it;
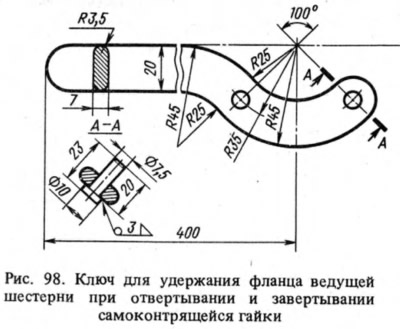
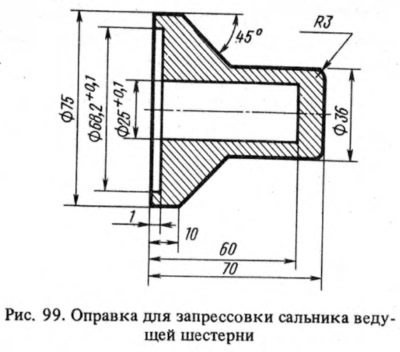
  • holding the flange with a special key (Fig. 98), unscrew the nut securing the drive gear flange and remove it together with the washer, as well as the drive gear oil seal, after which install a new oil seal without tilting it with a mandrel (Fig. 99), having previously lubricated its working surfaces with Litol-24 grease;
  • install the flange with the washer on the drive gear and, holding the flange with a special key, tighten the flange mounting nut, periodically checking the torque of resistance to turning of the drive gear with a dynamometer. If the initial torque of resistance to turning was 6 kgf cm or higher, then the new torque of resistance to turning should be 1-2 kgf cm greater than the initial one. If it was less than 6 kgf cm, then tighten the flange mounting nut until a torque of resistance of 6-9 kgf cm is obtained. If the torque of resistance to turning is exceeded when tightening the nut, disassemble the gearbox and replace the spacer sleeve, after which the gearbox is assembled and adjusted again.
install the flange with the washer on the drive gear and, holding the flange with a special key,…


install the flange with the washer on the drive gear and, holding the flange with a special key,…


(The original source is published on the website vazbook.ru)


This article is available at russian, bulgarian, belarusian, ukrainian, serbian, croatian, romanian, polish, slovak, hungarian
The text was reviewed by the specialist: Grigory Vologodtsev

Share with friends:

Previous articles
VAZ-2101: Rear axle
Next articles

Assembly of the main gear reducer
Checking the technical condition of gearbox parts
Disassembling the main gear reducer
Removal and installation the final drive gearbox
Determining the technical condition of the gearbox on a vehicle
Possible malfunctions of the main transmission

More articles from other manuals on VAZ cars:
➠ Replacing the gearbox pinion seal VAZ-21051 (1979-2010)
➠ Replacing the pinion seal VAZ-21061 (1976-2006)
➠ Replacing the pinion seal VAZ-21213 (1994-2006)
➠ Replacing the camshaft seal VAZ-11113 (1996-2003)
➠ Main gear pinion seal — replacement VAZ-2107 (1982-2012)
Link in different formats to this page


Visitor comments

No comments yet


How much will 31 + 30 ?


VAZ-2101 (1970-1983) 
  • General information
  • Vehicle description
  • Vehicle device
  • Vehicle operation
  • Maintenance
  • Main malfunctions
  • Applications
  • Power unit
  • Engine repair
  • Cooling and lubrication system
  • Supply system
  • Transmission
  • Clutch
  • Transmission
  • Cardan gear
  • Rear axle
  • Chassis
  • Front suspension
  • Rear suspension
  • Steering
  • Brake system
  • Body
  • Exterior
  • Interior
  • Electrical equipment
  • Engine electrics
  • Equipment and devices


VAZ-21011 (1974-1983) 
  • General information
  • Specifications
  • Operation and maintenance
  • Power unit
  • Engine repair
  • Cooling system
  • Lubrication system
  • Power and exhaust system
  • Ignition system
  • Engine electrics
  • Transmission
  • Clutch
  • Car gearbox
  • Cardan gear
  • Rear axle
  • Chassis
  • Car suspension
  • Steering
  • Brake system
  • Body
  • Exterior
  • Interior
  • Doors and locks
  • Electrical equipment
  • Equipment and devices
  • Lighting and signaling


VAZbook.ru © 2017 · Mobile version · Contact with administration · Sitemap: EN BG BY UA RS HR RO PL SK HU · Site search · News and articles VAZ-1111 · VAZ-11113 · VAZ-2101 · VAZ-21011 · VAZ-2104 · VAZ-2105 · VAZ-21051 · VAZ-2106 · VAZ-21061 · VAZ-2107 · VAZ-21099 · VAZ-2109 · VAZ-2108 · VAZ-2110 · VAZ-2112 · VAZ-2114 · VAZ-2115 · VAZ-2121 · VAZ-21213 · VAZ-21214 ·
The site stores technical data using cookies to improve the service.