
English Русский
Български
Беларускі
Український
Српски
Hrvatski
Română
Polski
Slovenský
Magyar
| Articles | Contacts | Sitemap |   
Repair and maintenance Lada Repair and maintenance Mazda Repair and maintenance Mitsubishi Repair and maintenance Toyota Repair and maintenance Land Rover Repair and maintenance Hyundai Repair and maintenance Nissan
VAZbook.ru


Main     1111   2101   2105   2106   2107   2109   2110   2115   2121  
VAZ-2108 (1984-2003) VAZ-2109 (1984-1997) VAZ-21099 (1990-2004)
  • Main
  • «Sputnik»
  • VAZ-2108
  • Power unit
  • Engine repair
  • Adjusting clearances in the valve drive mechanism

Adjusting clearances in the valve drive mechanism (VAZ-2108)

            0

Gap A (see figure 5) between the camshaft cams and the adjusting washers on a cold engine should be (0.20±0.05) mm for the intake valves and (0.35±0.05) mm for the exhaust valves. The clearance is adjusted by selecting the thickness of the adjusting washers 6. Adjusting washers with a thickness of 3 to 4.25 mm with an interval of every 0.05 mm are supplied as spare parts. The thickness of the washer is marked on its surface.

The clearance is adjusted in the following order. Remove the cylinder head cover and the front protective cover of the toothed belt. Unscrew the spark plugs and remove the oil from the oil baths in the cylinder head. Inspect the surface of the camshaft cams: they should not have any scoring, cavities, wear or deep scratches. Install the 67.7800.9503 device for pressing in the valve tappets on the cylinder head cover mounting studs. Mandrel 1 can be used instead of the device (figure 50).
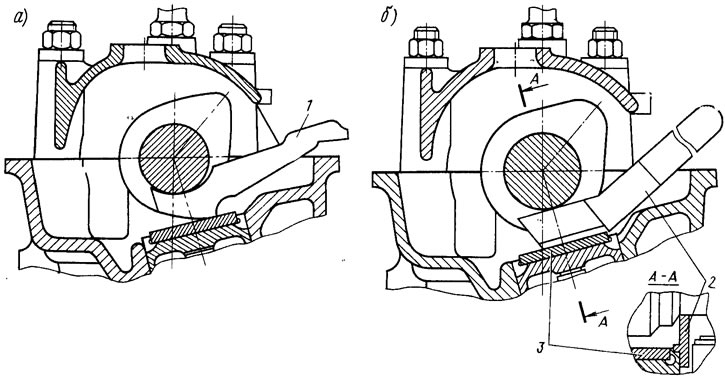
Figure 50. Recessing (a) and fixing (b) the valve tappets to replace the adjusting washer

Figure 50. Recessing (a) and fixing (b) the valve tappets to replace the adjusting washer


Turn the crankshaft until the timing marks on the pulley and the rear cover of the timing belt are aligned (see figure 6), and then turn it another 40-50° (2.5-3 teeth on the camshaft pulley). In this case, there will be a combustion phase in the 1st cylinder. The crankshaft should be turned only clockwise either by the generator drive pulley mounting bolt or by the camshaft pulley using the 67.7811.9509 tool. Do not turn the crankshaft by the camshaft pulley mounting bolt, as this can damage the bolt.


Check the clearances at the 1st and 3rd camshaft cams with a set of feeler gauges. If the clearance differs from the norm, then use device 67.7800.9503 or mandrel 1 (see figure 50) the valve tappet is pressed down and fixed in the lower position by installing the retainer 2 between the edge of the tappet and the camshaft (67.7800.9504).

With the device 67.7800.9506 (steel plate with flat magnet) or using pliers with narrow jaws, remove the adjusting washer 3 and measure its thickness with a micrometer. Then determine the thickness of the new washer using the formula H = B + (A - C), where H is the thickness of the new washer; A - measured gap; B — thickness of the removed washer; C — nominal clearance.

Example: Let's say: A = 0.26 mm; B = 3.75 mm; C = 0.2 mm (for intake valve). Then H = 3.75 + (0.26 - 0.2) = 3.81 mm. Within the clearance tolerance of ±0.05 mm, we take the thickness of the new washer to be 3.8 mm.

Install a new adjusting washer in the valve tappet, remove the 67.7800.9504 lock and check the clearance again. If it is adjusted correctly, a 0.2 or 0.35 mm thick feeler gauge should enter with a slight pinch. Consecutively turning the crankshaft by half a turn, which corresponds to turning the mark on the camshaft pulley by 90°, adjust the clearances of the remaining valves, observing the sequence specified in Table 4. After adjustment, pour oil into the oil baths of the cylinder head so that the contact points of the cams with the adjusting washers are in the oil. Install the cylinder head cover and the front toothed belt cover.
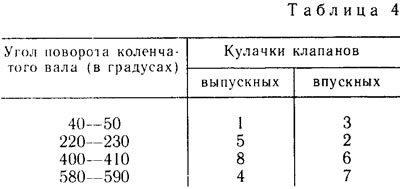

Install a new adjusting washer in the valve tappet, remove the 67.7800.9504 lock and check the…


Note: The cam numbers should be counted in order from the camshaft pulley.


This article is available at russian, bulgarian, belarusian, ukrainian, serbian, croatian, romanian, polish, slovak, hungarian
The text was reviewed by the specialist: Grigory Vologodtsev

Share with friends:

Previous articles
VAZ-2108: Engine repair
Next articles

Camshaft and its drive — inspection and repair
Cylinder head and its parts — inspection and repair
Crankshaft and flywheel — inspection and repair
Connecting rod and piston group — inspection and repair
Cylinder Block — Checking and Repairing
Adjusting the tension of the camshaft drive belt
Adjusting the alternator drive belt tension
Setting the ignition timing
Engine running-in after repair

More articles from other manuals on VAZ cars:
➠ Adjusting clearances in the valve drive mechanism VAZ-1111 (1988-1996)
➠ Adjusting clearances in the valve drive of engines 2111 and… VAZ-2112 (1999-2007)
➠ Adjusting thermal clearances in the valve mechanism of a… VAZ-21214 (1994-2006)
➠ Adjusting valve clearances VAZ-2115 (1997-2012)
➠ Valve timing mechanism VAZ-2101 (1970-1983)
Link in different formats to this page


Visitor comments

No comments yet


How much will 28 + 44 ?


VAZ-21099 (1990-2004) 
  • General information
  • Specifications
  • User manual
  • Maintenance
  • Car care
  • Troubleshooting
  • Power unit
  • Engine repair
  • Cooling and lubrication system
  • Power and exhaust system
  • Transmission
  • Car gearbox
  • Clutch and drive shafts
  • Chassis
  • Car suspension
  • Steering
  • Brake system
  • Body
  • Exterior
  • Interior
  • Doors and locks
  • Electrical equipment
  • Equipment and devices
  • Lighting and signaling
  • Engine electrics
  • Ignition system


VAZ-2109 (1984-1997) 
  • General information
  • Vehicle operation
  • Vehicle device
  • Power unit
  • Engine repair
  • Cooling and lubrication system
  • Supply system
  • Transmission
  • Clutch
  • Gearbox and drive
  • Chassis
  • Car suspension
  • Steering
  • Brake system
  • Body
  • Body elements
  • Electrical equipment
  • Engine electrics
  • Equipment and devices


VAZ-2108 (1984-2003) 
  • General information
  • Introduction to guide
  • Power unit
  • Engine repair
  • Cooling and lubrication system
  • Power and exhaust system
  • Transmission
  • Clutch and drive shafts
  • Car gearbox
  • Chassis
  • Front suspension
  • Rear suspension
  • Steering
  • Brake system
  • Body
  • Exterior
  • Interior
  • Doors and glass
  • Electrical equipment
  • Equipment and devices
  • Engine electrics
  • Ignition system


VAZbook.ru © 2017 · Mobile version · Contact with administration · Sitemap: EN BG BY UA RS HR RO PL SK HU · Site search · News and articles VAZ-1111 · VAZ-11113 · VAZ-2101 · VAZ-21011 · VAZ-2104 · VAZ-2105 · VAZ-21051 · VAZ-2106 · VAZ-21061 · VAZ-2107 · VAZ-21099 · VAZ-2109 · VAZ-2108 · VAZ-2110 · VAZ-2112 · VAZ-2114 · VAZ-2115 · VAZ-2121 · VAZ-21213 · VAZ-21214 ·
The site stores technical data using cookies to improve the service.