
English Русский
Български
Беларускі
Український
Српски
Hrvatski
Română
Polski
Slovenský
Magyar
| Articles | Contacts | Sitemap |   
Repair and maintenance Lada Repair and maintenance Mazda Repair and maintenance Mitsubishi Repair and maintenance Toyota Repair and maintenance Land Rover Repair and maintenance Hyundai Repair and maintenance Nissan
VAZbook.ru


Main     1111   2101   2105   2106   2107   2109   2110   2115   2121  
VAZ-2110 (1995-2007) VAZ-2112 (1999-2007)
  • Main
  • «Lada»
  • VAZ-2110
  • Electrical equipment
  • Engine electrics
  • Checking the generator without removing it from the car

Checking the generator without removing it from the car (VAZ-2110)

            0

To perform the generator testing work you will need:
  • multimeter (in voltmeter mode with a measurement limit of 1520 V);
  • technical stethoscope.
  • assistant.

Sequence of execution of the check


1. Prepare the car for repair work.

2. Warm up the car engine to operating temperature (at least 80°C).

3. Turn on all powerful electrical consumers in the car (heated rear window, electric heater fan, high beam headlights, heated seats).

Note: Further testing of the generator should be performed with an assistant.


4. By pressing the gas pedal and monitoring the engine operation using the tachometer, we maintain the engine crankshaft speed within 3000-3500 rpm.

5. Using a voltmeter, measure the voltage at the terminals of the battery. If the generator is in good working order, the voltmeter should show a voltage of at least 13 V.

Note: If the voltage is less than 13 V, the alternator belt may be loose, there may be a fault in the alternator circuit, the alternator voltage regulator may be faulty, the alternator brushes may be oily or worn out, or there may be other faults in the alternator itself.


6. Turn off all electrical consumers, while the voltmeter should show a voltage no higher than 14.7 V.

Note: If the voltage is greater than 14.7V, the voltage regulator is most likely faulty.


7. Using a stethoscope, we evaluate the condition of the generator bearings by the noise. A loud hum indicates wear of one or both bearings (the most common failure point is the front generator bearing).
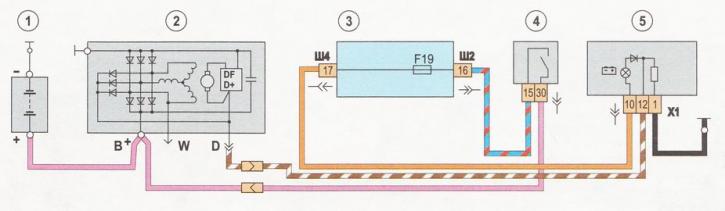
Generator electrical connection diagram: 1 - battery; 2 - generator; 3 - mounting block; 4 -…

Generator electrical connection diagram: 1 - battery; 2 - generator; 3 - mounting block; 4 - ignition switch; 5 - generator malfunction indicator lamp in the instrument panel
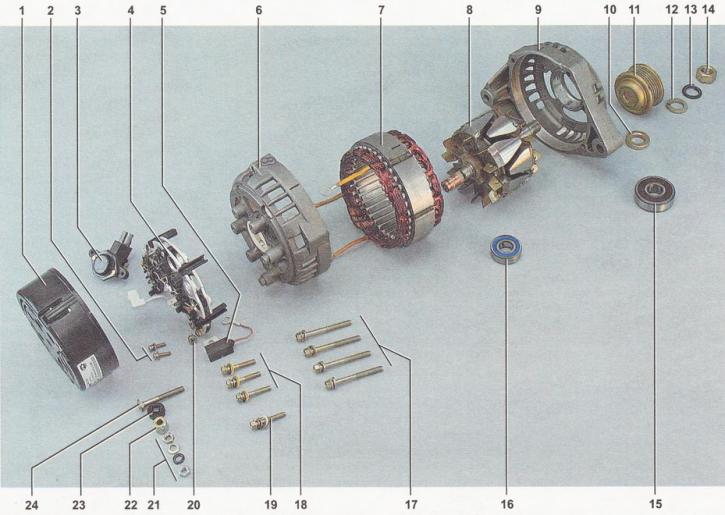


Generator details: 1 - protective cover of the rectifier unit; 2 - voltage regulator mounting…

Generator details: 1 - protective cover of the rectifier unit; 2 - voltage regulator mounting screws; 4 - rectifier block; 5 - capacitor; 6 - back cover; 7 - stator with windings; 8 - rotor; 9 - front cover; 10 - spacer sleeve; 11 - pulley; 12 - washer; 13 - spring washer; 14 - pulley mounting nut; 15 - front bearing; 16 - rear bearing; 17 - cover tightening bolts; 18 - bolts (with insulating gaskets) fastenings of the rectifier block and stator winding terminals; 19 - bolt (without insulating lining) rectifier block fastenings; 20 - Capacitor mounting screw; 21 - contact bolt fastening elements; 22 - spacer sleeve; 23 - insulating sleeve; 24 - contact bolt


The article is taken from an online resource: vazbook


This article is available at russian, bulgarian, belarusian, ukrainian, serbian, croatian, romanian, polish, slovak, hungarian
The text was reviewed by the specialist: Grigory Vologodtsev

Share with friends:

Previous articles
VAZ-2110: Engine electrics
Next articles

Generator — device and description
Checking and adjusting the alternator belt tension
Replacing the alternator belt
Removal, installation and repair of the generator
Disassembly, inspection of parts and assembly of the generator
Starter device and description

More articles from other manuals on VAZ cars:
➠ Rules for checking and operating the generator VAZ-1111 (1988-1996)
➠ Checking the generator on the car VAZ-21011 (1974-1983)
➠ Checking the generator with an oscilloscope VAZ-21051 (1979-2010)
➠ Generator — Checking and Repairing VAZ-2106 (1976-2006)
➠ Generator — Checking and Repairing VAZ-2107 (1982-2012)
Link in different formats to this page


Visitor comments

No comments yet


How much will 35 + 26 ?


VAZ-2110 (1995-2007) 
  • General information
  • Vehicle description
  • Specifications
  • User manual
  • Maintenance
  • Operation and maintenance
  • Tips for car owner
  • Power unit
  • Engine repair
  • Supply system
  • Control system
  • Cooling system
  • Exhaust system
  • Transmission
  • Clutch
  • Car gearbox
  • Front wheel drives
  • Chassis
  • Suspension and wheels
  • Steering
  • Brake system
  • Body
  • Exterior
  • Interior
  • Doors and glass
  • Tailgate
  • Ventilation and heating
  • Electrical equipment
  • Equipment and devices
  • Headlights and lighting
  • Engine electrics
  • Electrical circuits


VAZ-2112 (1999-2007) 
  • General information
  • Operation and maintenance
  • Power unit
  • Engine repair
  • Supply system
  • Control system
  • Cooling system
  • Exhaust system
  • Transmission
  • Clutch
  • Car gearbox
  • Front wheel drives
  • Chassis
  • Wheels and tires
  • Car suspension
  • Steering
  • Brake system
  • Body
  • Exterior
  • Interior
  • Doors and glass
  • Tailgate
  • Ventilation and heating
  • Electrical equipment
  • Equipment and devices
  • Headlights and lighting
  • Engine electrics
  • Electrical circuits


VAZbook.ru © 2017 · Mobile version · Contact with administration · Sitemap: EN BG BY UA RS HR RO PL SK HU · Site search · News and articles VAZ-1111 · VAZ-11113 · VAZ-2101 · VAZ-21011 · VAZ-2104 · VAZ-2105 · VAZ-21051 · VAZ-2106 · VAZ-21061 · VAZ-2107 · VAZ-21099 · VAZ-2109 · VAZ-2108 · VAZ-2110 · VAZ-2112 · VAZ-2114 · VAZ-2115 · VAZ-2121 · VAZ-21213 · VAZ-21214 ·
The site stores technical data using cookies to improve the service.