
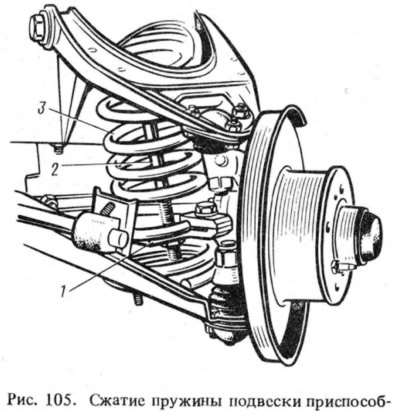
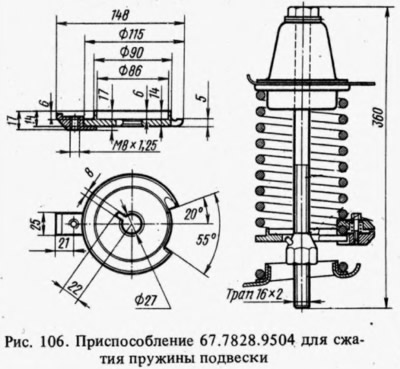
Insert screw 2 (pic. 105) accessories 67.7828.9504 (pic. 106) into the hole of the upper support of the suspension spring, from below they are put on a coil of spring 3 (see fig. 105) and on the screw 2 of the support plate 1 and fix it on the spring with a clamp. From below, a nut is screwed onto the screw so that its retainer enters the socket of the plate 1. Turning the screw 2 with a key, compress the spring until the suspension arms are completely unloaded. Take out the axle of the upper arm and disconnect it from the body. Disconnect the lower arm axle from the cross member and remove the suspension assembly from the vehicle. At the same time, it is necessary to note the number and location of the washers between the axis of the lower arm and the cross member, as well as the adjusting plates between the cross member and the side members of the body, so that when installing the units, put the washers and plates in their original place. Then the spring is removed, smoothly unloading it, the device is removed and the operations are repeated on the other side of the suspension.
Remove the mudguard and stabilizer bar. Supporting the engine with a traverse A.70526 or a hoist, remove the cross member.
Installation of components and parts of the suspension is performed in the reverse order of removal. In this case, the springs on the front and rear suspensions are installed in the same group (group A is marked with yellow paint, group B is marked with green). In exceptional cases, it is allowed to install group A springs on the front suspension, and group B springs on the rear suspension. If group B springs are installed on the front suspension, then springs of the same group are installed on the rear suspension.
To prevent incorrect distribution of forces in the rubber-metal joints, the nuts and lever axles are tightened in the following order:
- install the car on a flat area and direct the wheels straight;
- load a car weighing 320 kgf (4 people + 40 kg in the trunk);
- with a torque wrench, tighten the nuts for fastening the axles of the upper, and then the lower levers and the nuts for fastening the axle of the lower arm to the cross member. Then check and adjust the wheel alignment.