

At the new car (to TO-1) wheel alignment angles have the following values: camber 0°30'+40'-30'; pitch angle 4°+1°-1°30' convergence 1-7 mm.
After the TO-1 (after 2000-3000 km of run) and during the further operation of the car, the value of the wheel alignment angles should be: camber 0°30'±20' (0°5'±20') * Pitch angle 4°±30' (3°30' ±30')1; convergence 2—4 mi (3-5 mm)1.
The difference in the longitudinal angles of inclination of the axes of rotation of the right and left wheels should not exceed 0°30'.
Before adjusting the wheel alignment angles, check the tire pressure, the clearance in the front wheel hub bearings, and the health of the shock absorbers (for stem jamming), radial and axial runout of tires, clearance in the upper ball joints of the suspension, free play of the steering wheel. Detected malfunctions are eliminated by adjusting or repairing these components.
The control and adjustment of the wheel alignment angles can be carried out both on a loaded vehicle and on an unladen one, however, the control of the angles on an unloaded vehicle gives less accurate results. Therefore, in critical cases, it is recommended to carry out control and installation of corners on a car under a static load of 320 kgf, which corresponds to approximately the mass of 4 people. and a load of 40 kg in the trunk.
The car is loaded with special loads that are suspended from the bottom of the body, or with ballast (280 kg), distributed on the seat cushions and in the trunk (40 kg). The front seats must be in the middle position of their longitudinal travel. The cargo in the trunk is placed evenly, and the lack of gasoline is compensated by the cargo located on the right side of the trunk area.
After placing the car on the stand just before the corner control "live through" suspension of the car, for which a force of 40-50 kgf is applied 2-3 times, directed from top to bottom, first on the rear and then on the front bumper. In this case, the wheels of the car must be directed straight ahead.
Observe the following order of checking and adjusting the wheel alignment angles: caster angle, camber angle, toe-in.
Angle of longitudinal inclination of the axis of rotation
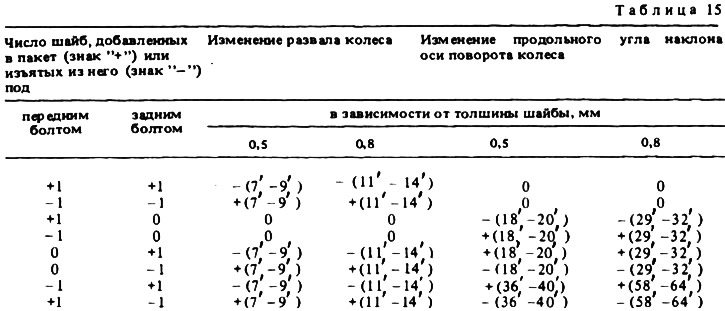
If, during verification, this angle does not correspond to the data given above, change the number of shims installed between the axis of the lower arm and the cross member and (see fig. 100), guided by the table. 15. When adjusting the wheel alignment angles, it is allowed to use U-shaped adjusting shims, which should be directed with the slot down. After adjustment, tighten the nuts with a torque wrench and check the angle value again.
Front camber angle
If the collapse differs from the norm, it is also regulated by changing the number of shims 27 and 25, guided by the table. 15. To increase the camber angle, remove the same number of washers from both bolts, and add them to decrease them.
Front wheel alignment
In case of incorrect toe-in of the wheels, the coupling collars of the side rods are loosened and both couplings are turned with the key 67.7813.9504 5 (see fig. 124) the same amount in opposite directions. In this case, the couplings are screwed on or rolled up with the tip of the rods and change the length of the side rods. After completing the adjustment, install the clamping collars with a slot horizontally with a deviation up or down no more than 600 and tighten them in this position. When the nuts are tightened, the edges of the slots of the clamping collars must not touch.
Wrench 67.7813.9504 is made by analogy with a pipe wrench and can be replaced with it.
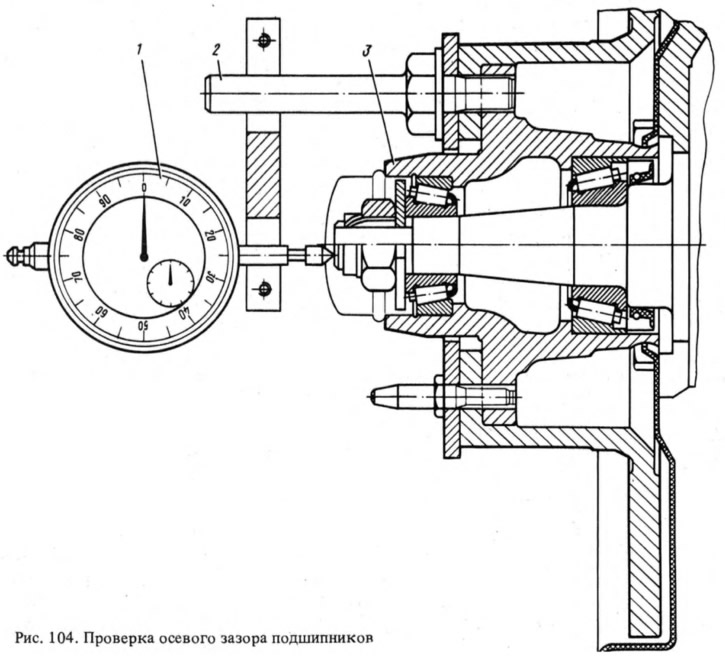
Checking and adjusting the clearance in the front wheel bearings. Hang the front of the car and remove the wheels. Carefully remove the hub cap with a puller 67.7801.9514 or a screwdriver. Attachment 02.7834.9505 is installed under the wheel mounting bolt (2, fig. 104). The indicator leg 1 is rested against the end of the axis of the pivot pin at the zero position of the arrow and, moving the hub 3 along the axis of the steering knuckle, measure the amount of movement (clearance) by indicator. If the gap is greater than 0.15 mm, it is adjusted in the following order:
- unscrew the adjusting nut from the pivot of the steering knuckle;
- install a new or used, but on a different car, nut and tighten it with a torque of 2 kgf·m, while simultaneously turning the hub in both directions 2-3 times for self-alignment of the bearings (if you use a nut removed from the adjustable assembly, it is difficult to ensure the reliability of its locking);
- loosen the adjusting nut and tighten it again with a torque of 0.7 kgf·m, and then release it by 20-25°and lock it, pressing the holes on the neck of the nut into the grooves at the end of the axis of the pivot pin. After adjustment, the clearance in the bearing should be in the range of 0.02-0.08 mm. When adjusting the clearance, it should be taken into account that the direction of the thread on the left trunnion is right, on the right - left.
Notes
1. Data in parentheses is for the vehicle without load.