
Rear fender welds
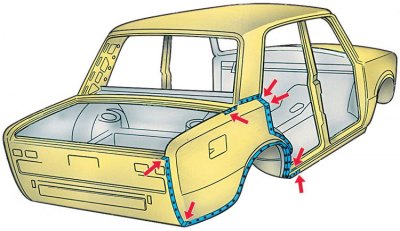
The dots indicate the resistance welding seams.
The arrows indicate the gas welding points.
The repair rules for the rear wing are the same as for the front wing.
1. When replacing the wing, remove the rear bumper, rear light, reflectors.
2. Empty the trunk. Remove the rubber seal, trunk floor upholstery, fuel tank (if the right wing changes) and disconnect the wiring.
3. Cut with a thin sharpened chisel or cut with a grinder along the connection wing:
- with a rear wheel arch along the bend, stepping back from the edge of the wing 20 mm;
- with spare wheel floor (or fuel tank) along the bend, stepping back from the edge of the wing 12–15 mm;
- with a rear body panel, stepping back from the connection line by 2 mm;
- with rear window crossbar panel, 2 mm away from the edge of the wing bend;
- with the rear part of the sidewall along the bend, stepping back from the edge of the wing 15–20 mm.
4. Cut the corner of the wing-to-rear panel connection of the upper part along a horizontal line, stepping back from the edge of the corner 15 mm.
5. Drill out the resistance weld points at the fender to rear roof side panel connections and detach the fender.
6. Remove the remaining strips of the wing in the joints with the body and clean the seats of the body elements and the new wing with a grinder.
7. Fit the new wing to the landing site and secure with quick release clamps.
8. Weld the fender by gas welding to the bottom and rear of the sidewall, to the rear window cross member panel, roof side panel, to the tailgate joint elbow, to the spare wheel floor (or fuel tank). In the figure, the places of gas welding are indicated by arrows.
9. Check the fit of the wing against the mating surfaces and weld it by contact welding with a step of 40–50 mm.
10. Install and weld the wing reinforcements with a spacer.