




Contents: Removal a carburetor engine with…↓ Installation ↓ Removal a carburetor engine without…↓ Installation ↓ Removal an injection engine without…↓ Installation ↓
There are two options for removing the engine: with disassembly and without disassembly. Removing the engine with disassembly is recommended in the absence of mechanical or hydraulic devices for lifting the engine (hoists with a crossbar, "goose", etc.). It is recommended to carry out the work with one or two assistants.
Removal a carburetor engine with disassembly
1. Place the vehicle on an inspection pit or overpass (see "Preparing a car for maintenance and repair").
2. Remove the mudguard (see "Mudguard - Removal and Installation").
3. Remove the hood (see "Hood - removal and installation").
4. Remove the battery (see "Battery - Removal and Installation").
5. Disconnect the fuel supply hose to the fuel pump (see "Fuel pump - removal and installation").
6. Disconnect the wire tip from the oil pressure sensor (see "Oil pressure sensor - replacement").
7. Remove the radiator (see "Radiator - removal and installation").
8. Remove the thermostat (see "Thermostat - replacement").
9. Remove the generator (see "Generator - removal and installation").
10. Remove the cylinder head (see "Carburetor Engine Cylinder Head Gasket - Replacement").
11. Disconnect the coolant drain hose from the heater radiator pipe (see "Heater Radiator - Replacement").
12. Remove the engine flywheel (see "Flywheel - removal and installation").
13. After disconnecting the wires, remove the starter from the engine compartment (see "Starter - removal and installation").
14. Unscrew the nuts of the lower fastening of the front supports of the power unit to the crossmember (see "Powertrain Mounts - Replacement").
15. Hang the cylinder block on a wooden beam, placing it on the front fenders of the car. Place a soft cloth under the beam.
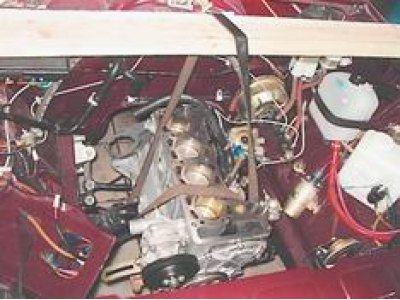
16. Raise the block and, removing the support pins from the crossmember holes, remove it from the engine compartment.
Installation
Installation and assembly of the engine is carried out in the reverse order.
Removal a carburetor engine without disassembling
To remove the engine, you will need a lifting device with a lifting capacity of at least 300 kg and slings (chain).
1. Place the vehicle on an inspection pit or overpass (see "Preparing a car for maintenance and repair").
2. Remove the hood (see "Hood - removal and installation").
3. Remove the battery (see "Battery - Removal and Installation").
4. Disconnect the wire from the ignition distributor that goes to the ignition coil terminal and the central high-voltage wire of the ignition coil (see "Ignition distributor - removal and installation").
5. Disconnect the fuel supply hose to the fuel pump (see "Fuel pump - removal and installation").
6. Disconnect the wire tip from the coolant temperature gauge sensor (see "Coolant Temperature Gauge Sensor - Replacement").
7. Disconnect the wire tip from the oil pressure sensor (see "Oil pressure sensor - replacement").
8. Remove the radiator (see "Radiator - removal and installation").
9. Remove the air filter housing (see "Air filter housing - removal and installation").
10. Disconnect the idle speed control and brake booster hoses from the intake manifold (see "Carburetor Engine Cylinder Head Gasket - Replacement").
11. Disconnect the air damper drive rod, the idle speed control hose and the wire blocks of the wire microswitch from the carburetor (see "Carburetor - removal and installation").
12. Disconnect the longitudinal rod of the carburetor throttle drive from the lever (see "Cylinder Head Cover Gasket - Replacement").
13. Remove the generator (see "Generator - removal and installation").
14. Remove the ground wire from the exhaust manifold stud (see "Carburetor Engine Intake Manifold and Exhaust Manifold Gaskets - Replacement").
15. Remove the coolant supply and discharge hoses from the heater radiator pipes (see "Heater Radiator - Replacement").
16. Remove the gearbox (see "Gearbox - removal and installation").
17. Using the standard bolt, attach the eye, removed during dismantling of the gearbox, to the upper left hole of the cylinder block.
18. After disconnecting the wires, remove the starter from the engine compartment (see "Starter - removal and installation").
19. We fasten the slings (chain) to the engine: on the right side - to the front eye; on the left side - by the rear eye attached to the cylinder block. We hang the engine on the hook of the lifting device.
20. Unscrew the nuts of the lower fastening of the front supports of the power unit to the crossmember (see "Powertrain Mounts - Replacement").
21. Raise the engine and remove the support pins from the holes in the crossmember. Remove the engine from the engine compartment.
Installation
Assembly and installation of the engine is carried out in the reverse order.
Removal an injection engine without disassembling
To remove the engine, you will need a lifting device with a lifting capacity of at least 300 kg and slings (chain).
1. Place the car on the inspection pit (see "Preparing a car for maintenance and repair").
2. Remove the hood (see "Hood - removal and installation").
3. Relieve the pressure in the fuel system (see "Relieving pressure in the fuel system") and disconnect the fuel hoses from the rail tubes (see "Fuel rail - removal, installation and testing of injectors").
4. Remove the battery (see "Battery - Removal and Installation").
5. Disconnect the wiring harnesses from the throttle position sensor, coolant temperature sensor, mass air flow sensor, ignition module, crankshaft position sensor and oxygen concentration sensor (see "Engine management system").
6. Disconnect the wiring harness from the idle speed control valve (see "Idle speed control valve - checking, removal and installation") and the injector wiring harness block from the engine harness (see "Fuel rail - removal, installation and testing of injectors").
7. Disconnect the throttle drive cable from the sector and remove the cable holders from the receiver and the cylinder head cover bracket (see "Throttle Cable Replacement").
8. Disconnect the brake booster hose from the receiver fitting (see "Receiver - removal and installation") and remove the hose holder from the cylinder head cover bracket.
9. Disconnect the fuel vapor supply hose from the throttle body fitting. Loosen the clamp and disconnect the air supply hose to the throttle body from the branch pipe (see "Throttle body - removal and installation").
10. After loosening the clamp, disconnect the hose supplying crankcase gases to the throttle body from the air duct pipe.
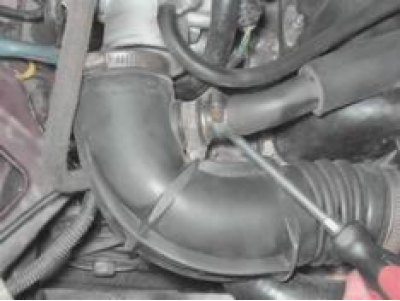
11. Unscrew the bolt securing the plastic bracket to the cylinder head cover (see "Cylinder Head Cover Gasket - Replacement").
12. Disconnect the plastic holder of the crankshaft position sensor wire and the adsorber hose from the cylinder head cover bracket.
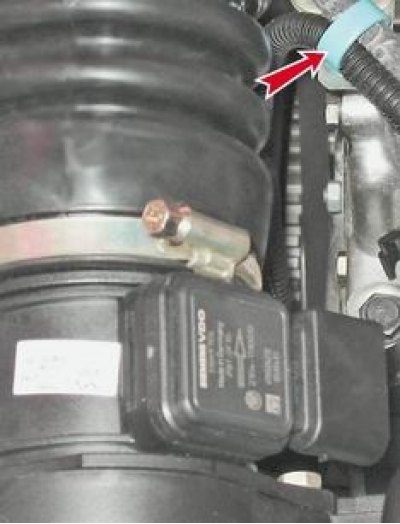
13. Remove the air filter housing from the rubber supports (see "Air filter housing - removal and installation") and remove it together with the air supply ducts.
14. Disconnect the wire tip from the coolant temperature gauge sensor (see "Coolant Temperature Gauge Sensor - Replacement").
15. Disconnect the wire tip from the oil pressure sensor (see "Oil pressure sensor - replacement").
16. Disconnect the ground wire from the right exhaust manifold mounting stud and remove the wire (see "Intake manifold and exhaust manifold gasket for injection engine - replacement").
17. Remove the coolant supply and discharge hoses from the heater radiator pipes (see "Heater Radiator - Replacement").
18. Remove the radiator (see "Radiator - removal and installation").
19. Remove the generator (see "Generator - removal and installation").
20. Remove the gearbox (see "Gearbox - removal and installation").
21. Using the standard bolt, attach the eye, removed during dismantling of the gearbox, to the upper left hole of the cylinder block.
22. After disconnecting the wires, remove the starter from the engine compartment (see "Starter - removal and installation").
23. We fasten the slings (chain) to the engine: on the right side - to the front eye; on the left side - by the rear eye attached to the cylinder block. We hang the engine on the hook of the lifting device.
24. Unscrew the nuts of the lower fastening of the front supports of the power unit to the crossmember (see "Powertrain Mounts - Replacement").
25. Raise the engine and remove the support pins from the holes in the crossmember. Remove the engine from the engine compartment.
Installation
The engine and all removed parts are installed in the reverse order.