




There are distributed injection systems with and without feedback. Moreover, both systems can have both imported and domestic components. All systems have their own design, diagnostics and repair features, which are described in detail in separate fuel injection system repair manuals.
This chapter only briefly describes the general principles of the design, operation and diagnostics of fuel injection systems, the procedure for removing/installing units, and also provides the features of repairing the engine itself.
The feedback system is used mainly on export cars. In this case, a catalytic converter of exhaust gases and an oxygen sensor are installed in the exhaust system, which provides feedback. The sensor monitors the concentration of oxygen in the exhaust gases, and the electronic control unit, using its signals, maintains such an air/fuel ratio at which the converter operates most effectively.
The open-loop injection system does not have a neutralizer or oxygen sensor; a CO potentiometer is used to regulate the CO concentration in the exhaust gases. A gasoline vapor recovery system is also not used.
Caution: Before removing any injection control system components, disconnect the wire from the "–" terminal of the battery.
Caution: Do not start the engine if the battery cable terminals are not tightly tightened.
Caution! Never disconnect the battery from the vehicle's electrical system while the engine is running.
Caution! When charging the battery, disconnect it from the vehicle's electrical system.
Caution! Do not allow the electronic control unit (ECU) to heat up above 65°C when in operation and above 80°C when not in operation (for example, in a drying chamber). It is necessary to remove the ECU from the car if this temperature is exceeded.
Caution! Do not disconnect or connect the wiring harness connectors to the ECU when the ignition is on.
Caution! Before performing arc welding on a vehicle, disconnect the wires from the battery and the wire connectors from the ECU.
Attention! Perform all voltage measurements using a digital voltmeter with an internal resistance of at least 10 MOhm.
Warning! The electronic components used in the injection system are designed for very low voltage, so they can easily be damaged by electrostatic discharge. To prevent damage to the ECU by electrostatic discharge:
- do not touch the ECU connectors or electronic components on its boards with your hands;
- when working with the programmable read-only memory (PROM) of the control unit, do not touch the terminals of the microcircuit.
Warning! Do not operate the engine with a neutralizer on leaded gasoline. This will lead to rapid failure of the neutralizer and oxygen concentration sensor.
Injection system diagram
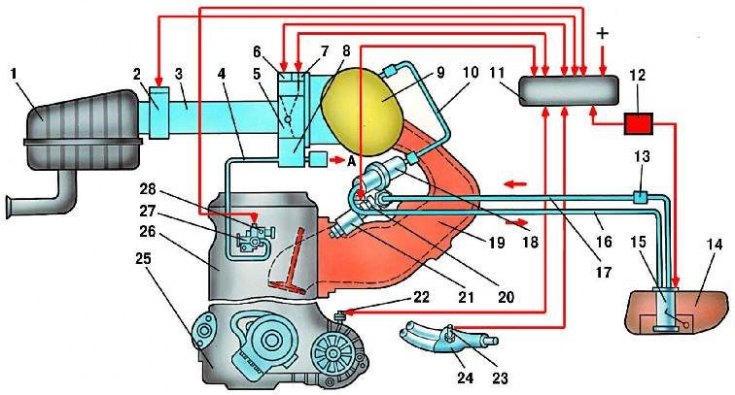
1. Air filter; 2. Mass air flow sensor; 3. Inlet pipe hose; 4. Coolant supply hose; 5. Throttle body; 6. Idle speed control; 7. Throttle position sensor; 8. Idle speed system heating channel; 9. Receiver; 10. Pressure regulator hose; 11. Electronic control unit; 12. Electric fuel pump relay; 13. Fuel filter; 14. Fuel tank; 15. Electric fuel pump with fuel level sensor; 16. Drain line; 17. Supply line; 18. Pressure regulator; 19. Intake pipe; 20. Injector ramp; 21. Nozzle; 22. Speed sensor; 23. Oxygen concentration sensor; 24. Muffler inlet pipe; 25. Gearbox; 26. Cylinder head; 27. Cooling system outlet pipe; 28. Coolant temperature sensor; A. To the coolant pump inlet pipe
Underhood space of a car with an injection system
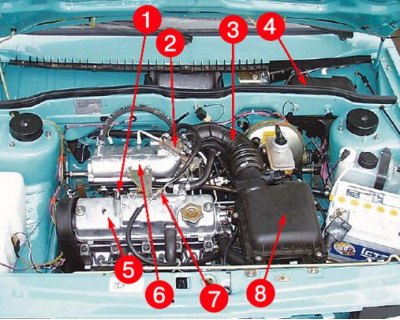
1. Ramp with nozzles; 2. Throttle body; 3. Air duct; 4. Fuse box; 5. Engine; 6. Receiver; 7. Throttle cable; 8. Air filter housing
Diagnostics
Here is only brief information on diagnostics of the injection system using the CHECK ENGINE indicator lamp. Diagnostics using special devices and diagnostic cards are described in separate repair manuals for distributed fuel injection systems.
The ECU constantly performs self-diagnostics for some control functions. The ECU language for indicating the source of the malfunction is diagnostic codes. Codes are two-digit numbers in the range from 12 to 61. The fault codes may differ slightly for different control units. The table shows the decoding of fault codes for the electronic control unit of the "January-4" type for the distributed fuel injection system without feedback and with domestic components.
When the ECU detects a fault, the code is stored in "memory" and the CHECK ENGINE indicator light comes on. This does not mean that the engine should be stopped immediately, but the reason for the indicator light coming on should be identified as soon as possible.
ECU fault codes type "January–4"
Code | Malfunction |
12 | Diagnostic circuit of the control lamp is working properly |
14 | Coolant Temperature Sensor High Signal |
15 | Low signal level of the coolant temperature sensor |
16 | Increased voltage of the on-board network |
17 | Low voltage of the on-board network |
19 | Incorrect crankshaft position sensor signal |
21 | Throttle Position Sensor Signal Voltage Too High |
22 | Throttle Position Sensor Signal Voltage Low |
24 | No vehicle speed sensor signal |
27 | High signal level of CO-potentiometer |
28 | Low signal level of CO-potentiometer |
33 | Incorrect signal from the mass air flow sensor (high frequency signal at the sensor output) |
34 | |
35 | Incorrect signal from the mass air flow sensor (low frequency signal at the sensor output) |
43 | |
51 | Unstable idle speed |
52 | Incorrect knock sensor signal |
53 | Programmable Read Only Memory (PROM) Error |
61 | Electronic control unit (RAM) error |
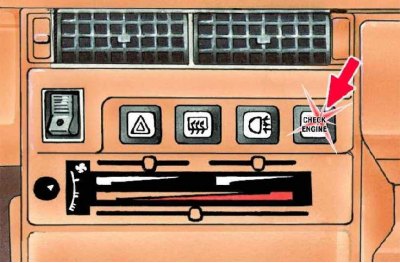
CHECK ENGINE lamp
 |
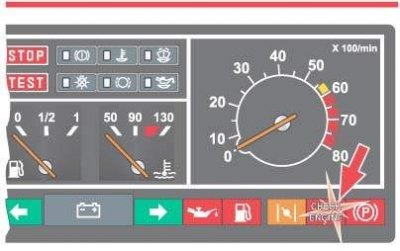 |
The lamp is located on the instrument panel and performs the following functions:
- informs the driver that there is a malfunction in the engine management system and the vehicle needs to be checked;
- issues diagnostic codes stored in the ECU "memory" to help the specialist find the fault.
When the ignition is turned on, the lamp lights up, and while the engine is not running, the lamp and systems are checked for serviceability. After the engine starts, the lamp should go out. If the lamp continues to light, the self-diagnostic system has detected a malfunction. If the malfunction disappears, the lamp usually goes out after 10 seconds, but the malfunction code will be stored in the ECU "memory".
In case of intermittent fault, the CHECK ENGINE lamp will light for about 10 seconds and then go out. However, the corresponding fault code will be stored in the ECU "memory" until its power supply is disconnected. When unexpected codes are detected during the code reading process, it can be assumed that these codes are generated by an intermittent fault and will help in diagnosing the system.
Reading codes
The diagnostic connector is used to communicate with the ECU. It is located under the instrument panel on the right side next to the ECU.
The fault codes stored in the ECU "memory" can be read using a special diagnostic tool or by counting the number of flashes of the CHECK ENGINE lamp.
To read codes with the lamp, it is necessary to connect contact B of the diagnostic connector to the "ground". To do this, connect it to contact A, which is connected to the "ground" of the engine.
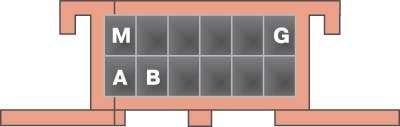
A-contact connected to the "ground"
B - diagnostic contact for sending a signal to the ECU
G - contact for electric fuel pump control
M - contact for information issuance (serial data channel)
When terminals A and B are connected, turn the ignition switch key to position I (ignition), while the engine should not be running. Under these conditions, the CHECK ENGINE lamp should flash the code "12" three times in a row.

This should happen in the following order: flash, pause (1–2 sec), flash, flash – long pause (2–3 sec), and so on two more times.
Code "12" indicates that the ECU diagnostic system is working. If code "12" is not displayed, then the diagnostic system itself is faulty.
After the code "12" is displayed, the CHECK ENGINE lamp will display fault codes three times if they exist, or will simply continue to display the code "12" if there are no fault codes.
If more than one fault code is stored in the ECU memory, each of them is displayed three times.
Attention! After diagnostics are completed, it is permitted to open contacts A and B of the diagnostic connector 10 seconds after the ignition is turned off.
Erasing codes
Erase codes from the ECU "memory" after repairs are completed or to see if the fault occurs again. To erase, disconnect the ECU power supply for at least 10 seconds.
The power supply can be disconnected by disconnecting the wire from the "-" terminal of the battery or by removing the ECU protection fuse from the fuse box.
Attention! To avoid damaging the ECU, turn its power off and on only when the ignition is off.
Distinctive features of injection systems
Controller | General Motors | "January-4" |
Controller marking | 2111–1411020–20 | 2111–1411020–22 |
Catalytic converter | Eat | No |
Crankshaft position sensor (The sensors are not interchangeable, please check the specific number directly on your car) | 2112–3847010, 2112–3847010–01 | |
Throttle position sensor (The sensors are not interchangeable, please check the specific number directly on your car) | 2112–1148200, 2112–1148200–31 | |
Air flow sensor | 2112–1130010–01GM, square case | |
Temperature sensor (The sensors are not interchangeable, please check the specific number directly on your car) | 2112–3851010, 2112–3851010–01, 2112–3851010–02 | |
Knock sensor (The sensors are not interchangeable, please check the specific number directly on your car) | 2121–3855010, 2121–3855010–01, 2121–3855020 | |
Speed sensor (The sensors are not interchangeable, please check the specific number directly on your car) | 2112–3843010, 2112–3843010–20, 2112–3843010–30, 2112–3843010–31, all with round connector | |
Oxygen sensor | 2121–3850010–11, 2121–3850010–20, type GM AFS–62, AFS–79, Bosch LHS–24 | No |
Injection system sensors
What are the risks of injection system sensor malfunctions:
- crankshaft position sensor - complete failure of the injection system, the engine does not start;
- mass air flow sensor - increased fuel consumption, significant deterioration in dynamics, problems with starting the engine;
- throttle position sensor - loss of power, jerks and dips during acceleration, unstable operation in idle mode;
- coolant temperature sensor — difficulties with starting in cold weather: you have to warm up the engine by pressing the gas pedal, when overheating the power is significantly reduced, detonation occurs;
- knock sensor — the engine is very sensitive to the quality of gasoline, increased tendency to detonation.
Features of electrical equipment of cars with distributed fuel injection with feedback
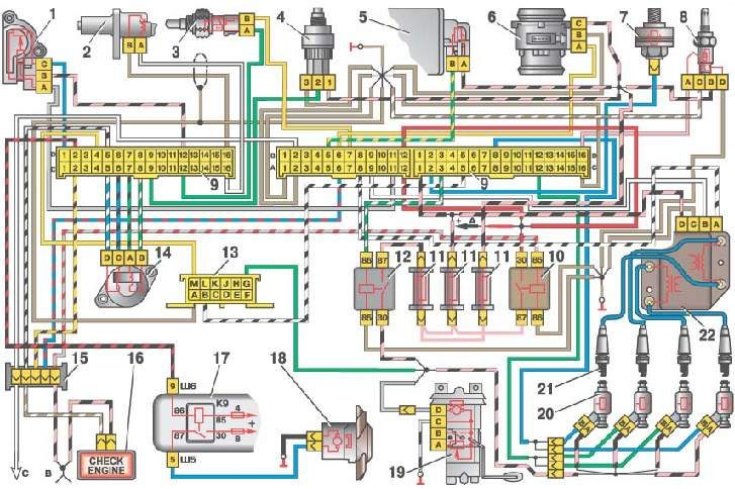
1. Throttle position sensor; 2. Crankshaft position sensor; 3. Coolant temperature sensor; 4. Speed sensor; 5. Evaporative Evaporative Blow-Off Valve; 6. Mass air flow sensor; 7. Knock sensor; 8. Oxygen concentration sensor; 9. Electronic control unit pads; 10. Ignition relay; 11. Fuses; 12. Electric fuel pump relay; 13. Diagnostic connector; 14. Idle speed controller; 15. Connector for connecting to the instrument panel wiring harness; 16. Display with CHECK ENGINE indicator light; 17. Mounting block; 18. Electric motor of the engine cooling system fan; 19. Electric fuel pump with fuel level sensor; 20. Nozzles; 21. Spark plugs; 22. Ignition module; A. To the "+" terminal of the battery; B. To terminal "15/1" of the ignition switch; C. To the low voltage input of the tachometer on vehicles with a "high" panel; K9. Fan motor switching relay