
English Русский
Български
Беларускі
Український
Српски
Hrvatski
Română
Polski
Slovenský
Magyar
| Articles | Contacts | Sitemap |   
Repair and maintenance Lada Repair and maintenance Mazda Repair and maintenance Mitsubishi Repair and maintenance Toyota Repair and maintenance Land Rover Repair and maintenance Hyundai Repair and maintenance Nissan
VAZbook.ru


Main     1111   2101   2105   2106   2107   2109   2110   2115   2121  
VAZ-2121 (1977-1994) VAZ-21213 (1994-2006) VAZ-21214 (1994-2006)
  • Main
  • «Niva»
  • VAZ-21213
  • Electrical equipment
  • Engine electrics
  • Checking the rectifier block valves

Checking the rectifier block valves (VAZ-21213)

            0

A working valve only passes current in one direction. A faulty valve may not pass current at all (chain break), or pass current in both directions (short circuit).

If one of the rectifier valves is damaged, the entire rectifier unit must be replaced.

A short circuit of the rectifier block valves can be checked without removing the generator from the car, after disconnecting the wires from the battery and the generator and removing the protective casing. The wire from the terminal "B" of the voltage regulator is also disconnected. For a generator with an old voltage regulator, it is also necessary to disconnect the terminal "B" of the voltage regulator from the terminal "30" of the generator.

You can check it with an ohmmeter or with a lamp (1-5W, 12V) and the battery, as shown in Fig. 7-8.
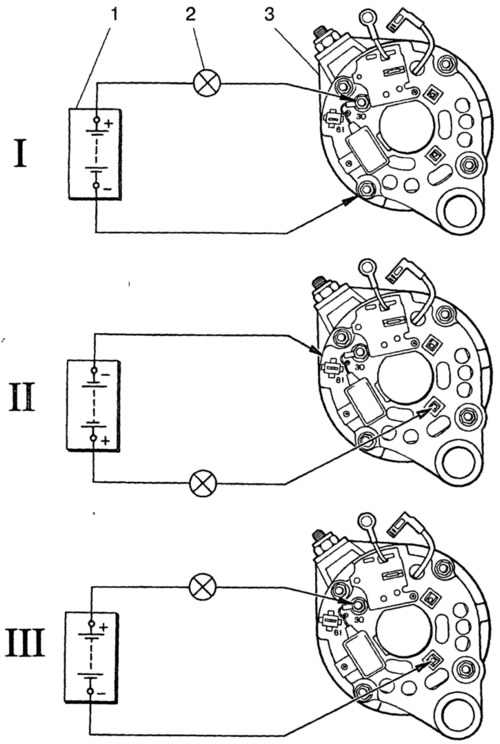
Fig. 7-8. Schemes for testing rectifier valves:

Fig. 7-8. Schemes for testing rectifier valves:
1 - battery; 2 - control lamp; 3 - generator; I - checking both "positive" and "negative" valves simultaneously; II - checking the "negative" valves; III - checking the "positive" valves.


Note: In order to simplify the fastening of the rectifier parts, three valves (with a red mark) create a "plus" of rectified voltage on the case. These valves are "positive", and they are pressed into one plate of the rectifier block, connected to the "30" terminal of the generator. The other three valves ("negative" with a black mark) have a "minus" of rectified voltage on the case. They are pressed into another plate of the rectifier block, connected to the "ground".


First check if there is a short circuit in both the "positive" and "negative" valves. To do this, connect the "plus" of the battery through a lamp to the "30" terminal of the generator, and the "minus" to the generator body (fig. 7-8, I). If the lamp is on, then the "negative" and "positive" valves are short-circuited.

A short circuit of the "negative" valves can be checked by connecting the "plus" of the battery through a lamp to one of the mounting bolts of the rectifier unit, and the "minus" to the generator body (fig. 7-8, II). The lamp burning means a short circuit in one or more "negative" valves. It should be remembered that in this case the lamp burning may also be a consequence of the stator winding turns shorting to the generator housing. However, such a malfunction is less common than a short circuit of the valves.

To check for a short circuit in the "positive" valves, connect the "plus" of the battery through a lamp to the "30" clamp of the generator, and the "minus" to one of the mounting bolts of the rectifier unit (fig. 7-8, III). The lamp lighting up will indicate a short circuit in one or more "positive" valves.

A break in the valves without disassembling the generator can be detected either with an oscilloscope or when testing the generator on a bench by a significant decrease (by 20-30%) in the value of the output current compared to the nominal. If the windings, additional diodes and voltage regulator of the generator are in good condition, and there is no short circuit in the valves, then the reason for the decrease in the output current is a break in the valves.

[The original is available on the online resource VazBook]


This article is available at russian, bulgarian, belarusian, ukrainian, serbian, croatian, romanian, polish, slovak, hungarian
The text was reviewed by the specialist: Grigory Vologodtsev

Share with friends:

Previous articles
VAZ-21213: Engine electrics
Next articles

Checking the generator stator
Checking the rotor excitation winding
Checking the generator with an electronic oscilloscope
Testing the generator on the bench
Possible generator malfunctions, their causes and methods of elimination
Checking additional diodes
Checking the generator voltage regulator
Checking the Generator Capacitor
Disassembling the generator
Generator assembly

More articles from other manuals on VAZ cars:
➠ Checking the generator rectifier block valves VAZ-21011 (1974-1983)
➠ Checking the diodes of the generator rectifier block VAZ-21051 (1979-2010)
➠ Rectifier block and capacitor — checking and replacement VAZ-2114 (2004-2013)
➠ Checking and repairing the cylinder block VAZ-1111 (1988-1996)
➠ Cylinder Block — Checking and Repairing VAZ-2108 (1984-2003)
Link in different formats to this page


Visitor comments

No comments yet


How much will 47 + 34 ?


VAZ-2121 (1977-1994) 
  • General information
  • Vehicle device
  • Car VAZ-21219
  • Power unit
  • Engine repair
  • Cooling system
  • Lubrication system
  • Supply system
  • Transmission
  • Clutch
  • Car gearbox
  • Transfer case
  • Cardan gear
  • Rear axle and gearbox
  • Front axle
  • Chassis
  • Front suspension
  • Rear suspension
  • Steering
  • Brake system
  • Body
  • Exterior
  • Interior
  • Doors and windows
  • Electrical equipment
  • Equipment and devices
  • Headlights and lighting
  • Engine electrics


VAZ-21213 (1994-2006) 
  • General information
  • Vehicle device
  • User manual
  • Power unit
  • Engine repair
  • Cooling and lubrication system
  • Supply system
  • Transmission
  • Clutch
  • Car gearbox
  • Transfer case
  • Cardan gear
  • Rear axle and shafts
  • Front axle and wheel drive
  • Chassis
  • Wheel suspension
  • Steering
  • Brake system
  • Body
  • Exterior
  • Interior
  • Electrical equipment
  • Engine electrics
  • Equipment and devices


VAZ-21214 (1994-2006) 
  • General information
  • Vehicle information
  • Troubleshooting
  • Power unit
  • Engine repair
  • Cooling system
  • Fuel system (carburetor)
  • Fuel system (injector)
  • Ignition system
  • Control system
  • Exhaust system
  • Transmission
  • Clutch
  • Car gearbox
  • Transfer case
  • Cardan gear
  • Front axle
  • Rear axle
  • Chassis
  • Front suspension
  • Rear suspension
  • Steering
  • Brake system
  • Body
  • Exterior
  • Interior
  • Doors, covers and windows
  • Ventilation and heating
  • Electrical equipment
  • Equipment and devices
  • Headlights and lighting
  • Engine electrics
  • Electrical circuits


VAZbook.ru © 2017 · Mobile version · Contact with administration · Sitemap: EN BG BY UA RS HR RO PL SK HU · Site search · News and articles VAZ-1111 · VAZ-11113 · VAZ-2101 · VAZ-21011 · VAZ-2104 · VAZ-2105 · VAZ-21051 · VAZ-2106 · VAZ-21061 · VAZ-2107 · VAZ-21099 · VAZ-2109 · VAZ-2108 · VAZ-2110 · VAZ-2112 · VAZ-2114 · VAZ-2115 · VAZ-2121 · VAZ-21213 · VAZ-21214 ·
The site stores technical data using cookies to improve the service.