English Русский
Български
Беларускі
Український
Српски
Hrvatski
Română
Polski
Slovenský
Magyar
| Articles | Contacts | Sitemap |   
Repair and maintenance Lada Repair and maintenance Mazda Repair and maintenance Mitsubishi Repair and maintenance Toyota Repair and maintenance Land Rover Repair and maintenance Hyundai Repair and maintenance Nissan
VAZbook.ru


Main     1111   2101   2105   2106   2107   2109   2110   2115   2121  
VAZ-2101 (1970-1983) VAZ-21011 (1974-1983)
  • Main
  • «Zhiguli»
  • VAZ-2101
  • Chassis
  • Steering
  • Checking and adjusting the steering on a car

Checking and adjusting the steering on a car (VAZ-2101)

            0

Contents: Checking the ball joints of the…↓ Check the condition of the…↓
General inspection. Before inspection, clean the steering gear parts and the steering gear housing from dirt. Set the wheels to a position corresponding to driving straight ahead and, turning the steering wheel in both directions, check:
  • free play (play) of the steering wheel, which should not exceed 5° (when measured along the wheel rim, no more than 18-20 mm);
  • steering wheel turning force (when installing the front wheels on a smooth plate), which should not exceed 25 kgf; are there any knocks in the hinges, joints and steering mechanism?;
  • strength of fastening of the steering gear housing, pendulum arm bracket (if necessary, tighten the threaded connections).

In addition, you should make sure that there is no play in the ball joints of the rods and in the pendulum arm bracket, and that the worm shaft does not move in the axial direction.

Then, by turning the adjusting couplings of the side rods, check the reliability of tightening their clamps. After this, check the condition of the ball joints and rubber protective caps, as indicated below.

Checking the ball joints of the steering rods


First of all, the movement of the tips along the axis of the fingers is checked. To do this, using a lever and support, move the tip parallel to the axis of the finger. The axial movement of the tip relative to the finger should be 1-1.5 mm. Such movement indicates that the finger insert is not jammed in the tip socket and moves together with the finger, compressing the spring. The hinge with the jammed insert is replaced.


Turning the steering wheel in both directions, check by touch for any play in the ball joints of the steering rods. If play is felt, then replace the tips or the steering rod assembly.

Check the condition of the protective caps of the ball joints of the steering rods


The cap is replaced if it has cracks, tears or separation of the rubber from the edging, and also if grease penetrates out when squeezed by hand.

Checking and adjusting the clearance in the steering gear worm bearings. To check, set the front wheels to the straight-ahead position. Then, turning the steering wheel in both directions, check whether the distance between the end of the housing 13 (see fig. 124) of the steering gear and the shaft end. A change in distance is a sign of clearance in the worm bearings.

To adjust the clearance in the worm bearings, turn the steering wheel 1-1.5 turns to the left, unscrew the lower cover mounting bolts 17 (see fig. 125) and drain the oil from the steering gear housing. After removing the cover, remove the adjusting gasket 18 or replace it with a thinner one. After this, having secured the lower cover, check again whether there is any axial movement of the worm in the bearings. If there is no movement, pour oil into the housing and check the steering wheel turning force (placing the front wheels on a smooth plate), which should not exceed 25 kgf.

Checking and adjusting the clearance in the engagement of the roller with the worm

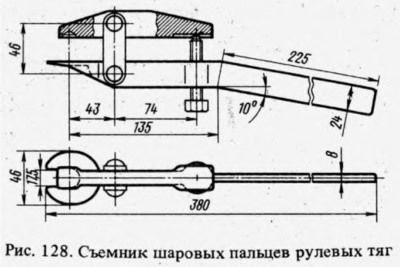
Having made sure that there is no axial movement of the worm in the bearings, use puller A.47035 (Fig. 128) to press out the ball joint pins from the steering knuckle and disconnect the lateral and middle rods from it, while maintaining the straight-ahead position of the front wheels.


Having made sure that there is no axial movement of the worm in the bearings, use puller A.47035…


[The information is posted on the portal vazbook.ru]

By shaking the pitman arm, check whether there is any play in the engagement of the roller and the worm. When turning the steering wheel 30° in each direction from the neutral position, there should be no play, i.e. no noticeable free play of the pitman arm. If free play of the pitman arm is felt, loosen nut 3 (see fig. 125) of the adjusting screw and, lifting the lock washer, tighten the adjusting screw 2 until the gap is eliminated. It is not recommended to tighten the adjusting screw too much. Then, holding the adjusting screw with a screwdriver, tighten nut 3.

Having made sure that the steering knuckle does not have free play, connect the ball joint pins to it and check the steering wheel turning force. If it exceeds 25 kgf, loosen the adjusting screw 2.


This article is available at russian, bulgarian, belarusian, ukrainian, serbian, croatian, romanian, polish, slovak, hungarian
The text was reviewed by the specialist: Grigory Vologodtsev

Share with friends:

Previous articles
VAZ-2101: Steering
Next articles

The structure and operation of the steering system
Removal and installation the steering gear
Disassembly and assembly of the steering mechanism
Checking and repairing steering gear parts
Steering rod repair
Repair of the pendulum lever

More articles from other manuals on VAZ cars:
➠ Checking and adjusting the clearance in the steering worm… VAZ-2105 (1979-2010)
➠ Steering — checking the technical condition and adjusting the… VAZ-2106 (1976-2006)
➠ Steering — checking the technical condition and adjusting the… VAZ-2107 (1982-2012)
➠ Checking and adjusting the clearance in the steering worm… VAZ-21213 (1994-2006)
➠ Checking the condition of the steering VAZ-1111 (1988-1996)
Link in different formats to this page


Visitor comments

No comments yet


How much will 26 + 38 ?


VAZ-2101 (1970-1983) 
  • General information
  • Vehicle description
  • Vehicle device
  • Vehicle operation
  • Maintenance
  • Main malfunctions
  • Applications
  • Power unit
  • Engine repair
  • Cooling and lubrication system
  • Supply system
  • Transmission
  • Clutch
  • Transmission
  • Cardan gear
  • Rear axle
  • Chassis
  • Front suspension
  • Rear suspension
  • Steering
  • Brake system
  • Body
  • Exterior
  • Interior
  • Electrical equipment
  • Engine electrics
  • Equipment and devices


VAZ-21011 (1974-1983) 
  • General information
  • Specifications
  • Operation and maintenance
  • Power unit
  • Engine repair
  • Cooling system
  • Lubrication system
  • Power and exhaust system
  • Ignition system
  • Engine electrics
  • Transmission
  • Clutch
  • Car gearbox
  • Cardan gear
  • Rear axle
  • Chassis
  • Car suspension
  • Steering
  • Brake system
  • Body
  • Exterior
  • Interior
  • Doors and locks
  • Electrical equipment
  • Equipment and devices
  • Lighting and signaling


VAZbook.ru © 2017 · Mobile version · Contact with administration · Sitemap: EN BG BY UA RS HR RO PL SK HU · Site search · News and articles VAZ-1111 · VAZ-11113 · VAZ-2101 · VAZ-21011 · VAZ-2104 · VAZ-2105 · VAZ-21051 · VAZ-2106 · VAZ-21061 · VAZ-2107 · VAZ-21099 · VAZ-2109 · VAZ-2108 · VAZ-2110 · VAZ-2112 · VAZ-2114 · VAZ-2115 · VAZ-2121 · VAZ-21213 · VAZ-21214 ·
The site stores technical data using cookies to improve the service.