
Removal and installation of a screen wiper
The wiper is removed from the engine compartment in the following order. Remove the brushes with levers, disconnect the wires from the battery and from the wiper motor; unscrew the nuts of the axles of the levers with the mounting sleeves; unscrew the nuts securing the motor bracket and remove the motor together with the lever system. On the workbench, the lever system is removed from the electric motor.
The wiper is installed in the reverse order.
Check and repair of the electric motor
Windscreen wiper motor ME-241 DC with excitation from permanent magnets.
If a malfunction of the electric motor is suspected, it is checked on the stand at a voltage of 14 V and a temperature (25±10) °C.
The data to be verified is as follows:
- The maximum effective moment on the gearbox shaft, kgf·m - 0.2
- Current consumption at a moment of 0.1 kgf·m, A, no more than - 2.8
- Reducer shaft speed at a torque of 0.1 kgf·m, rpm, not less than — 50
- Starting torque on the gearbox shaft, kgf·m, not less than — 1.2
To disassemble the electric motor, unscrew the screws securing the cover 1 (pic. 171) reducer and remove it together with the panel 2. Then unscrew the screws securing the cover 16 to the body 7 of the electric motor and separate them. Take out the anchor 8 of the electric motor. To remove the gear 3 of the gearbox, unscrew the crank nut 9, remove the retaining ring 10 from the axle and remove the axle with gear 3 and washers U5 from the housing.
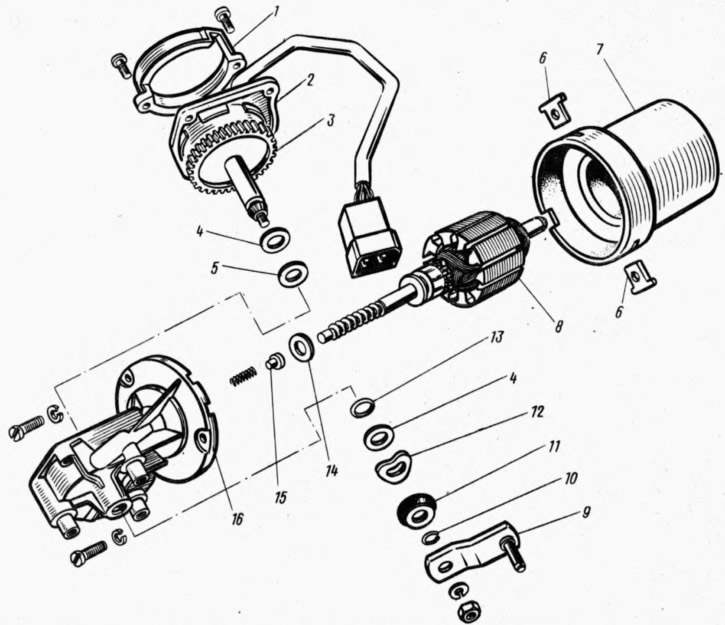
Pic. 171. Parts of the wiper motor:
1 - cover; 2 - panel; 3 - gear reducer; steel washer; 5 - textolite washer; 6 - cracker; 7 - body; 8 - anchor; 9 - crank; 10 - snap ring; 11 - protective cap; 12 - spring washer; 13 - sealing ring; 14 - adjusting washer; 15 - thrust bearing; 16 - motor cover.
After disassembly, the internal cavities of the electric motor are blown with compressed air to remove deposits of coal dust and the condition of the brushes and commutator is checked. The brushes should move freely, without jamming, in the brush holders, and the springs should be securely fastened.
They are cleaned with sandpaper with a grain size of 10 to M40, and then wiped with a clean cloth lightly smeared with technical petroleum jelly. If the collector is badly burned or worn out, then it is better to replace the anchor with a new one. Check for signs of seizing on the necks of the armature shaft. If necessary, clean them with the same sandpaper.
When assembling, the brushes are removed from the collector so as not to break them and not damage their edges, and the anchor is inserted into the housing with extreme care, avoiding hitting the poles so as not to break them. After assembly, to center the bearings, it is recommended to tap the motor housing with a wooden hammer, and then check it on the stand.