
Being the bearer of such high virtues, the body requires a lot of attention. And he deserves it. The body is very vulnerable. Any traffic accident almost always leaves its mark on him. How many different dramatic stories could be told by rumpled, skewed bodies. But time passes, the wounds heal, and the car sets off again.
Often in traffic accidents, the victims are doors, hood, trunk lid, bumpers, windows, electrical equipment, i.e. removable components and parts. To replace the deformed parts with new ones is quite within the power of everyone. In most cases, such work does not require any special equipment or special knowledge and skills. It is necessary to decide once and try with your own hands to eliminate small dents, deep scratches: straighten, putty and paint. There are many places on the body where the surface is without bends, roundings, where it is convenient to get close and where a dent or scratch has just appeared. Start your «universities» follows precisely from such simple defects.
The main body malfunctions can be divided into the following types: deformation of attachments and assemblies, malfunctions in the operation of fittings (locks, windows, limiters), dents and scratches on body panels and paint defects.
Car door
The degree of damage to any of the side doors of VAZ vehicles can be different, and therefore the required amount of work should also be different. If the door needs to be replaced, then you can first disassemble it, and only then remove it, or vice versa. Fittings are repaired on the door without removing it. To paint one door (this also applies to other attachments), it also does not need to be removed.
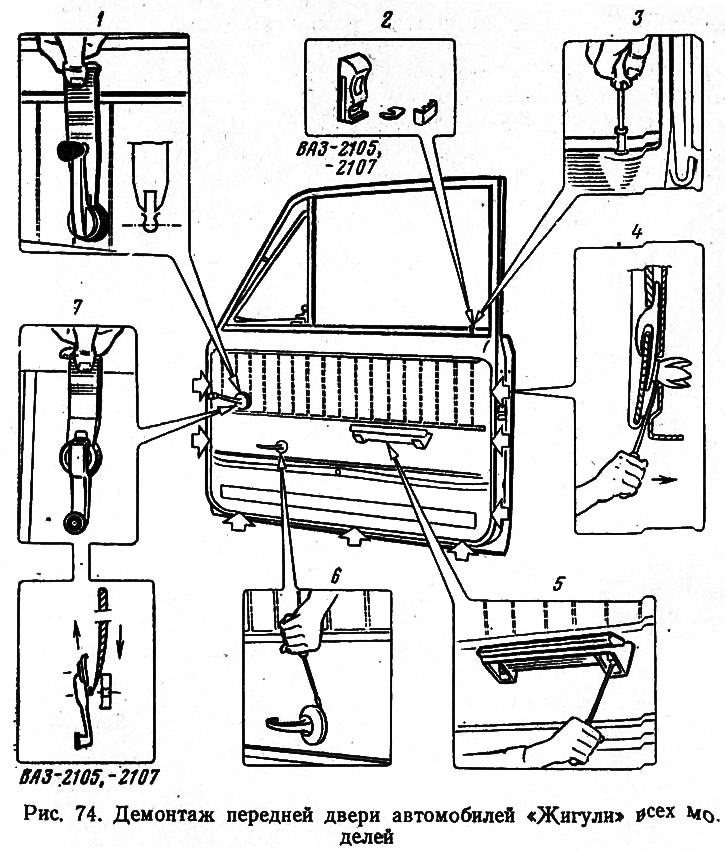
To learn how to repair door fittings, it is advisable to familiarize yourself with their internal structure. Disassembly must be done in the following sequence:
- unscrew the screws 5 securing the armrest (pic. 74) and take it off. On cars VAZ-2103, VAZ-2105, VAZ-2106, VAZ-2121 you must first remove the decorative cap that hides one of the screws;
- remove the handle 1 or 7 of the power window, to do this, press the socket and, using a tool or a thin screwdriver, remove the retaining spring, then remove the socket and gasket. On VAZ-2105 and -2107 cars, it is necessary to slightly drown the socket, move the lining along the handle until it comes out of the annular recess on the axle and only then remove the handle;
- on VAZ-2105 and VAZ-2107 cars, remove button 2 of the lock lock, after removing the button cap with a sharp tool and removing the connection bracket with the rod; on all other models of VAZ cars, unscrew button 3 of the lock;
- remove the lining 6 of the inner handle of the lock drive, helping yourself with a screwdriver;
- remove the upholstery of 4 doors, overcoming the resistance of spring plastic holders. Remember, holders are one-time use, but their services can be used again if care and skill are exercised when removing them;
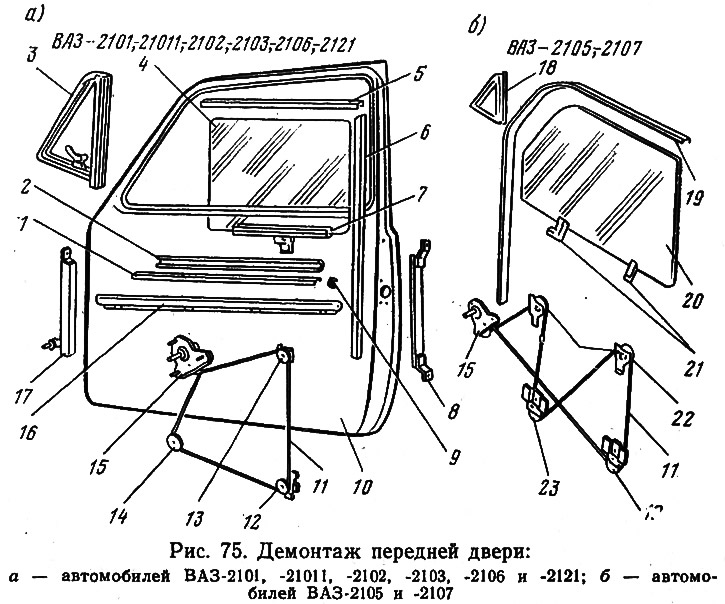
- while sliding window 4 (pic. 75) located at the top, it is necessary to remove the grooves 8 and 17, and only after that the glass is lowered down;
- remove the seal 5 or 19 of the sliding window;
- remove the pivot glass 3 and the plug 18 of the window with the rear-view mirror;
- remove trim 9, trim 1 and seal 2 of the sliding window, as well as trim 16 of the window frame for VAZ-2103, VAZ-2106 cars;
- remove clamping brackets and dust covers; remove the rear seal 6 of the sliding glass; loosen the nut of the tension roller 14 or 23 of the power window, disconnect the cable 11 from the holder 7 or the brackets 21 of the sliding window 4 or 20, release the cable holder, remove the cable from the rollers 12, 13, 14 or 22, 23, lower the glass down and, deflecting towards you remove its lower edge through the lower doorway 10. On VAZ-2105 and VAZ-2107 cars, the glass is removed through the top;
- unscrew the nuts and remove the power window mechanism 15;
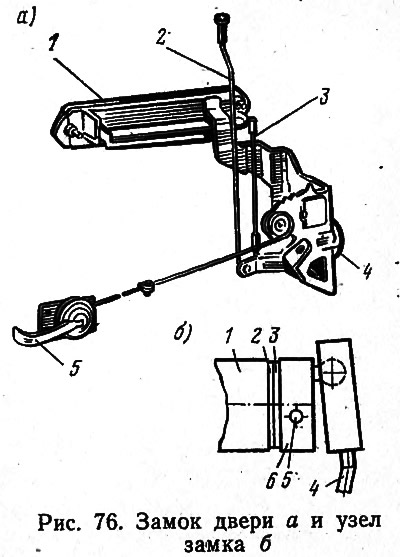
- unscrew button 2 or 3 (see fig. 74) padlock lock 4 (rice, 76, a);
- using an 8 mm key and a screwdriver, disconnect the rod 3 from the lock and remove the outer handle 1;
- using a Phillips screwdriver, disconnect the inner handle 5 of the door from the inner panel, remove the lock 4 as an assembly with the lock rod 2, the inner handle and the lock drive rod;
- remove the door opening limiter using a 10 mm socket wrench, pliers, a hammer and firmware;
- remove the door lamp from the VAZ-2103, VAZ-2106, VAZ-2107 cars;
- remove the bundle of wires with brackets (for cars VAZ-2103, VAZ-2106, VAZ-2107);
- remove door trim panel (for cars VAZ-2103, VAZ-2106).
When assembling the doors, follow the reverse sequence of disassembly. Don't forget to lube the power window cable as well (lubricant Litol-24), axis of rotation of the upper rollers 13 and 22 (see fig. 75), using the same Litol-24, adjust the operation of the power window.
Having familiarized yourself with the door fittings, you can competently take up troubleshooting. Here are the most common ones:
1. Glass is not fixed in position.
A defect is possible in two cases: if the brake spring of the mechanism 15 has burst (see fig. 75) power window (in this case, the window regulator is changed) and if the sliding window is loosened on the cable (in this case, adjust the correct position of the glass and tighten the screws of the cable holder).
2. The door does not lock.
The doors will be securely locked when there are no backlashes in the axes of the levers, curvature of the rods, dirt on the rubbing surfaces of the lock.
If the door does not lock, the lock must be removed and carefully inspected, paying attention to the quality of the riveting of the lever axis of the external lock drive. When the riveting is loosened, the lever tooth may not engage with the ratchet (axial displacement of the ratchet). Having found that the cause of the malfunction is, indeed, this, it is necessary to securely rivet the axle.
Sometimes the cause is a broken spring of the external drive lever. In this case, the lock must be replaced.
It happens that the cause of the malfunction is dirt on the rubbing surfaces of the lock. The lock should be washed in kerosene or gasoline, and then the rubbing surfaces should be lubricated with grease, preferably CIATIM-221.
3. The door is not blocked by the button.
The fault most often occurs after installation work (lock changes, etc.) or when closing the door with great force. In either case, deformation is possible (curvature) thrust. The defect is eliminated by editing the rods.
The lock may not work even if the rubbing surfaces of the lock are heavily soiled. Flushing and lubricating the lock eliminates the defect.
Sometimes the key hardly moves the cylinder in the lock of the front doors. In this case, the button of the blocking device usually sticks. Most often, the reason is the skew of the leash due to the presence of excessive clearance between cylinder 1 (pic. 76b) and a leash.
Motorists eliminate this defect as follows: after removing the door trim, disconnect the rod 4, knock out the pin 5 and remove the leash 6. An additional washer 3 with a thickness equal to the existing gap is installed between it and the washer 2.
4. The door does not open with the outside handle.
Such a malfunction is possible if the connection of thrust 3 is loose (see fig. 76, a) external handle with a lock drive lever. If you tighten the screw fixing the thrust, the defect disappears.
5. Turning the inside handle does not fully open the door.
The malfunction occurs due to the movement of the drive lever (low speed) traction. To eliminate the malfunction, it is necessary to adjust the position of the internal handle 5 (see fig. 76, a) with traction. To do this, loosen the screws securing the handle bracket, move the handle together with the bracket to the desired position and tighten the screws.
It often happens that the door needs to be replaced. The main thing in this case is to have a new door. Everything else can be done independently if desired. This also applies to all other attachments: hood, trunk lid. A new door is advisable in advance (before subassembly and installation on the body) color. Then disassemble the old door and remove it from the body, for which: disconnect the door stop from the rack by knocking out the stopper fastening pin, and, holding the door in the open position, unscrew the screws securing the door hinges to the body pillars. A word of caution: these screws require a heavy-duty T-handle screwdriver or an impact drill driver. The painted door is carefully installed instead of the deformed one. Subassembly is carried out in the reverse order of disassembly, but taking into account the following:
- putting the cable on the rollers and fixing the power window mechanism, make sure that the coils of the cable on the drum do not overlap each other;
- initially tightening the roller nut 14 (see fig. 75, a), adjust the tension of the cable by moving the roller, and then finally tighten the nut.
After installing and assembling a new door, it is imperative to adjust the operation of the lock (if required) in the following way:
- just in case (for memory) trace the outline of the retainer on the B-pillar;
- loosen the retainer, move it outward and tighten the bolts.
This is what happens when the door closes too tightly. If it does not close tightly, move the latch inward. The latch has to be raised higher than its original position if the door is lowered when closing, and moved down if the door is raised when closing.
If you carefully look at the VAZ cars passing by, you can see cars with the same deformed front doors. The reason for this deformation is a failed door stop. In order to avoid the appearance of such a dent, it is urgent to replace the limiter.
Not being able to purchase a new limiter, one of the Moscow motorists correctly reasoned that the left rear door opens the least, which means that its limiter can be rearranged to the front left. Next, he repaired the failed limiter and installed it on the left rear door.
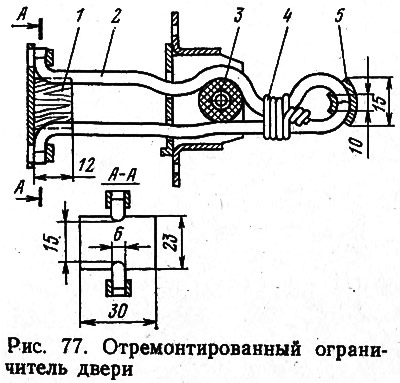
The limiter repair technology is as follows:
- insert the broken ends into the tube 5 (pic. 77) with an inner diameter of 6 mm;
- put limiter 2 on roller 3 and tie it with wire 4;
- having installed the repaired limiter in place, spread its ends with insert 1 made of wood or hard rubber.
doors (this applies equally to the hood and trunk lid) should be located in openings with uniform gaps around the perimeter. This is important not only for aesthetic perception. This ensures the tightness and quality of the locks.
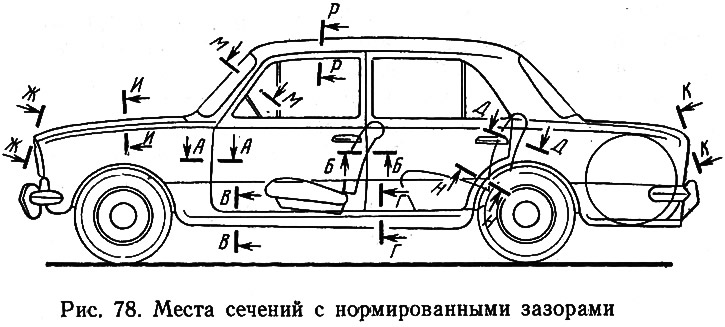
Between the mating body parts in the sections indicated in Fig. 78, there are certain standardized clearances (mm):

If it is necessary to replace the rear door of VAZ-2102 and VAZ-2121 cars, disconnect the stops from the door and unscrew the nuts securing the door to the hinges. To position the door evenly in the opening, use oval holes for the hinge pins.