
Insufficient braking performance
Fully serviceable brakes provide: smooth and simultaneous braking of all four wheels, stopping distance not exceeding the norm, normal temperature of brake drums and wheel disks. When even one of these conditions is violated, the most urgent intervention is required.
First of all, it is necessary to check the condition of all pipelines, and if dents are found on them, remember that this is dangerous. Even more serious should be taken to rubber hoses, on the outer sheaths of which there should not be even the slightest cracks. There should be no dangling tubes, since loosening of the fastening leads to vibrations and subsequent breakdowns.
If braking efficiency has decreased, the driver, no matter how inexperienced he may be, will feel what has happened. The brake pedal will spring back (will become soft), and in order to stop the car abruptly, you will have to apply considerable effort to the pedal. Decreased braking performance is usually caused by the following circumstances.
1. Leakage of brake fluid from the wheel cylinders of the front and rear brakes.
2. Air intrusion into the hydraulic drive system.
In both cases, you must first determine where the fluid is leaking from and through which air is sucked in, and then decide how to fix the defect.
If the tubes are intact, the fittings and plugs are tightened, and the drops of brake fluid hang over and over again, the wheel cylinders (current) you have to remove, disassemble, find out the cause of the leak and eliminate it. As you know, the wheel cylinders of the front wheel brakes are located in the calipers. It is more convenient to remove the caliper and only then disassemble it into parts. To remove the caliper (pic. 65) (without brake disc), it is necessary to disconnect the supply hose and unscrew the two bolts securing it from the outside of the brake shield. To prevent leakage of brake fluid, plug the hole in the hose and the rest of the tube with plugs.
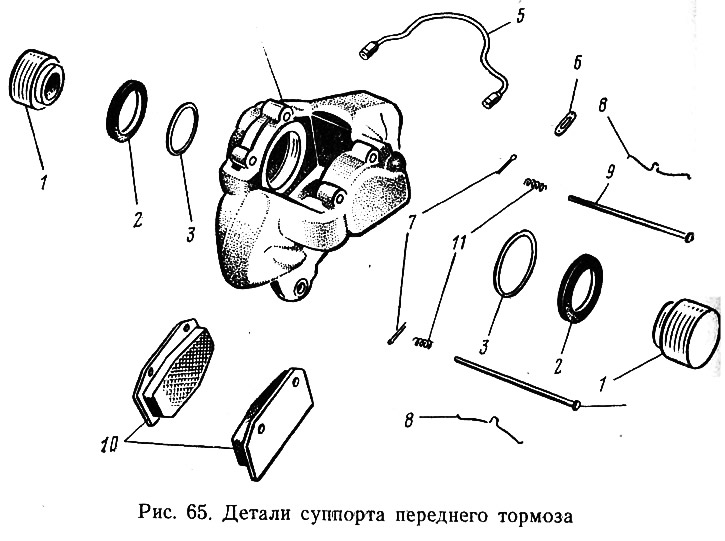
It is necessary to disassemble the caliper 4 and get to the parts of the wheel cylinders as follows:
- remove cotter pins of 7 brake pad mounting pins;
- remove pins 9 with springs 11;
- remove springs 8 and brake pads 10; disconnect tube 5 and remove dust caps 2 from cylinders;
- use a pump or compressed air hose to supply air to the cylinder through the brake fluid inlet;
- remove pistons 1 and sealing rings 3 pushed out of the cylinder;
- unscrew the air release valve 6.
All parts should be washed with warm water and dried with compressed air. Signs of wear and scratches on the piston and cylinder bore remind you that the parts need to be replaced. The dust cap and O-ring must also be replaced, and it is advisable to replace these parts with new ones in any case if the piston is removed.
The assembly of the front brake is performed in the reverse order of disassembly. Lubricate the piston, cylinder and O-ring with brake fluid before assembling. After installing the caliper in place and adding brake fluid to the front brake master cylinder reservoir, bleed the hydraulic system, i.e. remove the air that has entered the system. This operation is very similar to bleeding a hydraulic clutch. It is necessary to pump the hydraulic system of all four wheels. When starting to bleed the hydraulic system, as well as during the operation, it is necessary to control the presence of brake fluid in the reservoir and prevent its level from dropping, since air can again enter the system and energy will be wasted.
If one of the wheel cylinders of the rear wheel brakes turned out to be the culprit of the leak, it is removed and the same operations are performed as with the front wheel cylinders.
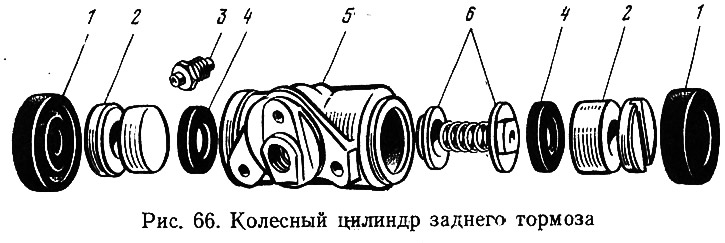
The sequence of disassembly of the rear wheel brake wheel cylinder (pic. 66) is as follows: remove protective caps 1 and pistons 2; take out cuffs 4; support cups 6 with a spring; unscrew valve 3 for air release. Before assembling, it is necessary to lubricate all parts liberally with brake fluid and, without exerting any effort, install the parts in the cylinder body 5. After installing the protective caps, you must manually check the smooth movement of the pistons.
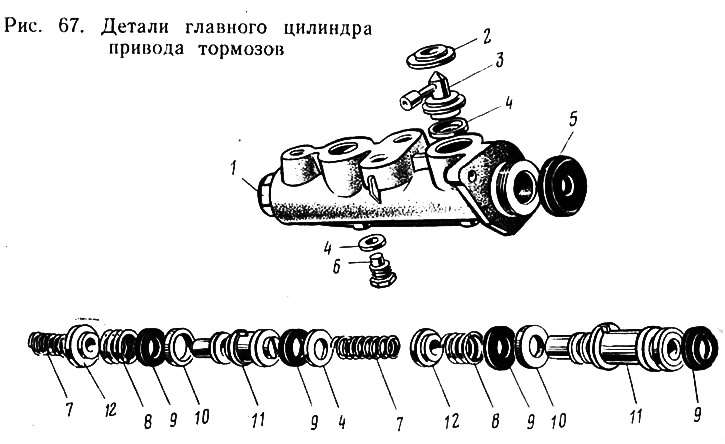
3. Damaged O-rings (cuffs) 9 master brake cylinders (pic. 67). Cuffs are usually changed, but for this it is necessary to remove and disassemble the master cylinder.
Remove the brake master cylinder in the following sequence:
- disconnect the flexible hoses from the main brake cylinder, and close the openings of the hoses and fittings with stoppers so that the liquid does not leak out in vain and dirt and dust do not get into the cylinder;
- disconnect the steel tubes through which the brake fluid flows from the master cylinder to the wheel cylinders;
- remove the master cylinder, after unscrewing the two nuts securing it to the body (for cars VAZ-2101 and VAZ-2102) or to a vacuum booster (for all other car models).
To disassemble the master cylinder, you must first prepare a comfortable workplace: a clean table, good lighting, a bath of brake fluid. Dismantling begins with the removal of the lock washer 2, the fitting 3 with the sealing washer 4. Then the cap 5 is removed. All the parts of the main cylinder are held in the body 1 by the bolt 6. Having unscrewed it, all the parts are removed: springs 7 and 8; spacer rings 10, pistons 11, cups 12.
In this case, the master cylinder had to be disassembled in order to replace the o-rings (cuffs) 9, however, having the opportunity to closely examine each detail of the cylinder, pay special attention to the condition of the pistons and the cylinder mirror. They should not have scratches, irregularities, signs of corrosion; there should not be an increased gap between the piston and the cylinder.
Before assembly, it is advisable to wash the parts of the master cylinder in isopropyl alcohol and blow with compressed air (the time the parts are in alcohol should not exceed 20 s). Installing the part in place, it is necessary to lubricate it abundantly with brake fluid.
4. Contamination or oiling of brake drums and pads. Pads and drums get dirty, as a rule, while driving on wet and muddy roads. They are oiled due to abundant lubrication with deformed oil seals or leakage of brake fluid from the wheel cylinders of the rear wheels. In both cases, the drums must be removed, the sources of oiling removed, and the brake pads and the mirror of the drums wiped with gasoline.
Non-simultaneous braking, skidding or vehicle withdrawal
This defect occurs for various reasons. Among them, there are those that are not difficult to eliminate. You have to start with them. First of all, you need to check the air pressure in the tires and, if necessary, make it the same on the right and left. At the same time, you should inspect the condition of the protectors of all four wheels. Uneven pressure and wear on the treads can cause the vehicle to skid or steer. Then you need to carefully inspect the pipelines of the hydraulic brake drive. Deep dents on them can prevent the free passage of brake fluid to one of the wheel cylinders, as a result of which the car can skid when braking.
Failure of the brake of at least one of the wheels will cause non-simultaneous braking and, as a result, the vehicle will move away from the straight direction of motion. This is especially dangerous in winter conditions on slippery roads. There is an old way to check for non-simultaneous braking. The car is installed on a lift or stands, the engine is started and the direct line is turned on (fourth) transmission. At medium speeds of the engine crankshaft, they begin to gently press on the brake pedal.
If the wheel brakes are working properly, the engine will stall at the same time as the wheels stop. If the brake of one of the wheels is faulty, the drive wheels will rotate at different speeds. Having found such an inconsistency, they find out what the reason is: either it is an incorrect adjustment of the brakes, or a leak of brake fluid, or oiling or contamination of the pad linings.
When the simplest causes are eliminated or excluded, and the malfunction remains, you should do more in-depth research, that is, check whether the mounting angles of the front wheels are violated and whether the pressure regulator is installed correctly. It is expedient to carry out these operations on HUNDRED.
Screeching and screeching brakes
Probably everyone has met with this defect. Crossroads, red traffic lights and various sounds of screeching cars stopping. VAZ cars, as a rule, stop without noise, but it happens that one of them suddenly squeals at the moment of braking.
Research shows that brake squealing and screeching occurs when:
- the return spring of the brake pads of the rear wheel brakes has weakened. Such a spring is replaced;
- Worn or heavily soiled brake pads. The pads are cleaned or changed;
- there is an ovality of the brake drums or a strong runout of the brake disc, which can be eliminated in a service station (bore the drum or grind the disc). At home, both the disc and the drum are replaced.
Increased effort when pressing the brake pedal
This malfunction usually affects cars equipped with a hydraulic vacuum brake booster (pic. 68). When the booster is working, very little effort is required on the brake pedal, and when you press it, you can hear the noise of air entering the booster. If, for braking, you have to press the pedal with force, then the hydraulic vacuum booster needs to be repaired. First of all, it is necessary to check the tightness of its components, the condition of the air filter, the serviceability of the valves, the condition of the cylinder, etc.

It is not difficult to disassemble the hydraulic vacuum booster, but we do not recommend doing this, since there are no spare parts for it on sale. At home, you can eliminate the violation of tightness (If «guilty» hoses or loose fittings) and clogged air filter 6.
When the air filter becomes clogged, air stops flowing into cavity A and, therefore, the vacuum booster is inactive. To get to the air filter, it is necessary to disconnect the pusher 5 from the pedal and remove the protective cover 3 with the holder 4. For all other malfunctions, the amplifier must be removed. To do this, remember the following: when removing the amplifier, it is not necessary to disconnect the brake master cylinder. This will prevent air from entering the system and subsequent bleeding of the brakes.
The operation of removing the amplifier should be performed in this order:
- disconnect the pusher 5 from the brake pedal;
- disconnect the nuts securing the master cylinder to the amplifier and disconnect the master cylinder;
- loosen the clamps and disconnect the hose 2 from the tip 1 and the fitting on the engine exhaust pipe;
- unscrew the nuts securing the booster to the bracket of the clutch and brake pedals and remove the booster from the car.
It is necessary to exert additional force on the brake pedal even when (on all car models) the rubber parts in the brake cylinders swell. This can happen (it was mentioned above), if gasoline, kerosene or mineral oil gets into the brake fluid. There is only one way out of this situation: the cylinders should be disassembled, rubber parts replaced, all parts washed in isopropyl alcohol or brake fluid. Naturally, the brake fluid must be drained from the system, the system must be filled with fresh fluid, and also pumped through, removing air.
Incomplete release of all wheels
After driving a few tens of kilometers, stop and touch the wheel disks and brake drums. It is not uncommon for drums and discs to heat up to over 60°C. This is the first sign of incomplete wheel release. In other words, when the pedal is fully released, the wheels continue to be under the action of the brakes.
This malfunction can and does occur for the following reasons.
1. There is no free travel of the brake pedal. Only normal (3-5 mm) pedal free play provides the required clearance between the pusher and the piston of the main cylinder, which is necessary for the complete release of the wheels.
2. On vehicles equipped with a hydraulic vacuum booster, the adjusting bolt of the hydraulic vacuum booster protrudes relative to the mounting plane of the master cylinder. The adjustment is carried out according to the scheme: disconnect the main cylinder from the hydraulic vacuum booster and check the bolt protrusion. The bolt should protrude 1.25 relative to the mounting plane of the master cylinder flange-0,2 mm (see fig. 68). If the size does not match, it is necessary, while holding the end of the rod, to unscrew or tighten the bolt.
3. The valve body of the hydraulic vacuum booster is stuck due to swelling of the diaphragm or pinching of the cover seal or protective cap. The defect is eliminated by replacing the hydraulic vacuum booster.
4. Master cylinder o-rings swell or master cylinder piston sticks. In both cases, the master cylinder is disassembled and the parts that fail to work are changed.
Braking one of the wheels when the pedal is released
Which particular wheel brakes is easy to determine by the degree of its heating. What is the reason? There may be several of them:
- the return spring of the rear brake pads is weakened or broken. To make it easier to determine the malfunction, you need to hang the wheels and turn each of them. If there is noise or knocking, then the return spring is to blame. Remove the drum, change the spring and free the drum from dirt;
- the piston of the wheel cylinder seizes; the sealing rings of the wheel cylinder swell;
- the position of the caliper relative to the brake disc is violated due to the loosening of the bolts;
- there is no clearance between the pads and the brake drum.
All these malfunctions are completely eliminated, and the process of performing operations is described above.