
When you buy a new car, the battery is already fully prepared for use, that is, it is filled with electrolyte and charged. If you buy a new battery, then it is sold dry, without electrolyte, and you will have to perform all operations until the battery is fully operational.
Given that the electrolyte is an aqueous solution of sulfuric acid (the electrolyte consists of chemically pure sulfuric acid with a density of 1.84 g/cm3 and distilled water), when working with it, you must strictly follow the safety rules: wear glasses, rubber gloves, an apron. The electrolyte is prepared in a vessel specially designated for this purpose, and without fail the acid is poured into water, and not vice versa. The solution is made up in such a way that its density is 1.27-1.29 g/cm3, and the temperature is 15-25°C. The prepared solution is poured into each of the six batteries using a funnel, after removing the plugs of the filling holes.
After 2 hours of exposure, the plates and battery separators have time to be saturated with electrolyte and it is already possible to measure the density and voltage. It is more convenient to check the density with a PE-2 density meter, and the voltage with a load plug. If during measurements it turns out that the density has decreased (this is natural, since the electrolyte interacts with the active mass of the plates) no more than 0.03 g/cm3, and the voltage is more than 12 V, then the battery can be considered serviceable. At a voltage of 10-12 V, the battery must be recharged. Before installing the battery in the vehicle, check the electrolyte level again and top up if necessary. It may happen that after a two-hour exposure, the density of the electrolyte will decrease by more than 0.03 g/cm3. Typically, the voltage of such a battery does not exceed 10-12 V. With such indicators, the battery must be recharged. For this purpose, numerous commercially available devices are used. You can use any device that can recharge the battery with a current of 5 A. The operation lasts at least 5 hours at an initial electrolyte temperature not higher than 27°C. During charging, it is necessary to control the density and temperature of the electrolyte. Permissible temperature limit 40°C. The battery is considered charged when copious gas evolution begins in all six batteries, and the density stabilizes and remains constant for at least 2-3 hours.
There are situations in which a new battery with freshly filled electrolyte must be charged. This happens if:
- the battery did not work after filling the electrolyte for 24 hours;
- the battery is placed on a car that will have a hard road, cold and frequent engine starts;
- The battery has been dry-charged for more than 6 months from the date of issue.
Battery drains while driving
When all devices and wires of electrical equipment are in good condition, the battery will always be charged. This is the whole point of the system: what consumers use must be restored by sources. The battery is both a source and a consumer at the same time. In her example, this uninterrupted chain is especially clearly traced.
If the battery is discharged or, conversely, recharged during operation, it means that the system is out of harmony, something has failed to work, and these «something» It could be a regulator or a generator. This is just the case when the PA-1 device will help to understand the reason.
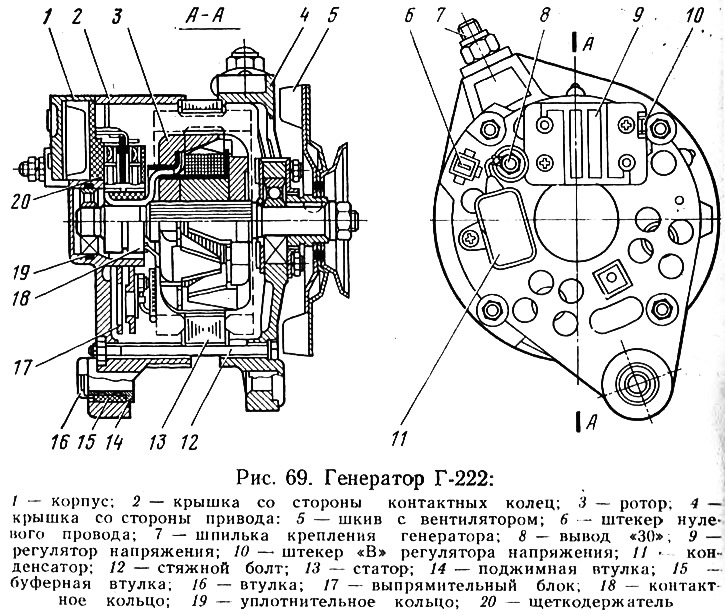
On VAZ vehicles of all models, the G-221 generator is used, except for VAZ-2105 and VAZ-2107 vehicles, which are equipped with a more powerful G-222 generator (pic. 69). On the cover of the G-222 generator, from the side of the slip rings, a G73-21V capacitor with a capacity of 2.2 μF is installed, designed to protect against radio interference.
Generators G-221 and G-222 are interchangeable in terms of dimensions and attachment points. However, if the G-222 generator can be installed on all models, then the G-221 generator cannot be installed on VAZ-2105 and VAZ-2107 cars, since the current generated by this generator is not enough to satisfy all their consumers.
When installing the G-222 generator instead of the G-221 generator on VAZ vehicles, two conditions must be met:
- ensure reliable contact with each other and good insulation of the wires going to the plug «67» and «15» voltage regulator;
- remove the relay-regulator PP-380, remembering that the G-222 generator has a relay built into the generator.
The most common generator problems include:
- weak tension of the alternator drive belt. The defect is easily fixed;
- fuse blown (8 A) voltage regulator. Due to the fact that on different models of VAZ cars, the voltage regulator circuit is protected by fuses of different numbering, the corresponding table in the car's operating instructions will help decide which one to check;
- open circuit between plug «67» generator and voltage regulator. Upon detection, the breakage is restored;
- open circuit between plug «15» voltage regulator (it is located in the engine compartment, in the upper corner of the left mudguard on all VAZ models and on the back cover of the generator in the VAZ-2105 car) and plug «15» ignition lock;
- violation of adjustment or damage to the charge control lamp relay. The RS-702 relay is used to turn on the control lamp on the instrument panel when the generator voltage is not enough to charge the battery. The relay is installed in the engine compartment on top of the right wheel mudguard. A failed relay is usually replaced.
There are cases when a turned slip ring on the generator rotor breaks the winding wire connected to it. Some motorists fix this malfunction on their own. The repair technology is as follows: the turned ring is fixed with epoxy glue, having previously degreased the surfaces to be glued. The torn wire is soldered, and excess glue is removed with a needle file.
On all VAZ vehicles, except for VAZ-2105 and VAZ-2107 vehicles, a 1F-380 voltage regulator is installed, which maintains the generator voltage within the specified limits when the engine crankshaft speed and generator load current change.
If you suspect that the voltage regulator is faulty (the car battery is constantly being recharged), it should be checked without removing it from the vehicle. For this you need:
- check the condition of the battery. It must be fully charged;
- disconnect all consumers, leaving the battery connected only to the ignition system;
- start the engine and with the help of suction (starting device) increase the engine crankshaft speed to 2500-3000 rpm. On models that have a tachometer, this is easy to achieve. If there is no tachometer, then set the speed «by eye»;
- Measure the voltage at the battery terminals with a voltmeter. With a working regulator, it should not exceed 14.5 V.
With a faulty regulator, the voltage will exceed 14.5 V. To confirm this, the regulator housing and body are connected to each other with a separate wire and the voltage is measured again. If the voltage is really higher than 14.5 V, then the output is correct and the relay must be adjusted as follows:
- turn off the ignition and remove the cover of the relay-regulator;
- loosen the calibration spring by bending the brackets up;
- start the engine and determine the results achieved. It is not always possible to get the desired results from the first run, and then you have to repeat the operation sometimes several times.
It happens, however, that with this method of checking the voltage becomes normal. This means - poor contact of the regulator body with the ground.
The G-222 generator on the back cover has a built-in small-sized microelectronic non-separable and unregulated voltage regulator Ya-112A. To check such a regulator without removing the generator from the car, you must have a DC voltmeter with a scale of up to 15-30 V, not lower than the 1st accuracy class. Before checking, let the engine run for 15 minutes at an average speed, then turn on the headlights and the battery and measure the voltage between terminal B and the generator ground. Voltage must not exceed 14.6V (at generator temperature 25±10°С). If the temperature is lower or higher than the specified value, the voltage is adjusted in one direction or another, respectively, by 0.2-0.3 V.
The voltage regulator is replaced when the battery is systematically overcharged or undercharged. To remove it, just unscrew the screws on the back of the generator and remove the brush holder assembly with the voltage regulator and capacitor.
In addition to the generator and voltage regulator malfunctions listed above, there may be open circuits, short circuits, etc. In these cases, it is advisable to contact a service station.
Connecting new consumers. Battery discharge can also occur with fully functional electrical equipment, but this is an exceptional case that occurs when the owner installs additional equipment on the car, which, together with the main one, consumes more energy than the sources can produce. In this case, it is necessary to decide which of the additional consumers should be removed.
Excessive contamination of the battery surface or electrolyte. Often, when topping up electrolyte or inaccurately performing an operation to determine the density, the electrolyte gets on the surface of the battery. As a result of careless treatment, a layer of dirt accumulates on the battery case (dust-electrolyte mixture). All this causes intense self-discharge. In these cases, the dirt must be removed, the battery case wiped with napkins soaked in a 10% solution of ammonia or soda ash. A similar phenomenon occurs with the battery when the electrolyte is contaminated. Dirty battery electrolyte is drained (remembering safety) and pour clean.
Electrolyte boiling
It happens that at a normal level of electrolyte in batteries, the surface of the battery is flooded with electrolyte, which splashes out through the ventilation holes in the plugs. Such a violent behavior of the electrolyte is its reaction to a large charging current, or to an increased density, or to the sulfation of the plates. The reasons for recharging the battery were discussed above, and the alternator or voltage relay is usually to blame.
If the electrolyte poured into the battery turned out to be greater than necessary, the density is done as follows: a part of the electrolyte is taken from each battery with a syringe, and distilled water is added instead. It is not necessary to measure the density immediately after adding water, it is necessary to allow (15-20 min) mix water and electrolyte.
Sulfation of the plates, i.e., the formation of coarse-grained lead sulfate on the surface of the plates, renders the battery unusable. It needs to be repaired or replaced. Sulfation of the plates, as a rule, is caused by:
- exposure of the plates due to a decrease in the electrolyte level;
- long-term storage of the battery without work;
- severe battery drain (below 1.7 V per battery).
The control lamp is on all the time
If the test lamp is constantly on when the engine is running, then one of the reasons may be a short circuit of one or more rectifier diodes in the generator. When this happens, a circuit is created that passes current from the battery through the alternator winding and the indicator lamp relay on «mass».
To check the health of the diodes, you do not need any devices. Turn off the ignition and remove the wire from the battery terminal. If the diode is really broken, at the moment the wire is disconnected, you will clearly hear the click of the control lamp relay. The same click is heard when the wire is connected.
The control lamp does not light up when the ignition is switched on
The coil of the relay of a control lamp of a charge of the storage battery is energized (with the generator running), equal to approximately 1/2 of the voltage generated by the generator, i.e. 6-7 V. When the ignition is on, but the engine and generator are not running, current from the battery passes through the relay contacts (12 V) and the lamp should be on. After starting the engine, the lamp should go out. If the control lamp does not go out, this means that there is a malfunction in the generator.
For a number of reasons, the control lamp does not light up when it is supposed to burn. Such reasons may be the following.
Burnout of the control lamp. In this case, the lamp should be replaced. To get to the lamp, you need to remove the instrument panel from the panel in which it is held by two spring clips. It is enough to squeeze one of them and press on the shield from the inside, as the latch will come out of the instrument panel opening. Loosen the two screws securing the fuse box (on car models VAZ-2101, VAZ-2102, VAZ-21011), move the block down (it will hang on wires) and through the hole formed, it will be possible to feel the clip by touch, squeeze it out and push out the instrument panel. After replacing the lamp, the shield is installed in the panel opening and the fuse box is put in place.
To perform a similar operation on VAZ-2103, VAZ-2106 and VAZ-2121 cars, it is necessary to compress the brackets with firmware, introducing it through special holes at the bottom of the instrument panel. For convenience, you can disconnect the plug connections of the devices and disconnect the flexible shaft from the speedometer. Instrument lighting and signaling lamps have a pin base and are removed from the lamp holders along with the cartridges.
On a VAZ-2105 car, removing the shield is much easier. To do this, use a screwdriver to remove the plugs of the two shield mounting screws located along the edges of the shield between the switches. Unscrew the screws and remove the shield.
Misadjustment or damage to the control lamp relay. Usually, a damaged indicator lamp relay is replaced with a new one, but it makes sense to try to put it in order by cleaning the contacts. To do this, it is enough to carefully bend the rolled sections of the housing cover and remove it. Clean the relay contacts with an abrasive plate and blow with compressed air. It is possible that this will be enough to resume normal operation of the relay.
The lamp stops burning (breakage in connections between: plug «86» relay and plug 1 fuse block; input «30» generator and «30/1» ignition switch). In these cases, the connections are carefully inspected and, if possible, the break is restored.
Motorists should remember that over time, the mastic that covers the surface of the battery is destroyed, and, as a result, terminal oxidation and self-discharge begin. Many motorists successfully restore bare spots with the help of the drug «Movil». With a brush, it is applied to the mastic cleared of dirt. The mastic softens and the surface is leveled. By the way, «Movil» you can also cover the battery terminals if you do not have VTV-1 at hand.