
Examination
Insufficient filling of gasoline in the carburetor can be caused by a malfunction of the fuel pump, as well as clogged or damaged fuel lines. To determine the cause of the malfunction, disconnect the hose from the discharge pipe 1 (see fig. 31) and using the manual priming lever, check whether fuel is supplied. If fuel is not supplied, check the vacuum at the suction pipe 4. If there is no vacuum, the pump is faulty.
The fuel pump can be checked on the stand. When rotating a roller having an eccentricity (1,25±0,02) mm, with frequency (2000±40) rpm fuel supply must be at least 54 l/h at (20±5) °С, The discharge head at zero fuel supply should be 2.3-3 m of water column.
Dismantling, cleaning and checking parts. Unscrew the cover bolt 5 (see fig. 31), remove the cover and filter 2, then unscrew the screws securing the housings, disconnect them, remove the diaphragm assembly and the spring. Rinse all parts with gasoline and blow with compressed air. Check the elasticity of the diaphragm spring, which should be compressed to 24 mm under a force of 3.2+0,15-0,10 kgf. Check the integrity of other springs and parts.
Cracks and hardening are not allowed on the diaphragm.
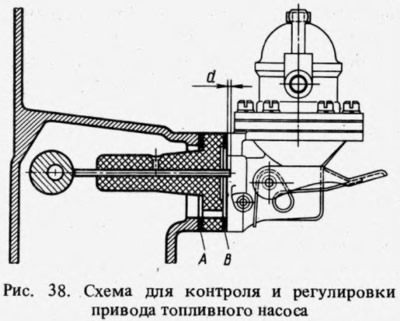
Installing the pump on the engine
For correct installation (pic. 38) two of the three gaskets are used: A - 0.27-0.33 mm thick, B - 0.70-0.80 mm thick; C - 1.10-1.30 mm thick. Gasket D is always placed under the heat-insulating spacer to the cylinder block. Gasket B is placed on the plane in contact with the Pump. Then the value of d is checked (the minimum amount that the pusher protrudes when the crankshaft is slowly turning). If d = 0.8-1.3 mm, the pump is finally fixed on the engine. If d is less than 0.8 mm, gasket B is replaced by gasket A; if more than 13 mm, gasket B is replaced with gasket C. Dimension d is checked again and the pump is fixed on the engine.
When installing the pump, the gaskets are replaced with new ones.