

Disassembly
Remove return spring 8 (see fig. 40) a lever that limits the opening of the throttle valve of the second chamber.
Unpin and disconnect the connecting rod of the three-arm lever 3 with the throttle axis lever.
Release the rod 9 of the pneumatic actuator from the throttle actuator lever of the second chamber.
Compressing the telescopic rod spring 4, separate it from the three-arm lever 3.
Remove the screws and remove the cover with gasket from the carburetor body, being careful not to damage the float and gasket.
Remove the mounting screws, disconnect the throttle body from the carburetor body.
Carefully remove the thermal insulation pad.
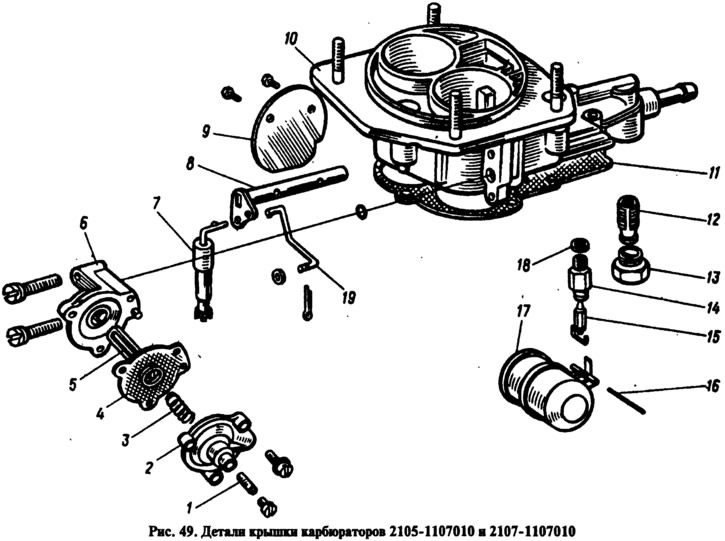
Disassemble cover 10 (pic. 49) carburetor, for which:
- using a mandrel, carefully push the axle 16 of the float out of the racks (push towards the rack with a cut);
- carefully remove float 17 with needle valve 75, gasket 11;
- turn out the saddle 14 of the needle valve, remove the gasket 18;
- unscrew plug 13 and remove fuel filter 12;
- disconnect the telescopic rod 7 and the rod 19 of the starting device from the lever of the axis 8 of the air damper;
- unscrew the fastening screws, separate the air damper 9 and axle 8.
- unscrew the two screws securing the body 6 of the starting device and remove it;
- unscrew the three screws securing the cover 2 of the starting device, remove the cover with the adjusting screw 1 and the spring 3, and then the diaphragm 4 with the stem 5.
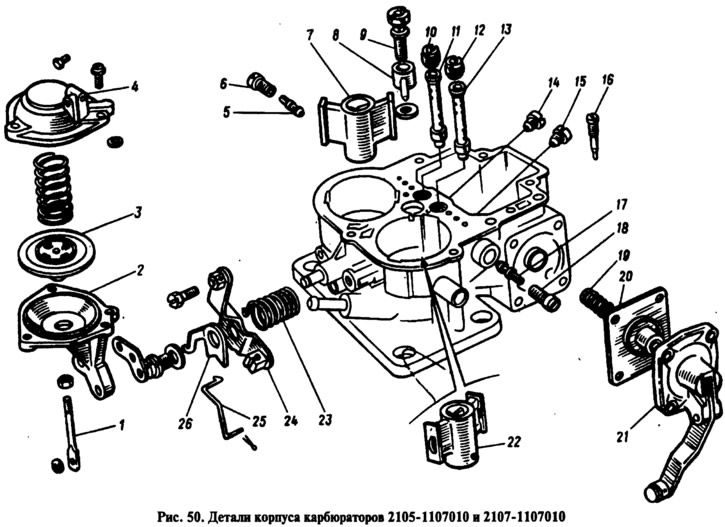
Disassemble the carburetor body, for which:
- unscrew the screw securing the three-arm lever 24 (pic. 50) air damper control;
- remove bracket 26, lever 24 and spring 23;
- disconnect the rod 25 from the lever;
- unscrew the cover screws 21 of the accelerator pump, remove the cover with the lever and the diaphragm 20 with the return spring 19;
- unscrew the main air jets 10 and 12, turn the body over and, tapping it lightly, shake out the emulsion tubes 11 and 13 from the wells;
- unscrew housings 6 and 18 of the fuel jets of the transition system and the idle system and remove them together with jets 5 and 17;
- unscrew the screw valve 9, remove the atomizer 8 of the accelerator pump with gaskets, unscrew the adjusting screw 16;
- take out small diffusers 7 and 22, unscrew the main fuel jets 14 and 15, the screws securing the housing 2 of the second chamber throttle pneumatic actuator and remove it;
- unscrew the three screws of the cover 4 and remove it, and then remove the spring and diaphragm 3 with the stem 1.
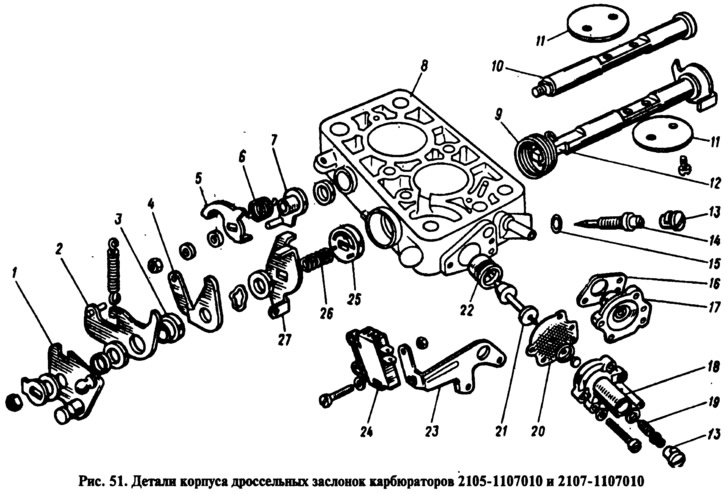
Disassemble body 8 (pic. 51) throttle valves, for which:
- remove the restrictive sleeves 13, unscrew the idle speed adjustment screw 14 with the sealing ring 15;
- unscrew the screws securing the cover 18 of the forced idle economizer and remove the bracket 23 with the microswitch 24, the cover 18 with the adjusting screw 19 of the amount of the mixture, the body 77 assembled with the diaphragm 20 and the needle 21 of the economizer and the gasket 16;
- extract the economizer needle seat 22 with a puller 67.7801.9520;
- bend the tab of the lock washer and unscrew the nut securing the levers on the axis of the throttle valve of the first chamber;
- remove the lock washer, levers 1, 2, 4 and 27 with washers and bushing 3 from the damper axis, and then the compression spring 26 of the spool and the spool 25 of the crankcase ventilation;
- having unscrewed the fastening screws, remove the damper 11, axle 12 and spring 9 of the first mixing chamber;
- unscrew the nut securing the levers on the axis of the throttle valve of the second chamber and remove the levers 5 and 7 with the spring 6;
- remove the damper 77 and shaft 10 of the second mixing chamber.
Assembly
Assemble the carburetor in reverse order. The float should not touch the walls of the carburetor, but rotate freely on the axis. The needle valve must slide freely in its seat. In order not to confuse jets, pay attention to their markings. After assembling the body, adjust the fuel level in the float chamber. When adjusting, make sure that the needle valve yoke does not interfere with the free movement of the float.