English Русский
Български
Беларускі
Український
Српски
Hrvatski
Română
Polski
Slovenský
Magyar
| Articles | Contacts | Sitemap |   
Repair and maintenance Lada Repair and maintenance Mazda Repair and maintenance Mitsubishi Repair and maintenance Toyota Repair and maintenance Land Rover Repair and maintenance Hyundai Repair and maintenance Nissan
VAZbook.ru


Main     1111   2101   2105   2106   2107   2109   2110   2115   2121  
VAZ-2104 (1984-2012) VAZ-2105 (1979-2010) VAZ-21051 (1979-2010)
  • Main
  • «Zhiguli»
  • VAZ-2105
  • Power unit
  • Supply system
  • Adjustment of carburetors 2105-1107010 and 2107-1107010

Adjustment of carburetors 2105-1107010 and 2107-1107010 (VAZ-2105)

            0

Contents: Checking the tightness of the needle…↓ Setting the fuel level in the float…↓ Adjusting the pneumatic drive of the…↓ Adjusting the position of the…↓ Adjusting the starting device ↓ Adjusting the throttle valve…↓

Checking the tightness of the needle valve


It is carried out on a stand that supplies fuel to the carburetor under a pressure of 3 m H2O. After the fuel level is set in the stand's control tube, it must not fall for 10-15 seconds. A decrease in the fuel level in the tube indicates a leak through the needle valve. Eliminate the leak by replacing the needle valve.

Setting the fuel level in the float chamber


The required fuel level is ensured by the correct installation of the serviceable elements of the shut-off device (Fig. 54). The distance between the float and the gasket 10 adjacent to the carburetor cover (dimension A) should be 6.5±0.25 mm. Adjust this size by bending the tongue 8. In this case, the supporting surface of the tongue should be perpendicular to the axis of the needle valve and should not have nicks and dents. Perform the check with gauge 67.8151.9505. Hold the cover vertically so that the tongue 8 of the float slightly touches the ball 5 of the needle valve 4, without sinking it. Adjust the value of 8±0.25 mm of the maximum float stroke by bending the stop 3. The tension fork 6 of the needle should not interfere with the free movement of the float.
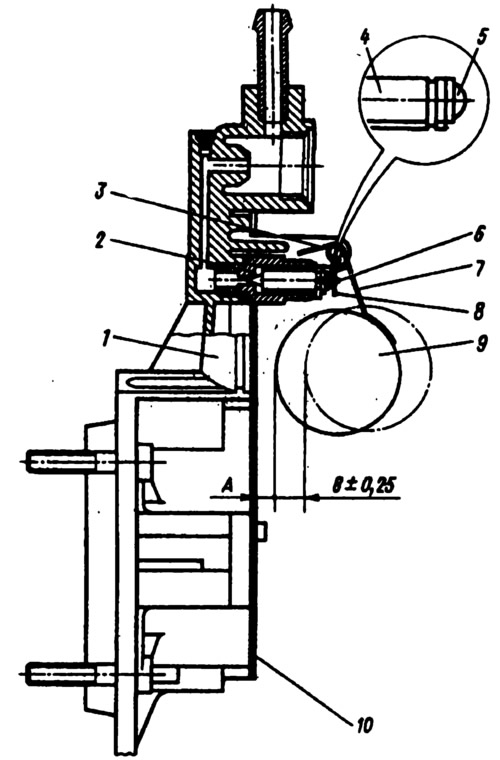
Fig. 54. Setting the fuel level in the float chamber:
1 - carburetor cover; 2 - needle valve seat; 3 - emphasis; 4 - needle valve; 5 - ball of the shut-off needle; 6 - valve needle puller; 7 - float bracket; in - tongue; 9 - float; 10 - gasket.


Check the float setting when replacing the float or needle valve.

Adjusting the pneumatic drive of the second chamber throttle valve


Before connecting the rod 5 (see fig. 43) to lever 7 on the axis of the second chamber throttle valve:
  • turn the throttle valve of the second chamber to the vertical position;
  • press down on the pneumatic actuator rod 5 until it stops and, holding the sleeve 2 from turning, by unscrewing or screwing the rod, adjust its length so that the hole in the tip of the rod 5 is opposite the pin on the lever 7;
  • place rod 5 on lever pin 7 and secure it with a lock washer;
  • secure rod 5 with a lock nut, holding sleeve 2 from turning with another key.

Adjusting the position of the microswitch


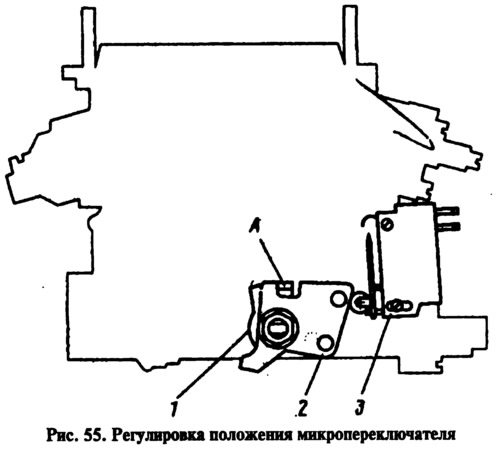
Adjusted with the air damper open. Microswitch 3 (Fig. 55) should turn off when lever 2 is turned clockwise until it stops. When lever 2 is turned from its initial position counterclockwise until it stops against the antennae A of lever 1, the microswitch should turn on. To adjust the moment of turning the microswitch on and off, loosen its fastening screws and turn the microswitch relative to the upper screw to the required position. After completing the adjustment, tighten the fastening screws.

Adjusted with the air damper open. Microswitch 3 (Fig. 55) should turn off when lever 2 is turned…


Adjusting the starting device


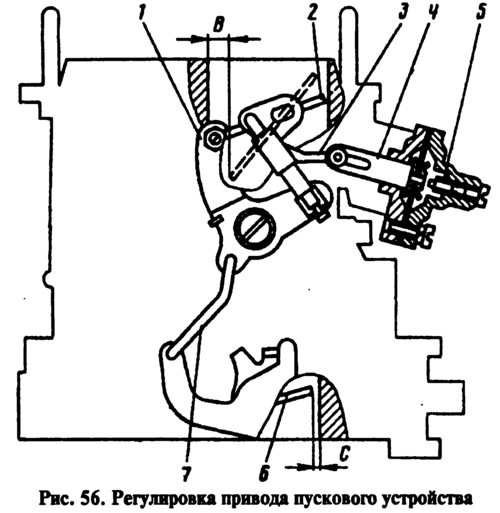
When turning lever 1 (Fig. 56) counterclockwise until it stops, air damper 2 should be completely closed. Moreover, in this position of the lever, the end of rod 3 should be at the end of the groove of rod 4 of the starting device, but at the same time not move the rod. Adjust by bending rod 3.

When turning lever 1 (Fig. 56) counterclockwise until it stops, air damper 2 should be completely…


With the air damper fully closed, the throttle valve 6 of the first chamber should be slightly open by 0.7-0.8 mm (gap C is the distance between the valve and the chamber wall at the transition holes of the idle system). Adjust this gap by bending the rod 7.

A fully closed air damper should open 5 degrees+0,5 mm (gap B) by the starting device rod when moving it manually to the right until it stops. Adjust this value with screw 5.

Adjusting the throttle valve positions


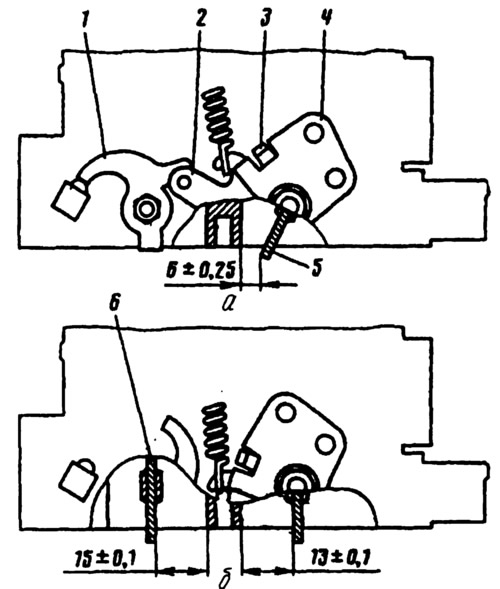
Partial opening of the first chamber throttle valve, at which the upper antenna of lever 3 (Fig. 57) touches lever 2, should be 6±0.25 mm. Adjust by bending the upper antenna of lever 3.

Fig. 57. Adjusting the throttle valve positions: a - partial opening of the throttle valve of the…
Fig. 57. Adjusting the throttle valve positions: a - partial opening of the throttle valve of the first chamber; b - full opening of the throttle valves;
1 - lever on the axis of the throttle valve of the second chamber; 2 - lever limiting the opening of the throttle valve of the second chamber; 3 - lever rigidly connected to the axis of the throttle valve of the first chamber; 4 - damper drive lever; 5 - first chamber throttle valve; 6 - second chamber throttle valve.


Full opening of the throttle valves is checked by turning the levers of their drive to the stop position. The maximum opening of the throttle valve of the first chamber (13±0.1 mm) is adjusted by bending the lower antenna of lever 3; the second chamber - 15±0.1 mm (for carburetors 2107-1107010 it should be 17±0.1 mm).


This article is available at russian, bulgarian, belarusian, ukrainian, serbian, croatian, romanian, polish, slovak, hungarian
The text was reviewed by the specialist: Grigory Vologodtsev

Share with friends:

Previous articles
VAZ-2105: Supply system
Next articles

Checking the technical condition and repairing the carburetor
Checking the technical condition and repairing the fuel pump
Checking the technical condition and repairing the fuel tank
Disassembly and assembly of carburetors models 21051-1107010 and 21053-1107010
Disassembly and assembly of carburetors models 2105-1107010 and 2107-1107010
Adjustments of carburetors 21051-1107010 and 21053-1107010

More articles from other manuals on VAZ cars:
➠ Description of operation of carburetor 2107-1107010-20 VAZ-2106 (1976-2006)
➠ Scheme of the device and operation of the carburetor… VAZ-21214 (1994-2006)
➠ Headlight adjustment VAZ-1111 (1988-1996)
➠ Carburetor adjustment VAZ-2101 (1970-1983)
➠ Headlight adjustment VAZ-2107 (1982-2012)
Link in different formats to this page


Visitor comments

No comments yet


How much will 44 + 43 ?


VAZ-2104 (1984-2012) 
  • General information
  • Operation and maintenance
  • Power unit
  • Engine repair
  • Fuel system (carburetor)
  • Fuel system (injector)
  • Control system
  • Cooling system
  • Exhaust system
  • Transmission
  • Clutch
  • Car gearbox
  • Cardan gear
  • Rear axle
  • Chassis
  • Front suspension
  • Rear suspension
  • Wheels and tires
  • Steering
  • Brake system
  • Body
  • Exterior
  • Interior
  • Doors and glass
  • Ventilation and heating
  • Electrical equipment
  • Equipment and devices
  • Headlights and lighting
  • Engine electrics
  • Electrical circuits


VAZ-2105 (1979-2010) 
  • General information
  • Vehicle description
  • Vehicle device
  • Vehicle operation
  • Maintenance
  • Power unit
  • Engine repair
  • Cooling and lubrication system
  • Supply system
  • Transmission
  • Clutch
  • Car gearbox
  • Cardan gear
  • Rear axle
  • Chassis
  • Suspension and shock absorbers
  • Steering
  • Brake system
  • Body
  • Body elements
  • Electrical equipment
  • Engine electrics
  • Equipment and devices


VAZ-21051 (1979-2010) 
  • General information
  • Introduction to guide
  • User manual
  • Troubleshooting
  • Power unit
  • Engine repair
  • Engine repair VAZ-2103
  • Cooling system
  • Lubrication system
  • Power and exhaust system
  • Fuel injection
  • Transmission
  • Clutch
  • Car gearbox
  • Cardan gear
  • Rear axle
  • Chassis
  • Suspension and shock absorbers
  • Steering
  • Brake system
  • Body
  • Exterior
  • Interior
  • Doors and windows
  • Electrical equipment
  • Equipment and devices
  • Engine electrics
  • Ignition system
  • Electrical circuits


VAZbook.ru © 2017 · Mobile version · Contact with administration · Sitemap: EN BG BY UA RS HR RO PL SK HU · Site search · News and articles VAZ-1111 · VAZ-11113 · VAZ-2101 · VAZ-21011 · VAZ-2104 · VAZ-2105 · VAZ-21051 · VAZ-2106 · VAZ-21061 · VAZ-2107 · VAZ-21099 · VAZ-2109 · VAZ-2108 · VAZ-2110 · VAZ-2112 · VAZ-2114 · VAZ-2115 · VAZ-2121 · VAZ-21213 · VAZ-21214 ·
The site stores technical data using cookies to improve the service.