
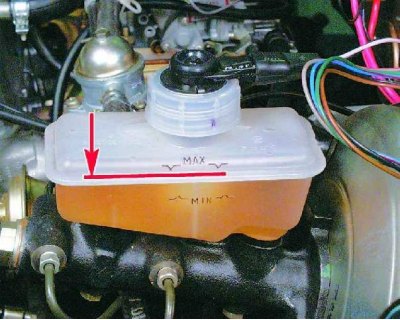
Attention! Regularly check the brake fluid level in the master cylinder reservoir. The brake fluid level should be just below the MAX mark on the master cylinder supply reservoir.
A drop in fluid level indicates either a leak of brake fluid from the system or excessive wear on the brake pads. If a lamp on the instrument panel lights up, signaling a low level of brake fluid, do not rush to top it up immediately, first check the thickness of the brake pads: maybe it's time to replace the pads?
Car manufacturers recommend replacing all brake fluid in the system after a certain period. Some drivers ignore this advice because the fluid in the tank seems clean enough to them, and it’s completely in vain. The fact is that brake fluid is very hygroscopic - it absorbs moisture from the air, and this moisture over time not only destroys the surfaces of brake cylinders, pipelines and, as a result, leads to premature failure of brake system components, but also significantly reduces the boiling point brake fluid.
Normal boiling point of brake fluid "Neva" - 190°С, "Tom" - 210°С, "Dew" - 260°С. With frequent heavy braking, the front wheel disc brakes become very hot and with a high water content, the brake fluid can boil, which usually leads to brake failure.
Tip: In order not to expose yourself to unexpected expenses in the future, it is better to change the fluid in the brake system in a timely manner.
Bleeding the brake system
If the brake pedal has become "soft", and with several successive clicks it becomes "harder", this indicates the presence of air in the hydraulic brake actuator.
To remove air from the system, it is necessary to bleed the brakes. The procedure for bleeding the brakes is quite simple, but it is more convenient to carry it out with two people.
1. Make sure the reservoir on the brake master cylinder is full.
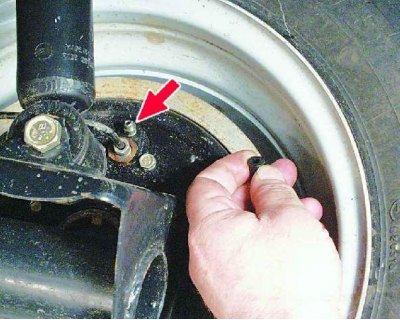
2. Clean the bleeder fitting on one of the rear brakes of dirt and put a rubber hose of the appropriate diameter on the fitting.
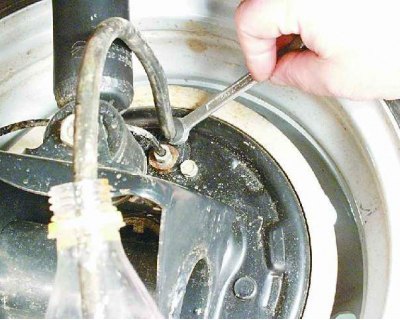
3. Dip the end of the hose into a transparent container with a small amount of brake fluid.
4. Have an assistant depress the brake pedal several times and hold it down.
5. Slightly unscrew the fitting with a wrench until the pedal "fail", and liquid with air bubbles will not flow from the hose.
6. Without releasing the pedal, tighten the fitting. Repeat the process until bubbles stop coming out.

7. After pumping the brake of the rear wheel, the brake of the front wheel of the same circuit is pumped in the same way.
Warnings!
- On the VAZ-21099 car, a diagonal brake drive is used, i.e. If you have bled the rear right wheel, then bleed the front left.
- When bleeding the brake system, do not forget to periodically check the level of brake fluid in the reservoir of the master brake cylinder and top up if necessary.
Checking the brake system
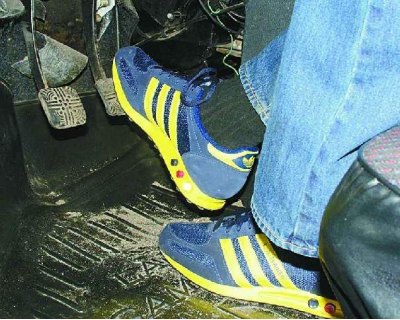
1. The reason for the loss of braking efficiency may be the unsatisfactory operation of the vacuum booster. For its express check, press the brake pedal several times with the engine off to "remove the vacuum" from the amplifier, and then, holding the pedal, start the engine.
Did the brake pedal drop a little?
No: see point 3.
2. Vacuum booster is OK. See item 6.

3. Check up an integrity and reliability of fastening of the hose connecting the vacuum amplifier with the inlet pipeline of the engine.
Is the hose correct?
No: see point 5.
4. The vacuum booster needs to be replaced.
5. Replace or repair hose.
6. If braking is accompanied by beating and pulsing of the brake pedal, you should first check the condition of the front disc brakes.

7. With the car on a jack, remove the front wheel and inspect the brake disc. The thickness of the brake disc must be at least 10.8 mm. The surface of the disc must be even and smooth on both sides.
8. If the surface of the disc is covered with rust in places, which usually happens after a long parking of the car with wet brakes, try cleaning the working surface with a fine emery cloth. If this procedure does not help, you will have to give the discs for grinding or replace them with new ones.
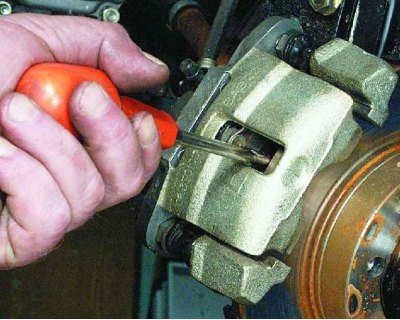
9. Check the mobility of the brake pads. To do this, use a screwdriver to try to take the pads away from the brake disc. If the pads cannot be separated, this means that "jammed" piston in the brake cylinder.
Warning! Jamming of the piston of the brake cylinder leads to the constant braking of the corresponding wheel when the pedal is released and the car skids when braking.
10. The parking brake actuates the rear brakes by a cable connecting the parking brake lever and the brake shoe control mechanism. Many drivers try to use as little as possible "handbrake", to prolong its life, and achieve the opposite result. If you do not use the parking brake, dirt and moisture stagnate in the sheaths of the cable, the cable becomes overgrown with rust, stops moving and in one "beautiful" moment breaks. So use "handbrake" on health, but do not forget to adjust its drive from time to time.
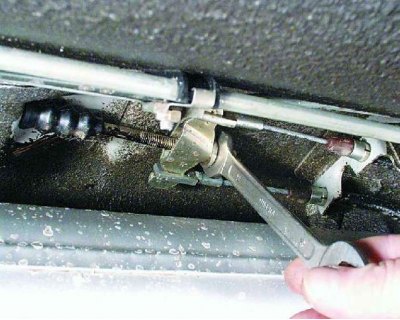
11. To adjust the parking brake, lift the lever up four or five ratchet clicks. From under the vehicle, loosen the tensioner locknut and use the adjusting nut to tension the cable.
Tip: After adjustment, check that the rear wheels turn freely. If they turn tight, then slightly loosen the adjusting nut and fix it with a lock nut.