
Device
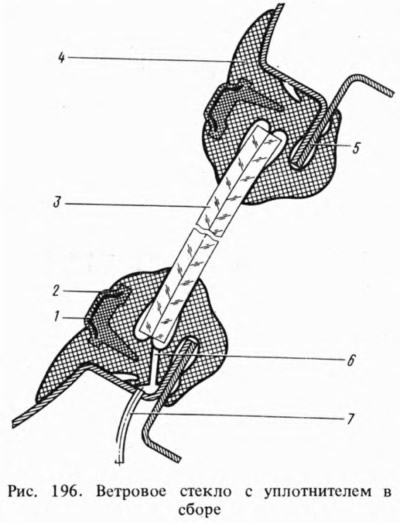
Windshield 3 (pic. 196) bent, safe, made of two layers of polished glass 3 mm thick, glued together with a plastic film. In the opening of the body, the glass is held by a rubber seal 4, put on the flange 5 of the body. A frame 2 made of transparent plastic with an internal metallized lining 1 is placed in the groove of the seal. To prevent water from entering the interior, the seal has a hole 6 for draining water, and in the lower corners of the opening there are drain pipes 7.
The rear glass and glass of the tailgate of cars 2102 and 21021 are bent, safe, hardened, and are held by seals of the same profile. Glasses of doors and sides of cars 2102 and 21021 are flat, safe, tempered.
The windshield washer consists of a pressure pump, two jets, a reservoir, a tee and plastic connecting tubes. The diaphragm pump, non-separable, with a foot drive is located in the lower part of the bulkhead and is equipped with a device that turns on the wiper 2-3 seconds after pressing the foot on the diaphragm rod cap. On the first releases of cars, the pump was mounted on the inside of the instrument panel and actuated by pressing a finger on the bottom of the diaphragm in the instrument panel hole.
The tank is welded from a PVC film, to which a plastic neck is welded. A suction tube with a strainer passes through the neck cover. In the summer you can fill the tank with clean water, in the cold season (up to -25°С) pour a mixture of liquid NIISS-4 (25—33%) with water or "Auto-cleaner-2 glasses" (30 cm3 for 1 liter of water).
The jets are inserted into bushings at the bottom of the windscreen frame. The direction of the liquid jet from the sprayer hole is adjusted by turning the sprayer when loosening the fixing screw or by turning the jet on the body.
Glass replacement
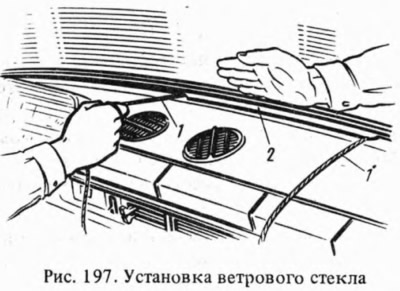
To replace a damaged windshield, remove the wiper arms, the seal edging and, by pressing on the upper corners of the glass, squeeze it out. An assistant supports the glass from the outside. When installing the windshield, the grooves of the sealant are washed with gasoline and the sealant with the edging is put on the glass. In the groove with which the seal 2 (pic. 197) put on the flange of the body opening, lay cord 1 with a screwdriver. Install the glass in the body opening and pull the ends of the cord from the inside of the body so that the seal sits in place. The assistant presses lightly on the glass from the outside.
To remove the rear window, remove the edging of the seal and, by pressing on the lower corners of the glass, squeeze it out. An assistant supports the glass from the outside. Rear window installation is the same as windshield installation.
Removal and installation of the injection pump and windshield washer jets
To remove the pump, unscrew the fastening nuts and remove it as an assembly. Then disconnect the electrical wires from the pump and remove the tubes from the fittings. Installation is carried out in the reverse order.
Removal of jets is necessary when nozzles are clogged or parts are replaced. To do this, slightly squeeze the plastic sleeve from the side of the body air intake box, and pick it up with a screwdriver from above and, overcoming resistance, remove the jet assembly with the sleeve. The screw is removed and all parts are cleaned and blown with compressed air. After assembling the jet, insert the sleeve into the hole in the body. Then the jet is sharply inserted into the bushing so that the jet housing fits into the flanges of the bushing with a groove, and the operation of the jet is checked. By turning the jet or sprayer, the direction of the liquid jet is regulated.