
Only specialists with experience and, at least, a tester, can check the health of the starter. Everyone else can only check the reliability of the connection of wires and the absence of their external breaks.
It's easier with the ignition switch. In its rear part there is a plate, on the contacts of which wires are put on with the help of plugs. It happens that the plug is disconnected and the circuit breaks. Therefore, it is useful to check the fastening of the wires. Contacts can also oxidize and then they lose conductivity.
To get to the contact plate of the ignition switch, it is necessary to remove the upper and lower halves of the steering wheel cover. To clean up burnt or oxidized contacts of the ignition lock, it is not necessary to remove the lock itself. The contact plate is held in the lock body by a spring ring, which is very easy to remove by prying it with a thin blade of a screwdriver. Before removing the circlip holding the contact plate, remove «negative» battery terminal. This precaution will save you from a short circuit if you carelessly handle the wires going to the ignition switch. After removing the ring, you can remove the plate with contacts. If the wear of the contacts is small, then the malfunction can be eliminated by stripping. When the contacts are completely worn out, they change the entire contact plate, or even the entire ignition switch (due to lack of plates).
In order to remove the ignition lock when the steering wheel cover is dismantled, unscrew the two screws that hold the lock in the holder. Then set the ignition key in the lock to a horizontal position and press the spring plate of the lock to the left through the hole in the cage, which will release the lock from the steering wheel anti-theft device. Replace the ignition switch in reverse order.
If one of the ignition lock terminals breaks off along the way, the wire can be put on any free terminal, and the lock will work again. It also happens like this: the starter is working, but the engine does not start.
This can happen in three cases:
- 1) fuel does not enter the carburetor;
- 2) there is no spark capable of igniting the mixture;
- 3) the air damper remains closed when not needed.
1. The indicator should inform about the presence of fuel in the tank, although it may also have malfunctions. In extreme cases, you can dip a clean twig into the neck of the fuel tank. If the tube from the fuel tank to the pump is not clogged, then the presence of gasoline can be detected by removing the tube from the pump fitting.
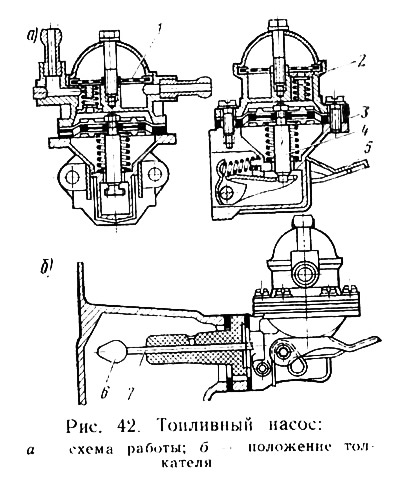
Let's assume there is fuel. Then turn for the fuel pump (pic. 42). Remove the tube going to the carburetor and make a few strokes using the manual drive 5 of the pump. Its performance will be revealed immediately. True, there is one caveat: the manual pumping mechanism will be inactive if the pusher 7 at this time is located on the top of the eccentric in, and the stem 4 of the diaphragm 3 is, respectively, in the lowest position. It is only necessary to turn the crankshaft of the engine one revolution with the help of the starting handle, the eccentric and the rod will take a different position, and the manual pumping mechanism will work again. If the test showed that the fuel pump is unable to supply fuel up to the carburetor, it must be dealt with. Worn or damaged diaphragm 3, clogged or stuck valves 2, clogged filter 1 or loss of tightness - these are the main reasons for the failure of the fuel pump. First of all, you need to check the tightness of the fuel pump, as this is fraught with fire. In addition, it is not economically viable. And further. Violation of tightness allows air to penetrate inside the pump, into the vacuum cavity.
2. If the power system is excluded, the cause of engine inactivity may be the ignition system. Due to some reasons that are still unknown to us, the ignition system is not able to create a spark that could ignite the mixture compressed in the combustion chamber.
The ignition system has two circuits: low and high voltage. The low voltage circuit includes: battery - ignition switch - primary winding of the ignition coil - capacitor - breaker contacts. The high voltage circuit consists of the secondary winding of the ignition coil - the central high voltage wire - the coal of the distributor cap - the rotor - the distributor cap - the high voltage wires - the spark plugs.
In the case being analyzed, the engine crankshaft is turned by the starter, therefore, the battery is working. Check for spark between spark plug high voltage wire and ground. To this end, remove one wire from the candle, expose the end of the wire (the cap is pushed up) and install it so that there is a gap of no more than 5 mm between the end of the wire and the ground.
Turn the crankshaft using the starter or crank. A spark should jump between the wire and ground. If a spark jumps on all wires (each wire is checked separately), then the spark plugs could be the cause. If there is no spark on any of the wires, then it is necessary to check the high voltage wire itself and the distributor cap. If there is no spark on any of the spark plug wires, then the central wire is removed from the socket of the distributor cap and the presence of a spark between it and the ground is checked. When checking, there are the following options:
- when the crankshaft rotates, there is a spark between the center wire and ground. In this case, a malfunction in the distributor (cover, rotor with resistor, coal);
- no spark occurs when the crankshaft rotates. In this case, it is necessary to check the low voltage circuit: close the breaker contacts and, using a test lamp, check for voltage on all elements of the low voltage circuit from the contacts to the battery.
If the low voltage circuit is working, and when the contacts open, a spark jumps between them, then the defect is in the ignition coil (in the secondary winding). When there is no spark between the contacts, the cause should be sought primarily in the contacts themselves, that is, their surfaces are so clean and what is the gap between them.
If the cause is not in the contacts, it is necessary to connect the test lamp wire to «mass» and with the contacts open and the ignition on, touch the other end of the test lamp wire first to terminal B, and then to the terminal without a designation. More often than not, the lamp will not flash on contact with an unnamed terminal. In such a case, many drivers believe that the cause is the ignition coil, but there is another reason - the plastic washer to which the breaker wire is attached. The washer becomes oily, as a result of which the insulation of the moving contact is broken.
When there is current leakage due to cracks in wires, caps and other parts, the location of the leakage is easiest to determine in the dark. A jumping spark in the dark is perfectly visible.
Often, with a working power system, the engine cannot be started due to malfunctions of the distributor cap or rotor. Cracks, severe contamination, loss of the carbon electrode are the main reasons. Eliminate them by replacing low-quality parts with new ones. Sometimes, if a malfunction caught you on the road, and there are no new parts, they try to repair the cover or rotor. Cracks are found, they are cleaned, wiped and filled with BF glue, if the youngster happened to be at hand.
Another way to repair the rotor has been tested (runner). It is removed by unscrewing two screws, a double-folded plastic bag is placed on the centrifugal machine, and then the broken rotor is installed in place. It remains to cut off the protruding ends of the film and install the cover. To reduce the chance of a rotor breakdown, some motorists put on the inside of a new runner (rotor) several layers of varnish or a thin layer of epoxy. When a charcoal is lost, it can be temporarily replaced either by a charcoal from a pocket torch battery, or an ordinary willow rod, but raw. As you can see, the most stubborn and inquisitive get their way and get to the service station. However, it is not always possible to detect a malfunction by moving forward along the chain.
If, for example, no manipulations succeed in obtaining a spark, touch the ignition coil. It should be hot. This is a symptom of an interturn short circuit. This coil needs to be replaced.
There were high voltage wires and spark plugs. Wires can fail if they are very old with cracked insulation or very dirty, especially at the tips. Regularly monitoring their condition is a prerequisite, and if the wires have worked out, replace them along with the caps.
In search of a malfunction that caused difficulties when starting the engine, it is impossible to bypass the moment of ignition installation.
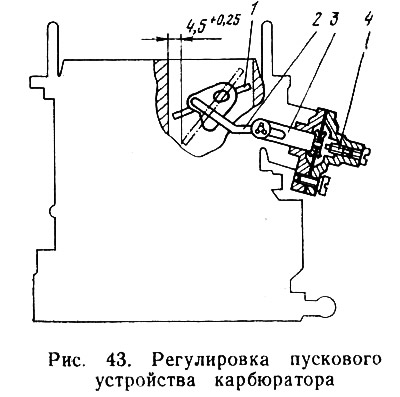
3. A significant reason affecting the engine start is the position of the carburetor air damper at the first flashes of a spark in the cylinders. To understand why the air damper is closed when it is not required of it, you should familiarize yourself with the starting device a little (pic. 43) carburetor. The trigger mechanism is located in the carburetor itself, and the control drive (handle, cable and cable sheath) - outside of it.
Starter drive (suction) works normally if the rod with the handle moves easily, without jamming. With the handle pushed in as far as it will go, the air damper must be fully open and vice versa. The quality of the drive is easy to control if you remove the air cleaner and look into the carburetor.
It should be remembered: when the starter drive handle is fully extended, the air damper should be slightly opened by 4.5±0.25 mm using rod 3. A cold engine, running with the starter drive handle fully extended, has a crankshaft speed of 1800-2500 rpm. Adjusting the position of the air damper 1, and consequently, the specified speed of the crankshaft, is achieved by bending the rod 2 or turning the screw 4. By unscrewing the screw 4, we weaken the pressure on the diaphragm, and the air damper opens to a larger angle.
It happens that turning the adjusting screw 4 does not achieve the desired results. Then you have to unscrew the screws, remove the housing cover of the starting device and find out the reasons.