

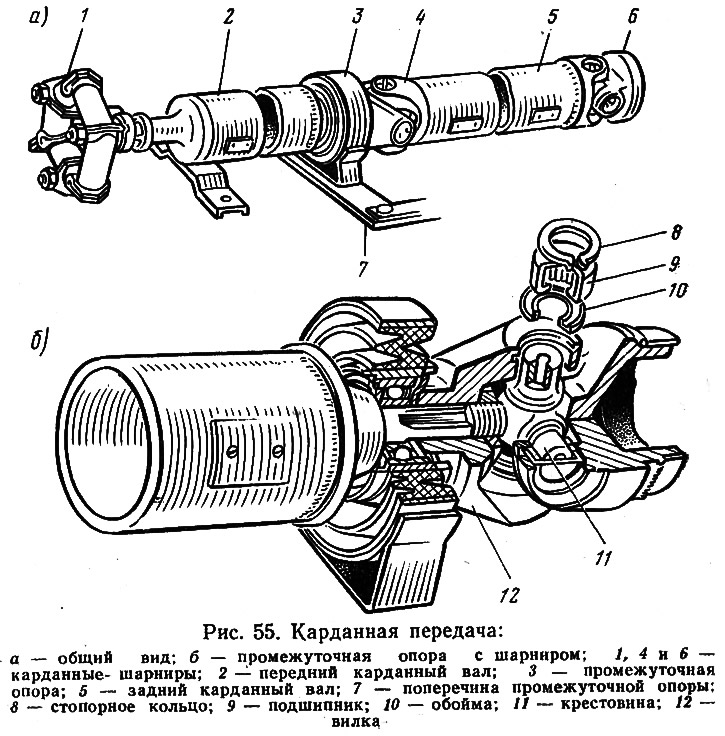
Intermediate support 3 of the rear end of the front shaft 2 is elastic with a ball bearing. It is attached to the cross member of the body. The middle cardan joint is universal.
The presence of two short cardan shafts reduces the likelihood of them vibrating due to imbalance. Two short shafts with an intermediate support are less prone to damage, and the supports experience significantly less stress. But, despite the listed advantages, a number of malfunctions still occur during operation, due to which the components and parts of the driveline must either be repaired or replaced.
Knocking in driveline
After about 50-60 thousand kilometers, it may happen that the driveline starts to make a knock, and it will occur when starting off, hard acceleration or gear changes.
The causes of knocking can be:
- loosening of bolts and nuts securing the flexible coupling and flanges of universal joints. The defect occurs because the owner neglected the recommendations and did not control the quality of fasteners for transmission units and assemblies for a long time;
- increased clearance in the spline connection of cardan shafts;
- increased clearance in the cardan shaft bearings.
If one of the last two is the cause of the knocking of the driveline, then the driveline must be removed, as far as possible, disassemble and replace worn parts. To remove the driveline, you need an inspection ditch or overpass. The car is installed and fixed in place in the same way as when removing the gearbox or clutch. Work on the removal of the driveline must be performed in the following sequence:
- remove the safety bracket;
- compress the elastic coupling with a device that is an ordinary clamp (this was mentioned in the description of the removal of the clutch), and, turning the shaft, unscrew the nuts of the bolts of the flexible coupling flange, remove the bolts and the coupling collar;
- disconnect the rear propeller shaft from the main gear drive flange;
- disconnect the return spring of the rear parking brake cable guide;
- detach cross member 7 (see fig. 55) intermediate support 3 from the floor of the body and remove the driveline towards the front of the vehicle.
The removed driveline must first be washed and cleaned of dirt, and only then proceed to inspect the condition of its individual components and parts.
First check the cardan joints. They should turn easily and smoothly and not have large axial and radial clearances. It would be nice to check the balance of the driveline, but at home it is difficult to do this. The driveline is considered to be still fully operational if the imbalance does not exceed 0.0022 N·m (for reference), the forks turn smoothly, without jamming, the circumferential clearance in the spline connection does not exceed 0.30 mm, and grease is not ejected through the seals.
Most often, crosses deliver troubles 11 (see fig. 55). As a result of wear of the spikes of the cross and bearings 9, the gap between them increases and the driveline begins to rattle.
As in the case of the camshaft, the problem with the universal joint cross has aroused increased interest among inquisitive motorists. As a result, it was found that, in addition to the traditional cause of dirt ingress, premature wear of the spikes and bearings of the frogs is facilitated by an increased gap between the corners (pic. 56, a). The increased clearance allows the needles to work with a warp, and therefore the spikes of the cross have longitudinal grooves located at an angle to the axis (pic. 56b).
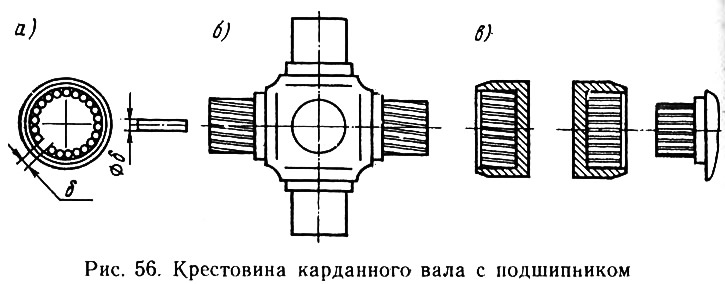
To avoid distortion, some motorists, having selected among the sewing needles one that in its diameter corresponds to the gap between the needles, made from it (cut to size) additional element and filled the gap with it. The result was positive (pic. 56, in), i.e. wear marks - leveled off.
A few years ago, few people dared to change the crosses on their own. Now this is far from the most difficult operation for a motorist. Certain difficulties in performing this operation are that it is very difficult to balance the cardan transmission at home, so every possible measure must be taken so as not to disturb the balance. For this purpose, before disassembly, the relative position of the parts relative to each other is marked so that during assembly they take the original position in which the balancing was carried out. It should be noted that even the smallest and lightest parts can upset the balance. That's why when replacing the cross, even the retaining rings are marked 8 (see fig. 55) and clips 10, where the seals are. In order to remove the cross, the front propeller shaft is installed in a vice and with special pliers (they have thin and long lips) remove pre-marked retaining rings 8.
The bearing housings are installed in the forks 12 with an interference fit, so for pressing out it is necessary to use either a clamp or a hammer and a drift.
fixture (pic. 57), proposed by a car enthusiast from Baranovichi, allows you to disassemble and assemble the cross in just a few minutes, without even completely removing the cardan shaft from the car. To perform this operation, you must:
- disconnect the cardan shaft from the flange of the rear axle gearbox and remove all lock washers from the cross;
- put on a ring (pic. 57, a) with bushings screwed into it (pic. 57b) on the cardan joint;
- bring the bushings to the forks into which the bearing housings of the cross are pressed;
- screw the fingers into two opposite holes of the bushings (pic. 57, in) until it stops in the bottoms of the bearings of the crosses.
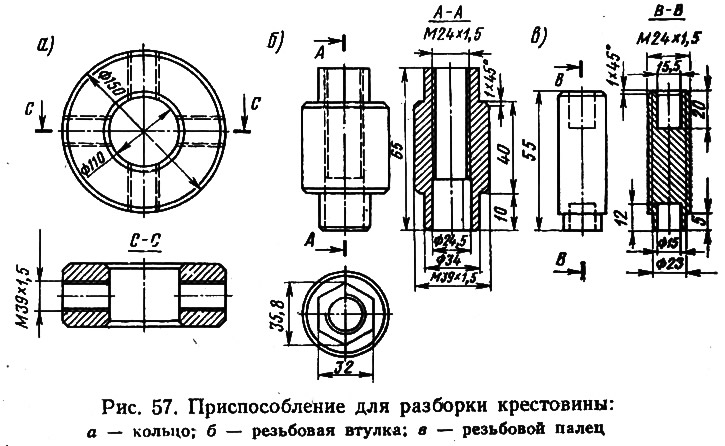
Having done these operations, you have securely fixed the device on the gimbal. Now it remains only to press out the crosspiece by rotating the two bushings of the fixture with a 32 mm key.
Before assembling the hinge, it is first of all necessary to fill the cavities in the spikes of the cross and lubricate the inner surface of the bearing housings with Fiol-1 grease (0.4-0.6 g), and then insert the spikes into the fork. The bearing housings, together with the needles, are put on the crosspiece spikes and pressed in. The defect can be considered eliminated if the axial free play of the cross is practically not felt, since according to the instructions it should not exceed 0.01-0.04 mm. In the event that the gap is too large, you can try to reduce it by installing a thicker retaining ring.
When the knock of the driveline is caused by a large circumferential clearance in the spline connection of the forks with the shaft (the gap should not exceed 0.30 mm), you have to completely disassemble the driveline and change worn parts. Given that they can be forks and even shafts, it is advisable to entrust the repair work to specialists, since special equipment is needed and, most importantly, after assembly, the driveline will need to be balanced without fail.
Practice shows that the cardan joints of the off-road vehicle were in a particularly difficult situation VAZ-2121 «Niva». This is due to a number of reasons: firstly, this car is designed to drive where the asphalt ends, and secondly, the loads on the hinges, despite the shortened length of the cardan shafts, are much greater.
Taking into account the accumulated experience, the plant began to develop cardan joints with improved bearing design, double seals and grease fittings for periodic filling and lubrication renewal.
Noise and vibration
Noise and vibration of the driveline usually occur at a speed of 80-90 km / h. The whole car is covered by a small shiver and a monotonous rumble is heard. It has long been known that vibration and the accompanying hum are the result of an imbalance in the driveline, which, in turn, is the result of deformation of one of the shafts, increased gaps or loosening of the supports.
It happens that a stone that has unsuccessfully flown out from under the wheel exactly hits one of the cardan shafts. This is enough to create an imbalance. You can't ride with a vibrating driveshaft, and you usually have to change it.
Noise and vibration may appear after poor assembly work, i.e. due to a mismatch of mounting marks. In this case, you have to start all over again.
Vibration can be caused by increased clearance in the bearing of the intermediate bearing. Nothing can get rid of this defect, except for replacing the bearing. In any of the above cases, it is advisable to contact a service station, as balancing is required.
Rarely, but it is possible that the cause of vibration is the weakening of the cross member to the car body. If this is indeed the reason, it can be easily eliminated by tightening the cross member mounting nuts.