
English Русский
Български
Беларускі
Український
Српски
Hrvatski
Română
Polski
Slovenský
Magyar
| Articles | Contacts | Sitemap |   
Repair and maintenance Lada Repair and maintenance Mazda Repair and maintenance Mitsubishi Repair and maintenance Toyota Repair and maintenance Land Rover Repair and maintenance Hyundai Repair and maintenance Nissan
VAZbook.ru


Main     1111   2101   2105   2106   2107   2109   2110   2115   2121  
VAZ-2101 (1970-1983) VAZ-21011 (1974-1983)
  • Main
  • «Zhiguli»
  • VAZ-21011
  • Chassis
  • Car suspension
  • Disassembly and assembly of front suspension units

Disassembly and assembly of front suspension units (VAZ-21011)

            0

Removal the front wheel hub with puller A.40005/1/B
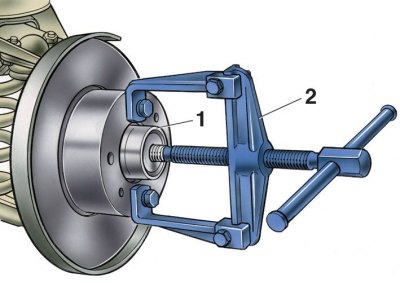


1 – wheel hub; 2 – puller

1 – wheel hub; 2 – puller


1. If the suspension repair requires complete disassembly of its components, it is more convenient to start this directly on the car, before compressing the suspension spring. To do this:
  • bend back the petals of the locking plates, unscrew the caliper mounting bolts, moving it to the side, and secure the caliper so that it does not hang on the hoses;
  • puller 67.7801.9514 (see subsection 8.1.3) remove the front wheel hub cap;
  • unscrew the adjusting nut of the hub bearings, remove the washer and, using the puller A.40005/1/9B (see fig. Removing the front wheel hub with puller A.40005/1/B), remove the hub assembly with bearings, seal and brake disc; remove the inner bearing inner race from the steering knuckle.

2. Carry out further disassembly after removing the suspension unit from the vehicle, securing it on a workbench and proceeding in the following order.
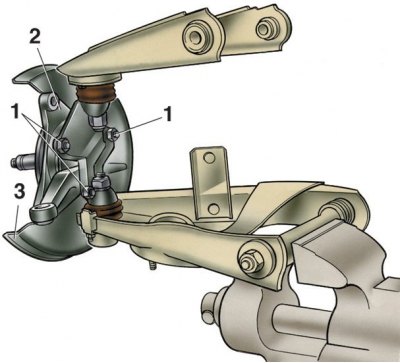
2. Carry out further disassembly after removing the suspension unit from the vehicle, securing it…


3. Unscrew all nuts 1, remove the locking plates and the steering knuckle arm; this releases the brake caliper mounting bracket 2 and the brake disc protective cover 3.


3. Unscrew all nuts 1, remove the locking plates and the steering knuckle arm; this releases the…


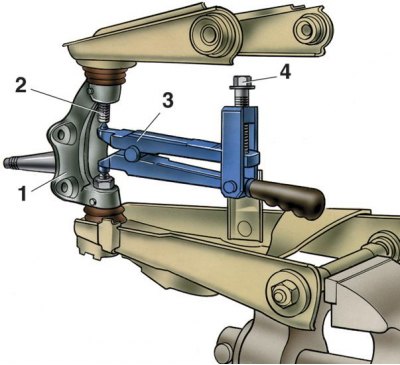
4. Loosen the upper hinge pin mounting nut and install tool 3 (puller 67.7801.9513) between the pins of the ball joints 2 and, tightening the puller bolt 4, press out the pin of the upper joint from the steering knuckle 1.
4. Loosen the upper hinge pin mounting nut and install tool 3 (puller 67.7801.9513) between the…


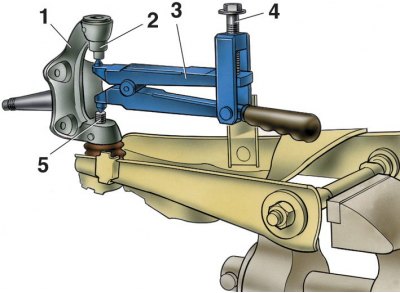
5. Loosen the nut securing the lower hinge pin and install tool 3 between the hinge pins and stop 2 (puller 67.7801.9513); by tightening screw 4 of the puller, press out pin 5 and remove the lower arm from the knuckle.

6. Assembly of the front suspension units is carried out in the reverse order of disassembly. In this case:
  • lubricate the front wheel hub bearings with LITOL-24 grease as indicated in subsection 8.1.3;
  • before assembling the ball joints of the suspension arms, add SHRB-4 or LITOL-24 grease to the protective covers in an amount equal to 1/3 of the cover's volume in a free state;
  • tighten the nuts and bolts for fastening the suspension units and parts to the torques specified in subsection 14.1;
  • after assembling the suspension and installing it on the vehicle, you should "break in" the suspension elements by driving for 15–20 kilometers, after which you should definitely check and, if necessary, adjust the wheel alignment angles.


This article is available at russian, bulgarian, belarusian, ukrainian, serbian, croatian, romanian, polish, slovak, hungarian
The text was reviewed by the specialist: Grigory Vologodtsev

Share with friends:

Previous articles
VAZ-21011: Car suspension
Next articles

Removal and installation the front suspension
Checking and adjusting the front wheel alignment angles
Determining the condition of the front suspension parts
Front suspension, wheels, tires — design description
Checking the technical condition and repairing the front suspension
Replacing rubber-metal hinges of levers on a car
Features of the rear suspension device
Removal and installation the rear suspension
Checking the technical condition of the rear suspension

More articles from other manuals on VAZ cars:
➠ Disassembly and assembly of front suspension units VAZ-2105 (1979-2010)
➠ Disassembly and assembly of front suspension units VAZ-21213 (1994-2006)
➠ Front suspension device VAZ-1111 (1988-1996)
➠ Front suspension device VAZ-2106 and VAZ-2103 VAZ-2106 (1976-2006)
➠ Description of the front suspension design VAZ-2107 (1982-2012)
Link in different formats to this page


Visitor comments

No comments yet


How much will 47 + 18 ?


VAZ-2101 (1970-1983) 
  • General information
  • Vehicle description
  • Vehicle device
  • Vehicle operation
  • Maintenance
  • Main malfunctions
  • Applications
  • Power unit
  • Engine repair
  • Cooling and lubrication system
  • Supply system
  • Transmission
  • Clutch
  • Transmission
  • Cardan gear
  • Rear axle
  • Chassis
  • Front suspension
  • Rear suspension
  • Steering
  • Brake system
  • Body
  • Exterior
  • Interior
  • Electrical equipment
  • Engine electrics
  • Equipment and devices


VAZ-21011 (1974-1983) 
  • General information
  • Specifications
  • Operation and maintenance
  • Power unit
  • Engine repair
  • Cooling system
  • Lubrication system
  • Power and exhaust system
  • Ignition system
  • Engine electrics
  • Transmission
  • Clutch
  • Car gearbox
  • Cardan gear
  • Rear axle
  • Chassis
  • Car suspension
  • Steering
  • Brake system
  • Body
  • Exterior
  • Interior
  • Doors and locks
  • Electrical equipment
  • Equipment and devices
  • Lighting and signaling


VAZbook.ru © 2017 · Mobile version · Contact with administration · Sitemap: EN BG BY UA RS HR RO PL SK HU · Site search · News and articles VAZ-1111 · VAZ-11113 · VAZ-2101 · VAZ-21011 · VAZ-2104 · VAZ-2105 · VAZ-21051 · VAZ-2106 · VAZ-21061 · VAZ-2107 · VAZ-21099 · VAZ-2109 · VAZ-2108 · VAZ-2110 · VAZ-2112 · VAZ-2114 · VAZ-2115 · VAZ-2121 · VAZ-21213 · VAZ-21214 ·
The site stores technical data using cookies to improve the service.