
Every 45,000 km, and also after the first 2,000 km, adjust the direction of the headlight beams.
Headlight adjustment
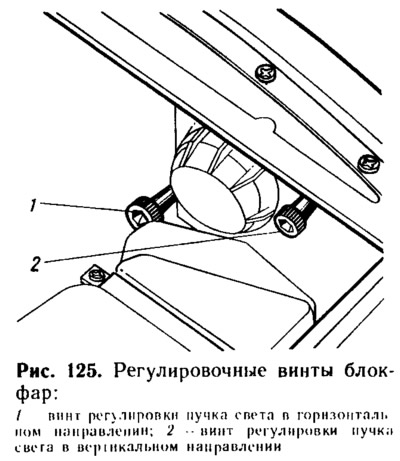
The direction of the light beams of the headlights should be such that the road in front of the car is well lit, and the drivers of oncoming vehicles are not blinded when the dipped headlights are turned on. Headlights are adjusted by turning screws 1 and 2 (pic. 125), which rotate the optical element in the vertical and horizontal planes. Headlights can be adjusted using a screen, which can be used as a smooth wall of the house, a sheet of plywood measuring 2X1 m, etc.
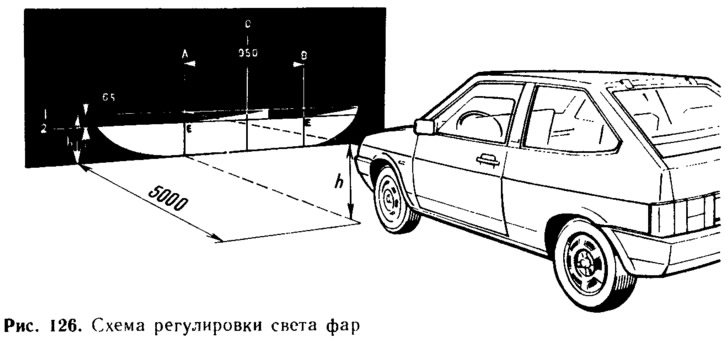
Place a fully fueled and equipped car, with a load of 75 kg on the driver's seat, on a flat horizontal area 5 m from the screen so that the longitudinal axis of the car is perpendicular to the screen. Before marking the screen, you need to make sure that the air pressure in the tires is normal, and then rock the car from the side so that the suspension springs take their normal position.
Draw on screen (pic. 126) vertical lines: axial O and lines A and B passing through point E, corresponding to the centers of the headlights. These lines must be symmetrical about the center line of the vehicle. At a height equal to the distance of the centers of the headlights from the floor, draw line 1 and below it by 65 mm line 2 of the centers of light spots.
Set the headlight hydrocorrector knob on the instrument panel to the position that corresponds to the load when there is one driver in the car.
Turn on low beam. Sequentially, first for the right headlight (the left one is closed with dense material), and then for the left (right closed) adjust with screws 1 and 2 (see fig. 125) headlight beams. For adjusted headlights, the upper border of the light spots must coincide with line 2 (see fig. 126), and the points of intersection of the horizontal and inclined sections of light spots - with points E.
Lamp replacement
To replace the headlight bulb, turn the headlamp housing counterclockwise until it stops and remove it. Then shine the block of wires from the lamp, press the spring latches of the lamp fastening and remove the lamp. Gloves must be worn when replacing the lamp to avoid oily finger marks on the glass. If there are such traces on the lamp, then remove them with alcohol. This is necessary for the reason that halogen lamps are used in the headlights, in which the bulb heats up to high temperatures, and traces of fat will lead to a darkening of the bulb and a quick failure of the lamp.
To replace the side light bulb in the headlight, remove the cartridge assembly with the lamp from the optical element, gently press the bulb, turn it counterclockwise and remove it from the cartridge.
To replace the front turn signal bulb, remove the block from the bulb holder, turn the bulb holder assembly counterclockwise and remove it from the socket.
For side direction indicators, a burned-out lamp should be replaced by removing the cartridge from the socket.
In the lampshade, to replace the lamp, gently press the sides of the diffuser in its middle part and remove the diffuser from the lampshade housing. After that, replace the lamp.
At the rear lamps, the lamps are replaced from the luggage compartment. To do this, it is necessary to remove the protective covers, squeeze out the fixing latches of the lamp base and remove the base assembly with the lamps. Then, on the removed base, replace the burned-out lamps.
To replace the lamp in the license plate light, remove the lamp from the socket in which it is held by the housing spring latches.