
The instrument cluster is attached to the front panel of the car with two nuts. The connections of the instrument cluster are made by printed wiring on a foil-coated getinax board. The board is fixed on the back side of the case. Wiring diagrams for instrument cluster (release before 1996 and after 1996) shown in fig. 7-39 and 7-40.

Pic. 7-39. Wiring diagram of the instrument cluster manufactured before 1996 (back view):
1 - plug connector block with conditional numbering of plugs; 2 - tachometer; 3 - voltage stabilizer; 4 - lamp for lighting the instrument cluster; 5 - coolant temperature gauge; 6 - fuel gauge; 7 - resistor 470 Ohm, 0.25 W; 8 - resistor 36 Ohm, 5 W; 9 - control lamp of the toxicity reduction system; 10 - control lamp for heating the rear window; 11 - fog light control lamp; 12 - control lamp high beam headlights; 13 - control lamp for outdoor lighting; 14 - control lamp of direction indicators; 15 - voltmeter; 16 - brake fluid level control lamp; 17 - diode IN4002; 18 - oil pressure control lamp; 19 - differential lock control lamp; 20 - fuel reserve control lamp; 21 - a control lamp of seat belts; 22 - parking brake warning lamp.
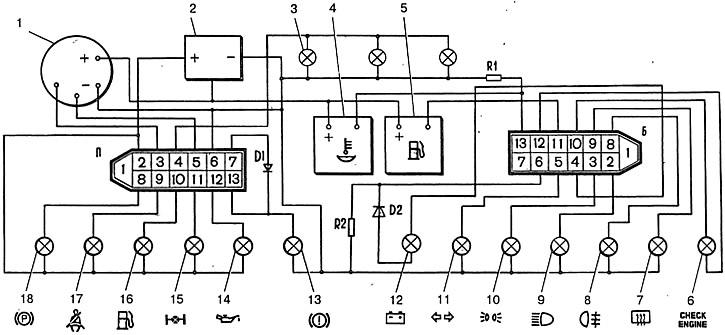
Pic. 7-40. Wiring diagram of instrument cluster after 1996 (back view):
1 - tachometer; 2 - voltage stabilizer; 3 - lamp for lighting the instrument cluster; 4 - coolant temperature gauge; 5 - fuel gauge; 6 - control lamp of the toxicity reduction system; 7 - control lamp for heating the rear window; 8 - fog light control lamp; 9 - control lamp high beam headlights; 10 - control lamp for outdoor lighting; 11 - control lamp of direction indicators; 12 - voltmeter; 13 - brake fluid level control lamp; 14 - oil pressure control lamp; 15 - differential lock control lamp; 16 - fuel reserve control lamp; 17 - a control lamp of seat belts; 18 - control lamp of the parking brake; D1, D2 - diodes IN4002; R1 - resistor 470 Ohm, 0.25 W; R2 - resistor 51 ohm, 5 watts.
The speedometer has two counters of the distance traveled: one is total, and the second «daily». The readings of the second counter can be set to zero by the handle brought out through the glass of the instrument cluster. The readings of the daily counter can be reset only when the vehicle is stationary, by turning the knob clockwise.
Warning: In order not to damage the instrument cluster glass, do not clean it with any solvents.