
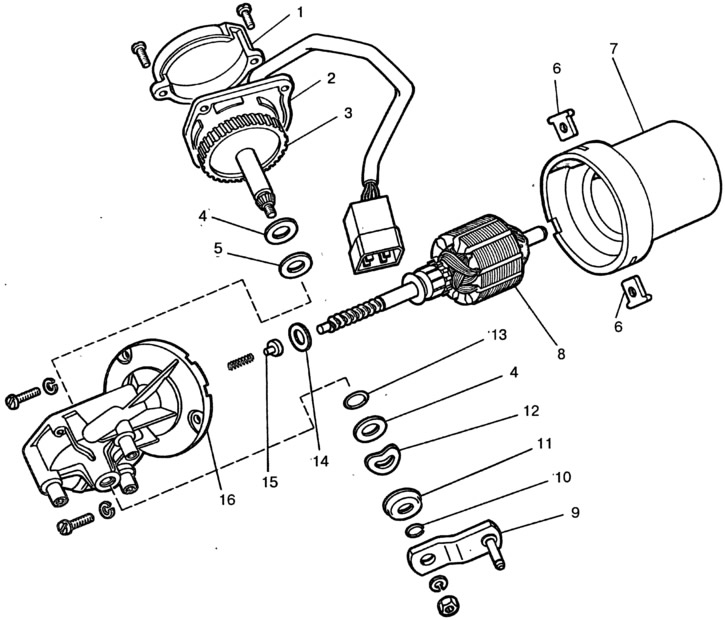
Pic. 7-35. Windshield Wiper Motor Parts:
1 - cover; 2 - panel; 3 - gear reducer; 4 - steel washer; 5 - textolite washer; 6 - cracker; 7 - body; 8 - anchor; 9 - crank; 10 - retaining ring; 11 - protective cap; 12 - spring washer; 13 - sealing ring; 14 - adjusting washer; 15 - thrust bearing; 16 - motor cover.
To remove gear 3 of the reducer, unscrew the crank nut 9, remove the retaining ring from the axle and remove the axle with the gear and washers from the housing.
After disassembly, blow out the internal cavities of the electric motor with compressed air to remove deposits of coal dust and check the condition of the brushes and commutator.
The brushes must move freely, without jamming, in the brush holders, and the springs must be intact and have sufficient elasticity. Clean the collector with a fine-grained sandpaper, and then wipe it with a clean cloth lightly smeared with technical petroleum jelly. If the collector is badly burned or worn out, then it is better to replace the gearmotor with a new one.
Check for signs of seizing on the necks of the armature shaft. If necessary, clean them with fine-grained sandpaper.
When assembling, take the brushes away from the commutator so as not to break them or damage their edges, and insert the armature into the housing with extreme care, avoiding hitting the armature on the poles so as not to break them.
After assembly, to center the bearings, tap the gearmotor housing with a wooden mallet, and then check it on the stand.
Data for checking the gearmotor:
- Maximum effective torque on the gearmotor shaft*, Nm (kgf·m) — 2 (0,2)
- Current consumption* at 1 Nm torque (0.1 kgf·m), no more, A - 2.8
- Gearmotor shaft speed* at 1 Nm torque (0.1 kgf·m), min-1 — 50
- Starting torque on the gearmotor shaft*, not less than, Nm (kgf·m) — 12 (1,2)
* At 14 V and temperature (25±10) °C cold.