
English Русский
Български
Беларускі
Український
Српски
Hrvatski
Română
Polski
Slovenský
Magyar
| Articles | Contacts | Sitemap |   
Repair and maintenance Lada Repair and maintenance Mazda Repair and maintenance Mitsubishi Repair and maintenance Toyota Repair and maintenance Land Rover Repair and maintenance Hyundai Repair and maintenance Nissan
VAZbook.ru


Main     1111   2101   2105   2106   2107   2109   2110   2115   2121  
VAZ-1111 (1988-1996) VAZ-11113 (1996-2003)
  • Main
  • «Oka»
  • VAZ-11113
  • Power unit
  • Engine repair
  • Replacing the rear crankshaft oil seal

Replacing the rear crankshaft oil seal (VAZ-11113)

            0

You will need:
  • screwdriver
  • seal press mandrel
  • hammer

Disconnect the wire from the "–" terminal of the battery.

Remove the gearbox (see subsection 11.1.1.), clutch (see subsection 11.2.1.) and flywheel (see subsection 10.7, operations 77–80).

The reason for the clutch discs becoming oily may be an oil leak either through the gearbox input shaft seal or through the crankshaft rear seal.

Motor and transmission oils have different smells. Therefore, having a certain skill, you can determine by smell which of the seals is defective.

If you find signs of oil leaking through the crankshaft oil seal, first check whether the crankcase ventilation system is clogged or whether its hoses are pinched, and correct the faults if necessary.

If the leak does not stop after this, replace the seal.
If the leak does not stop after this, replace the seal.


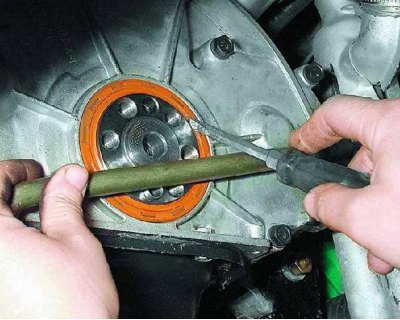
1. Using a screwdriver, pry the working edge out of the seal. Be careful – the seal may be pushed into the engine.
1. Using a screwdriver, pry the working edge out of the seal. Be careful – the seal may be pushed…


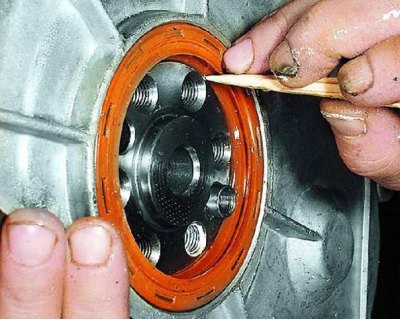
2. Lubricate the working lip of the new oil seal with engine oil. Install the oil seal with the working lip inside the cylinder block and carefully tuck the working lip onto the crankshaft flange using a wooden stick.


2. Lubricate the working lip of the new oil seal with engine oil. Install the oil seal with the…


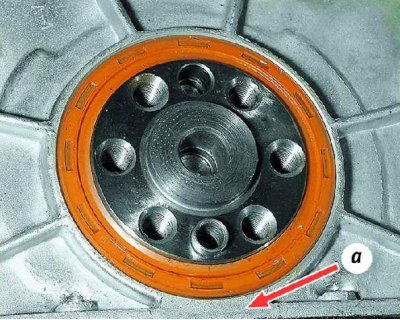
3. Press the seal flush with the surface of the holder using a suitable mandrel. The seal may be recessed relative to the surface of the holder by no more than 0.25 mm.

(Information copied from the portal: VAZBOOK)


This article is available at russian, bulgarian, belarusian, ukrainian, serbian, croatian, romanian, polish, slovak, hungarian
The text was reviewed by the specialist: Grigory Vologodtsev

Share with friends:

Previous articles
VAZ-11113: Engine repair
Next articles

Replacing the front crankshaft oil seal
Replacing the oil pan gasket
Replacing valve stem seals
Replacing the camshaft seal
Replacing the cylinder head gasket
Cylinder head repair
Lapping valves
Removal and installation of the power unit
Disassembling the engine
Engine parts defect detection

More articles from other manuals on VAZ cars:
➠ Replacing the rear crankshaft oil seal VAZ-21061 (1976-2006)
➠ Replacing the rear crankshaft oil seal VAZ-21214 (1994-2006)
➠ Rear Crankshaft Oil Seal — Replacement VAZ-2104 (1984-2012)
➠ Rear Crankshaft Oil Seal — Replacement VAZ-2107 (1982-2012)
➠ Rear Crankshaft Oil Seal — Removal and Installation VAZ-2108 (1984-2003)
Link in different formats to this page


Visitor comments

No comments yet


How much will 12 + 35 ?


VAZ-1111 (1988-1996) 
  • General information
  • Vehicle description
  • Vehicle device
  • Vehicle operation
  • Maintenance
  • Applications
  • Power unit
  • Engine repair
  • Cooling system
  • Lubrication system
  • Supply system
  • Transmission
  • Clutch
  • Transmission
  • Chassis
  • Front suspension and wheels
  • Rear suspension
  • Steering
  • Brake system
  • Body
  • Exterior
  • Interior
  • Electrical equipment
  • Engine electrics
  • Equipment and devices


VAZ-11113 (1996-2003) 
  • General information
  • Introduction to the guide
  • User manual
  • Maintenance
  • Power unit
  • Engine repair
  • Cooling and lubrication system
  • Fuel system
  • Exhaust system
  • Transmission
  • Car gearbox
  • Clutch and drive shafts
  • Chassis
  • Front suspension
  • Rear suspension
  • Steering
  • Brake system
  • Body
  • Exterior
  • Interior
  • Doors and locks
  • Electrical equipment
  • Equipment and devices
  • Lighting and signaling
  • Engine electrics
  • Ignition system


VAZbook.ru © 2017 · Mobile version · Contact with administration · Sitemap: EN BG BY UA RS HR RO PL SK HU · Site search · News and articles VAZ-1111 · VAZ-11113 · VAZ-2101 · VAZ-21011 · VAZ-2104 · VAZ-2105 · VAZ-21051 · VAZ-2106 · VAZ-21061 · VAZ-2107 · VAZ-21099 · VAZ-2109 · VAZ-2108 · VAZ-2110 · VAZ-2112 · VAZ-2114 · VAZ-2115 · VAZ-2121 · VAZ-21213 · VAZ-21214 ·
The site stores technical data using cookies to improve the service.