English Русский
Български
Беларускі
Український
Српски
Hrvatski
Română
Polski
Slovenský
Magyar
| Articles | Contacts | Sitemap |   
Repair and maintenance Lada Repair and maintenance Mazda Repair and maintenance Mitsubishi Repair and maintenance Toyota Repair and maintenance Land Rover Repair and maintenance Hyundai Repair and maintenance Nissan
VAZbook.ru


Main     1111   2101   2105   2106   2107   2109   2110   2115   2121  
VAZ-2101 (1970-1983) VAZ-21011 (1974-1983)
  • Main
  • «Zhiguli»
  • VAZ-2101
  • General information
  • Maintenance
  • Checking and adjusting the clutch

Checking and adjusting the clutch (VAZ-2101)

            0

Between the engine and the gearbox is the clutch, a mechanism that performs a wide variety of work. It transmits torque from the engine crankshaft, temporarily disconnects transmission units from the engine, which is necessary when engaging and disengaging gears, smoothly connects the engine to the transmission, and protects transmission parts and mechanisms from breakdowns during overloads. The clutch can last a long time, and its longevity depends mainly on the driver, or rather, on his experience. For a beginner, the clutch works almost in extreme conditions, especially if the asphalt runs out on the route.

Considering the variety of car models, the Volga Automobile Plant uses three types of clutch: 2101, 2103 and 2121. Clutch 2101 is installed on VAZ-2101, -2102, -21013 cars; clutch 2103 - respectively for VAZ-2103 and VAZ-2105; clutch 2121 - for cars VAZ-2121, VAZ-2106 and VAZ-2107. The first two clutches differ slightly from each other and can replace each other in case of emergency. To distinguish these two types from the 2121 clutch, you need to look at the diaphragm spring. On it, in the petal area, you will find a hole with a diameter of 5 mm.

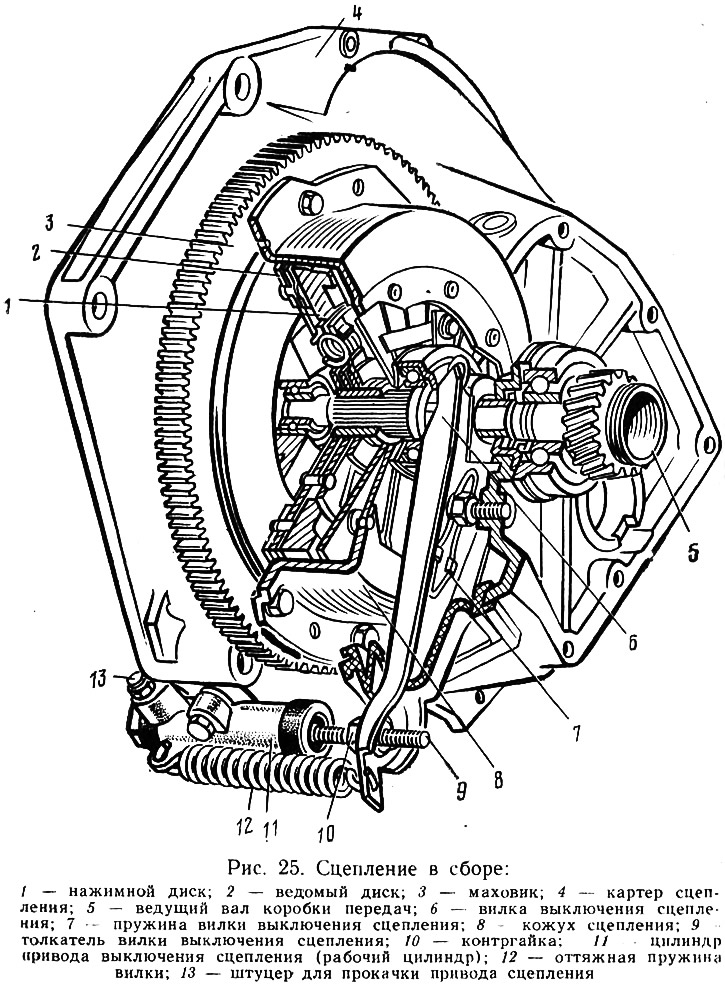
The clutch (Fig. 25) consists of a housing 4, cast from an aluminum alloy, a steel driven disk 2 with friction linings riveted on both sides, a pressure driving disk 1, which, together with a diaphragm spring, is installed in a steel casing 8 of the clutch release mechanism and drive.

The clutch (Fig. 25) consists of a housing 4, cast from an aluminum alloy, a steel driven disk 2…


There is a term "free play" of the clutch pedal, i.e. the pedal play at which the mechanism does not yet engage. Try to feel the free play by smoothly pressing the pedal. At first, the clutch pedal will move down easily, almost without resistance, then the resistance will begin to increase. The first stage is the free play. Its permissible value is 25-35 mm.


The free travel of the clutch pedal is a total indicator. The initial small part (0.4-2.0 mm) of the pedal travel (Fig. 26) is provided by a gap of 0.1-0.5 mm between the pusher and the piston of the master cylinder. The larger part is provided by the free travel of the pusher of the working cylinder.
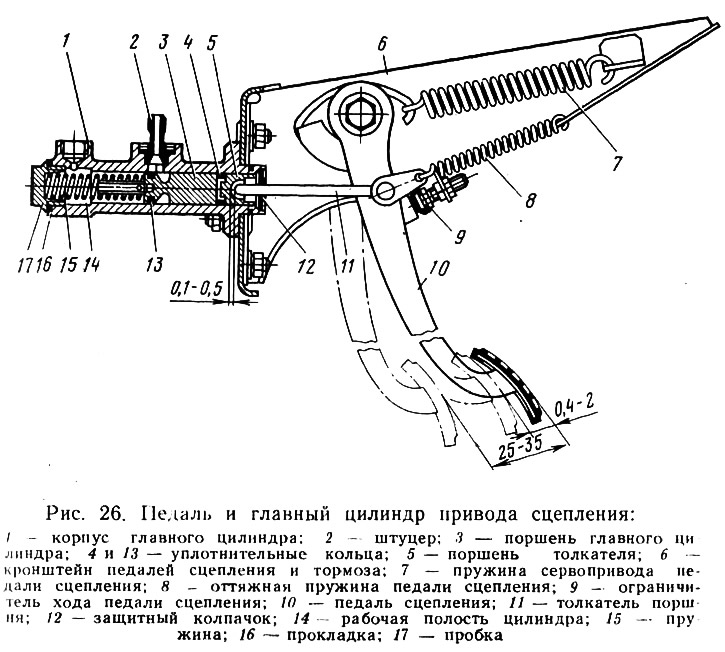
The free travel of the clutch pedal is a total indicator. The initial small part (0.4-2.0 mm) of…


It turns out that many errors in clutch operation occur due to incorrectly adjusted free travel of the clutch pedal. If it is large, incomplete disengagement occurs, therefore, the clutch will continue to work, but not with the entire plane of the disks, but only barely touching each other. If the free travel is too small, slippage occurs, and therefore increased wear of the clutch parts.

As you can see, the clutch is a sensitive mechanism and must be handled with care. Given the importance of the functions performed and the vulnerability to improper operation, the plant recommends checking the free travel of the pedal during each maintenance. These recommendations are easy to follow, since the operation itself is quite simple. You need to take a ruler and, sitting in the driver's seat, measure the free travel of the clutch pedal, smoothly pressing it. Adjustment will also take a little time, but you will need an overpass or inspection ditch. To perform the operation, you will need two keys measuring 13X17 and 17X19 mm and a ruler.


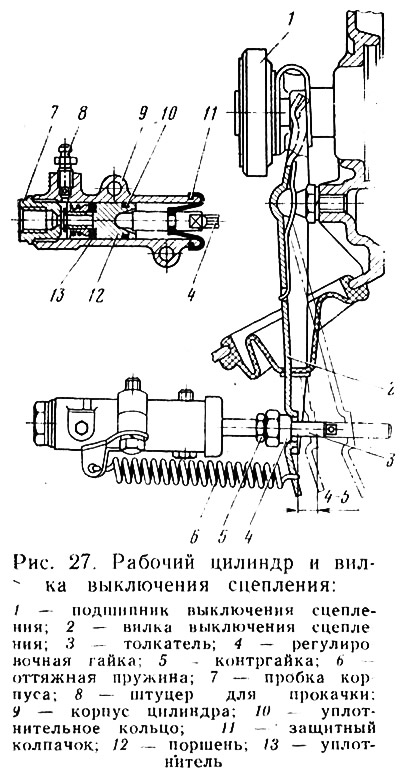
The free travel of the clutch pedal is adjusted with nut 4 (Fig. 27) of pusher 3. By unscrewing lock nut 5 using nut 4, increase or decrease the free travel of the pusher so that the minimum deviation of fork 2 for disengaging the clutch, held by spring 6, is equal to 4 mm, and the maximum is 5 mm, and tighten lock nut 5. Such manipulations with the pusher will ensure the required free travel of the pedal.

The free travel of the clutch pedal is adjusted with nut 4 (Fig. 27) of pusher 3. By unscrewing…


To ensure complete disengagement of the clutch, it is necessary to remember about the "small part" of the free travel, i.e. to provide a gap of 0.1-0.5 mm between the pusher and the piston of the master cylinder. This adjustment is performed by the limiter 9 (Fig. 26) of the clutch pedal travel.

The original is available on the online resource vazbook


This article is available at russian, bulgarian, belarusian, ukrainian, serbian, croatian, romanian, polish, slovak, hungarian
The text was reviewed by the specialist: Grigory Vologodtsev

Share with friends:

Previous articles
VAZ-2101: Maintenance
Next articles

Carburetor adjustment
Replacement and maintenance of spark plugs
Setting the ignition timing
Gap between breaker contacts
Valve timing mechanism
Brake condition check
Checking the wheel suspension
Front wheel bearings and hubs
Shock absorbers, anti-roll bars, reaction rods and joints
Lighting and signaling devices

More articles from other manuals on VAZ cars:
➠ Checking the tightness of the power unit seals (with clutch and… VAZ-1111 (1988-1996)
➠ Clutch Release Hydraulic Drive — Checking Fluid Level VAZ-2104 (1984-2012)
➠ Carburetor Drive — Checking and Adjusting VAZ-2106 (1976-2006)
➠ Checking and adjusting the front wheel alignment angles VAZ-2107 (1982-2012)
➠ Checking and adjusting wheel alignment angles VAZ-2109 (1984-1997)
Link in different formats to this page


Visitor comments

No comments yet


How much will 16 + 17 ?


VAZ-2101 (1970-1983) 
  • General information
  • Vehicle description
  • Vehicle device
  • Vehicle operation
  • Maintenance
  • Main malfunctions
  • Applications
  • Power unit
  • Engine repair
  • Cooling and lubrication system
  • Supply system
  • Transmission
  • Clutch
  • Transmission
  • Cardan gear
  • Rear axle
  • Chassis
  • Front suspension
  • Rear suspension
  • Steering
  • Brake system
  • Body
  • Exterior
  • Interior
  • Electrical equipment
  • Engine electrics
  • Equipment and devices


VAZ-21011 (1974-1983) 
  • General information
  • Specifications
  • Operation and maintenance
  • Power unit
  • Engine repair
  • Cooling system
  • Lubrication system
  • Power and exhaust system
  • Ignition system
  • Engine electrics
  • Transmission
  • Clutch
  • Car gearbox
  • Cardan gear
  • Rear axle
  • Chassis
  • Car suspension
  • Steering
  • Brake system
  • Body
  • Exterior
  • Interior
  • Doors and locks
  • Electrical equipment
  • Equipment and devices
  • Lighting and signaling


VAZbook.ru © 2017 · Mobile version · Contact with administration · Sitemap: EN BG BY UA RS HR RO PL SK HU · Site search · News and articles VAZ-1111 · VAZ-11113 · VAZ-2101 · VAZ-21011 · VAZ-2104 · VAZ-2105 · VAZ-21051 · VAZ-2106 · VAZ-21061 · VAZ-2107 · VAZ-21099 · VAZ-2109 · VAZ-2108 · VAZ-2110 · VAZ-2112 · VAZ-2114 · VAZ-2115 · VAZ-2121 · VAZ-21213 · VAZ-21214 ·
The site stores technical data using cookies to improve the service.