
English Русский
Български
Беларускі
Український
Српски
Hrvatski
Română
Polski
Slovenský
Magyar
| Articles | Contacts | Sitemap |   
Repair and maintenance Lada Repair and maintenance Mazda Repair and maintenance Mitsubishi Repair and maintenance Toyota Repair and maintenance Land Rover Repair and maintenance Hyundai Repair and maintenance Nissan
VAZbook.ru


Main     1111   2101   2105   2106   2107   2109   2110   2115   2121  
VAZ-2110 (1995-2007) VAZ-2112 (1999-2007)
  • Main
  • «Lada»
  • VAZ-2112
  • Power unit
  • Supply system
  • Fuel rail engine 2111 (1.5i 8v) — removal, disassembly, assembly and installation

Fuel rail engine 2111 (1.5i 8v) — removal, disassembly, assembly and installation (VAZ-2112)

            0

Contents: Removal ↓ Disassembly ↓ Assembly and installation ↓
The fuel rail is dismantled, if necessary, by removing the injectors, as well as in other cases during engine repair.

Attention! Before performing the operation, read the safety rules for servicing and repairing the power supply system (see "Safety precautions for maintenance and repair of the power supply system").


Removal


1. Relieve the fuel pressure in the fuel line (see "Fuel line - pressure relief").

2. Remove the receiver (see "Engine receiver 2111 (1.5i 8v) - removal, replacement of seals and installation").

Comment.The receiver does not need to be removed, but then it will be difficult to ensure the necessary cleanliness of the injectors during assembly.

3. By pressing the spring clips, disconnect the wiring harness connectors from the four injectors.
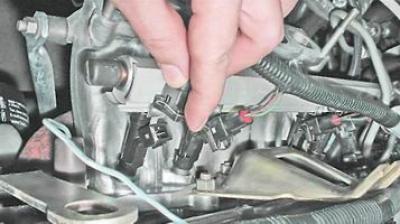
3. By pressing the spring clips, disconnect the wiring harness connectors from the four injectors.


4. Remove the hose from the fuel pressure regulator pipe.

5. With an open-end wrench by 17 mm unscrew the fitting of the fuel supply pipe to the rail (1), holding the hexagonal end of the fuel line hose with a wrench of the same size. Similarly, disconnect the fuel drain pipe from the hose (2). The connection of the drain pipe is marked with blue paint at the factory.
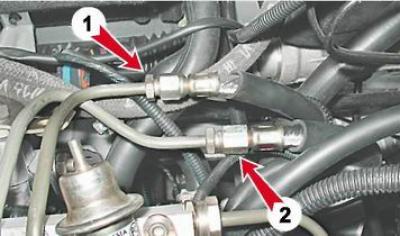


5. With an open-end wrench by 17 mm unscrew the fitting of the fuel supply pipe to the rail (1),…


6. Remove the hose tips from the tubes.

7. With a hex key by 5 mm we unscrew the two bolts securing the fuel rail to the intake manifold.
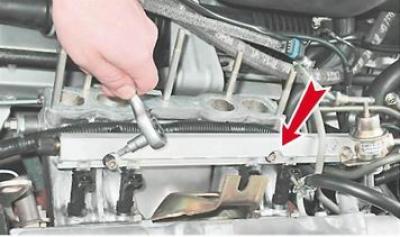
7. With a hex key by 5 mm we unscrew the two bolts securing the fuel rail to the intake manifold.


8. Remove the fuel rail assembly with injectors.
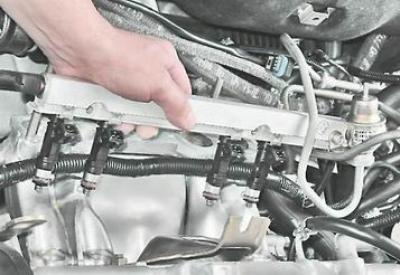
8. Remove the fuel rail assembly with injectors.


Warning! Be careful, there is a small amount of fuel left in the fuel rail.


The text is copied from the online portal: vazbook.ru


9. Using a slotted screwdriver, remove the rubber sealing rings from the ends of the tubes.
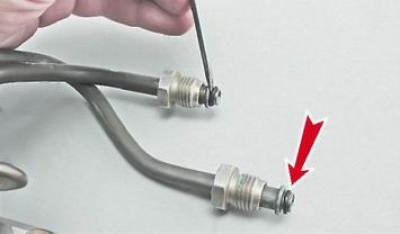
9. Using a slotted screwdriver, remove the rubber sealing rings from the ends of the tubes.


Warning! Replace damaged sealing rings.


Disassembly


10. Using a slotted screwdriver, move the injector retainer along the fuel rail.
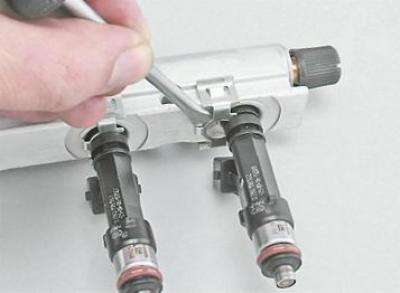
10. Using a slotted screwdriver, move the injector retainer along the fuel rail.


11. Remove the injector from the fuel rail.
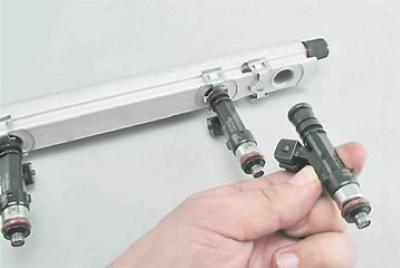
11. Remove the injector from the fuel rail.


12. Remove the other three injectors in the same way.

Warning! The connections of the injectors to the fuel rail and to the intake manifold are sealed with rubber rings. Any damaged sealing rings must be replaced.


13. Remove the spring injector retainers from the fuel rail.

14. Remove the fuel pressure regulator (see "Fuel rail engine 2111 (1.5i 8v) - replacement of fuel pressure regulator").

15. Key by 24 mm we unscrew the nut of the fuel supply pipe and remove the end of the pipe from the fuel rail.
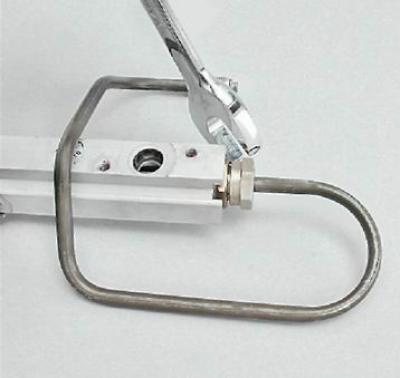
15. Key by 24 mm we unscrew the nut of the fuel supply pipe and remove the end of the pipe from the…


Warning! The connection of the tube with the fuel rail is sealed with a rubber ring installed at the end of the rail. Replace the damaged sealing ring.


16. If necessary, use a metal cap from the wheel nipple to unscrew the valve stem of the diagnostic nipple.

Assembly and installation


We assemble and install the fuel rail in the reverse order. Before assembly, cover the sealing rubber rings with a thin layer of motor oil.


This article is available at russian, bulgarian, belarusian, ukrainian, serbian, croatian, romanian, polish, slovak, hungarian
The text was reviewed by the specialist: Grigory Vologodtsev

Share with friends:

Previous articles
VAZ-2112: Supply system
Next articles

Fuel rail engine 2111 (1.5i 8v) — replacement of fuel pressure regulator
Fuel rail engine 21124 (1.6i 16v) — removal, disassembly, assembly and installation
Fuel rail engine 2112 (1.5i 16v) — removal, disassembly, assembly and installation
Fuel rail — checking operating pressure
Fuel filter — replacement
Fuel rail engine 21114 (1.6i 8v) — removal, disassembly, assembly and installation
Fuel module of engines 2111 and 2112 (1.5i) — removal and installation
Fuel module of engines 2111 and 2112 (1.5i) — replacement of fuel level indicator sensor
Fuel module of engines 2111 and 2112 (1.5i) — cleaning the mesh filter
Fuel module of engines 2111 and 2112 (1.5i) — replacement of fuel pump

More articles from other manuals on VAZ cars:
➠ Fuel rail engine 2111 (1.5i) — replacement of fuel pressure… VAZ-2114 (2004-2013)
➠ Removal injectors from the engine fuel rail VAZ-21214 (1994-2006)
➠ Engine power supply system. Fuel supply, air supply and exhaust… VAZ-2101 (1970-1983)
➠ Starting an engine with a fuel injection system VAZ-2105 (1979-2010)
➠ Engine fuel system parts VAZ-2106 (1976-2006)
Link in different formats to this page


Visitor comments

No comments yet


How much will 50 + 25 ?


VAZ-2110 (1995-2007) 
  • General information
  • Vehicle description
  • Specifications
  • User manual
  • Maintenance
  • Operation and maintenance
  • Tips for car owner
  • Power unit
  • Engine repair
  • Supply system
  • Control system
  • Cooling system
  • Exhaust system
  • Transmission
  • Clutch
  • Car gearbox
  • Front wheel drives
  • Chassis
  • Suspension and wheels
  • Steering
  • Brake system
  • Body
  • Exterior
  • Interior
  • Doors and glass
  • Tailgate
  • Ventilation and heating
  • Electrical equipment
  • Equipment and devices
  • Headlights and lighting
  • Engine electrics
  • Electrical circuits


VAZ-2112 (1999-2007) 
  • General information
  • Operation and maintenance
  • Power unit
  • Engine repair
  • Supply system
  • Control system
  • Cooling system
  • Exhaust system
  • Transmission
  • Clutch
  • Car gearbox
  • Front wheel drives
  • Chassis
  • Wheels and tires
  • Car suspension
  • Steering
  • Brake system
  • Body
  • Exterior
  • Interior
  • Doors and glass
  • Tailgate
  • Ventilation and heating
  • Electrical equipment
  • Equipment and devices
  • Headlights and lighting
  • Engine electrics
  • Electrical circuits


VAZbook.ru © 2017 · Mobile version · Contact with administration · Sitemap: EN BG BY UA RS HR RO PL SK HU · Site search · News and articles VAZ-1111 · VAZ-11113 · VAZ-2101 · VAZ-21011 · VAZ-2104 · VAZ-2105 · VAZ-21051 · VAZ-2106 · VAZ-21061 · VAZ-2107 · VAZ-21099 · VAZ-2109 · VAZ-2108 · VAZ-2110 · VAZ-2112 · VAZ-2114 · VAZ-2115 · VAZ-2121 · VAZ-21213 · VAZ-21214 ·
The site stores technical data using cookies to improve the service.